
Drawing Tools
Apart from using predefined shapes in UXPin, you can also draw any unique shape with our mighty drawing tools, Pen and Pencil.
Pen Tool
Choose the Pen icon from the Quick tools menu and click anywhere on the Canvas to add the first point. Then, click anywhere else to add the second one. When adding the next one, click-and-drag to draw a curve. Close the path by clicking on the first point. Or, press
"Enter"
or
"Esc"
and leave it open.
Tip
Filling an open shape with colors or images will have the same effect as if the path was closed.
To draw a heart with the Pen tool, you need to start with a square.
Editing Paths
If you select a Path and double click it, you’ll enter the edit mode. That's when you can select, adjust, or change properties of individual points, lines, or entire shapes. If the path is a curve, it will have handles at both sides already in the edit mode. If it is a corner with no handles, double click the point to show the handles and change the curve type to Bézier.
- To move your points only along the x/y axes, press
"Shift"
while dragging. To select multiple points at once, keep"Shift"
pressed while you click. Then move any of the selected points and all of them will change their positions. - To add extra points, click anywhere on the existing path. To add a point exactly in the middle of the path, click with
"Shift"
pressed. - To remove points, press
Alt
and click, or hit"Delete"
for actively selected points. - If you want to draw a straight line or keep the angles at 45° or 90°, hold
"Shift"
while drawing.
Tip
You can cut away lines from any closed vector shape. When editing the shape, press Alt and click on the line to cut it out.
Point Types
There are four types of points available: straight, mirrored, asymmetric and disjointed. By default, each point placed on the canvas is set as straight.
You can change the type of the curve point by choosing one of the options from the Curve section in the Properties Panel. Double-clicking a straight point changes it into a mirrored type.
- The mirrored point creates a Bézier curve — the handles mirror each other and are placed in the same distance from the point. Once you drag one handle control point, the other will move as well to create a smooth curve.
- The asymmetric point, handle controls are placed at the same angle but you can put each of them at a different distance from the point.
- The disjointed point type allows positioning the handles both at different angles and a different distance from the point.
Note
Radius is not available for shapes, including lines and arrows that have Bézier curves or 2 points.
Border
To specify the border options, select the shape and click the cog icon in the Border section of the Properties Panel.
Click one of the icons at the top to change the type of path ends and joins.
Ends types:
- Butt end — chops off the border at the ends;
- Round end — extends the border past the ends with semicircular shape;
- Square end — extends the border past the ends with square shape.
Joins types:
- Miter join — causes the outside corner of the border to come to a sharp point;
- Round join — causes the outside corner of a border to come to a rounded or smooth curve;
- Bevel join — cuts off the corner so that the width of the border is the same at the bevel as on the rest of the border.
Additionally, you’ll be able to set the endpoints for the path to create different arrows.
You can also determine the start and stop point of a border by entering the exact percentage. As a result, the border will be added only to the limited part of the element and you’ll be able to create e.g. radial charts.
To change the path into a dashed or dotted line, enter the specific value in the Dash field. If you want the dash and gap to have the same length, type in a value, for example, 10 and both dash and gap will be 10 px long.
You can also set different lengths for each dash and gap — it’s enough to enter multiple values and separate them with a comma. The values will be assigned to dashes and gaps respectively and the pattern will be continued for the whole border.
For example, if you enter 30,20,10,5, the system will create a dashed line with 30 px, a gap with 20 px, a dash with 10 px, and a gap with 5 px. Then the values will repeat again.
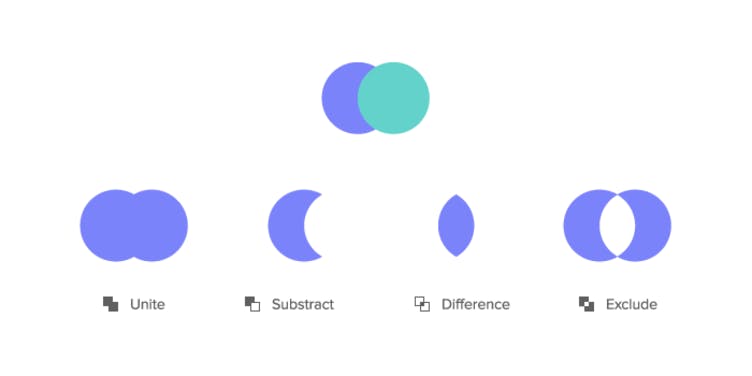
Boolean Operations
Boolean operations allow combining any set of basic Pen tool shapes to create more complex ones. The combined shapes are treated as a single layer and have shared properties. Additionally, they can be combined further with other shapes.
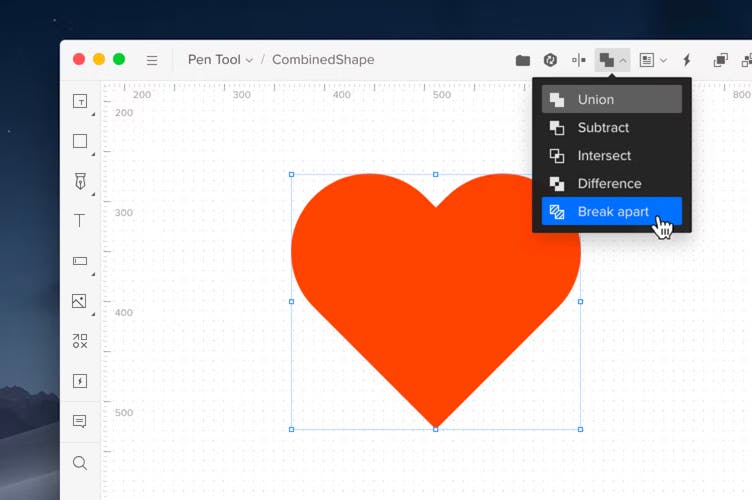
To combine the shapes, select them on the canvas and click Combine shapes icon from the top bar. You’ll be able to choose one of the following formulas:
- Union — combines the selected shapes into a group that is a sum of the areas;
- Subtract — removes the area of a shape from a bottom layer shape (opposite of Union);
- Intersect — creates a shape that consists of the overlapping part of sublayers;
- Difference — creates a shape that consists of the areas of sublayers which don’t overlap (opposite of Intersect).
The combined shapes are presented in the Layers panel just as regular groups so you can access all the shapes inside. For each combined shape you’ll see an icon informing which type of boolean operation has been used. However, you can always change the formula for any boolean group if needed.
Also, the individual shapes inside the group are still editable. You’ll be able to change their position, edit points and add new ones.
To break the combined shape, click Break apart from the drop-down.
Masks
Masks are used to show selected parts of elements within a specific area or shape. Any shape can mask other shapes, text, and SVG files.
Creating a mask
To create a mask, select all the shapes you want to include in the mask. The shape that will be the mask needs to be the bottom-most element from all the selected ones. If you don't select the shapes you want to include in the mask, the element you selected will mask every layer that's above it on the layers list that can be masked. Next, click Mask in the Top bar or in the context menu. Or, use the
Alt
Ctrl
"M"
shortcut. You’ll see a mask group with an upward arrow in the Layers panel.
Masks are reversible. To remove its effect and return to the original form, click the Unmask icon in the Top bar.
Alpha and outline
Masks take the color’s alpha channel (opacity) or the outline of the shape to mask the elements above it. The Outline mask is the default behavior, but you can change this in the context menu by choosing Mask and then Outline.
Pencil Tool
You can draw shapes freehand with the Pencil Tool. It's great for quickly sketching rough ideas. Click the down arrow under the Pen icon and choose Pencil. Then, click-and-drag to start drawing. Once you're done, UXPin will simplify the path.