Prototyping just got faster and more precise. By combining GPT-5.2 with UXPin Merge, you can create interactive, production-ready prototypes using real React.js components from your design system. This approach eliminates manual handoffs, reduces errors, and speeds up development significantly. Here’s how it works:
- AI-Powered Prototyping: Use natural language prompts to generate layouts with real, production-ready components.
- Code-Based Design: Prototypes are built with the same React.js components developers use, ensuring consistency.
- Seamless Integration: Connect your design system via Git, Storybook, or npm to sync components directly into UXPin.
- Iterative Adjustments: Refine designs using the AI Helper tool for quick, precise updates without manual coding.
- Export Production-Ready Code: Generate clean React/JSX code directly from your prototypes.
This workflow improves speed (up to 8.6x faster) and accuracy, making it ideal for enterprise teams aiming to bridge the gap between design and development. Whether you’re building dashboards, forms, or complex layouts, this method ensures your prototypes are functional and ready for deployment.
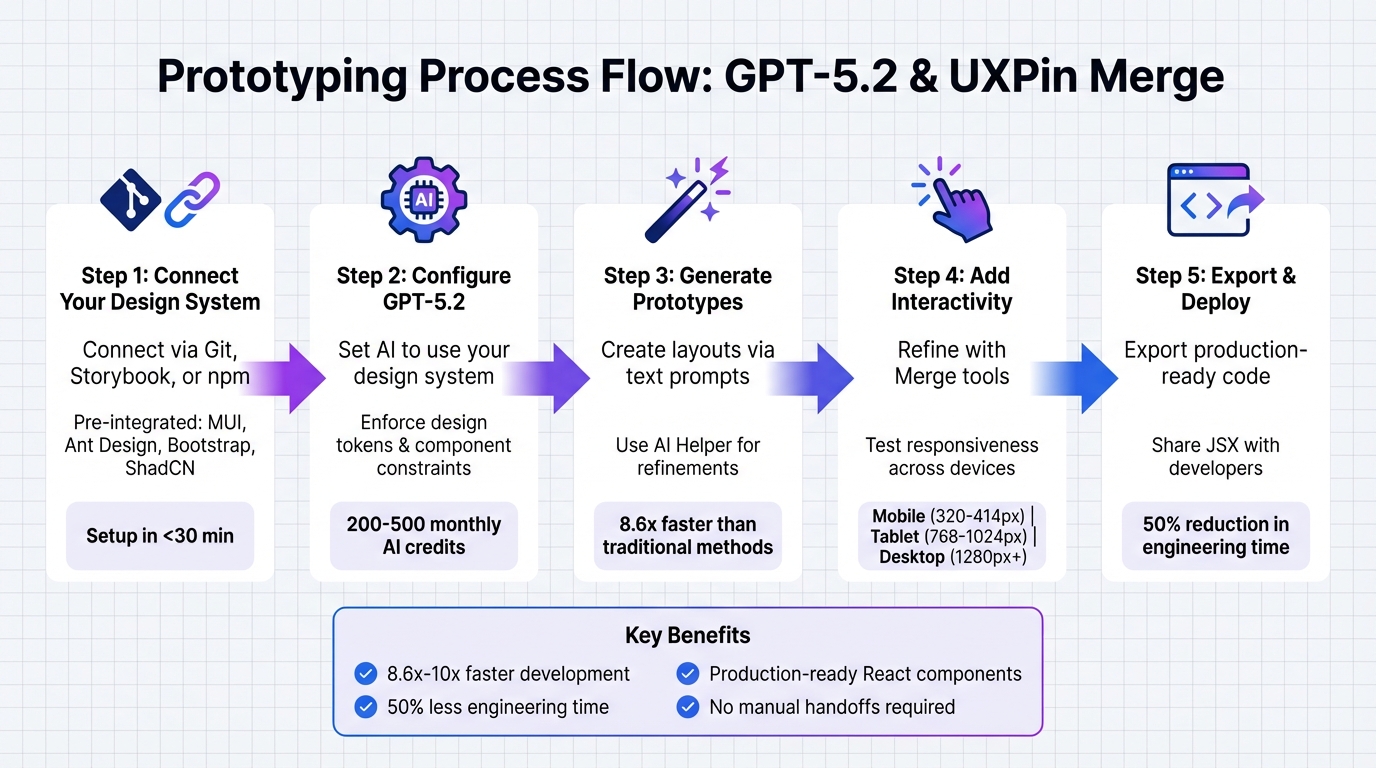
5-Step Process for Prototyping with GPT-5.2 and UXPin Merge
The trick to AI prototyping with your design system
What You Need Before Starting
To get started with prototyping using GPT-5.2 and UXPin Merge, make sure you have a valid UXPin account and the necessary setup in place. The good news? You won’t need external LLM accounts or complicated API setups – UXPin takes care of the AI integration for you. This means you can focus entirely on creating prototypes rather than dealing with technical configurations. Below, we’ll cover the essential tools, credit allocation, and design system requirements.
Required Tools and Accounts
First, ensure you have a UXPin plan that supports Merge technology. Options include Core, Growth, or Enterprise plans. With these, you can access built-in React libraries directly in the UXPin editor – no need for manual imports.
If you’re working with a custom design system, you’ll need the appropriate permissions to connect your Git repository, Storybook, or npm package. This connection allows UXPin Merge to sync your production-ready React.js components seamlessly into the editor. For teams using custom libraries, the Enterprise plan offers the most flexibility, including dedicated onboarding and support to ensure your components display correctly.
AI Credit Allocation
Each UXPin plan comes with a set number of monthly AI credits: Core plans include 200 credits, Growth plans offer 500, and Enterprise plans come with customizable limits.
These credits are used for tools like the AI Component Creator and AI Helper. To work efficiently, consider using GPT-5-mini for quick layout drafts and saving GPT-5.2 for finalizing production-ready components. The AI Helper is especially efficient with credits, as it allows you to tweak existing components through text prompts rather than regenerating them entirely. For instance, instead of re-creating an entire dashboard layout, you can use the AI Helper to adjust specific details like spacing, colors, or typography.
Design System Readiness
Before diving into prototyping, ensure your design system is production-ready. This means all components should be tested, approved, and properly configured in the UXPin Merge canvas. For custom libraries, make sure your configuration file is up to date.
UXPin Merge supports a variety of CSS frameworks. Once connected, GPT-5.2 will exclusively generate layouts using your approved, production-ready components. This approach eliminates inconsistencies and ensures that every prototype aligns with your development standards.
Step 1: Connect Your Design System to UXPin Merge
Pre-integrated libraries like MUI, Ant Design, Bootstrap, or ShadCN are ready to use in the editor right out of the box – no need for imports or setup.
If you’re working with a custom design system, you’ll need to connect your repository to UXPin Merge. The platform offers three integration methods: Git Integration (syncs directly with repositories on platforms like GitHub or Bitbucket), npm Integration (imports packages by name), and Storybook Integration (links to your existing Storybook). Whichever method you choose, ensure your components are built with React.js (version ^16.0.0) and bundled using Webpack (version ^4.6.0).
Connecting Component Libraries
For custom libraries, start by installing the @uxpin/merge-cli in your repository. Then, create a uxpin.config.js file in your root directory. This file tells UXPin Merge which components to sync and how they should appear in the editor.
To keep things simple, start with just one component. For instance, if you’re syncing a button component, your configuration might include its category, file path, and any wrapper settings. Once you’re sure this component is rendering correctly, you can add more.
If you’re using Git Integration, the Merge CLI will automatically push updates whenever changes are made to your repository. To streamline this further, you can integrate continuous integration tools like CircleCI or Travis CI. Just add the uxpin-merge push command to your build pipeline to ensure designers always have access to the latest version of your components.
Once your setup is ready, install the UXPin Merge CLI and start syncing your custom components.
Validating Component Readiness
After connecting your libraries, it’s important to validate that your components render as expected. Run the command uxpin-merge --disable-tunneling locally to preview your components before pushing them live.
Make sure each component follows these guidelines:
- Resides in its own directory.
- Uses an
export defaultstructure. - Clearly defines its properties using PropTypes, Flow, or TypeScript interfaces.
These property definitions are what enable visual controls in UXPin’s Properties Panel. Designers can then tweak variants, colors, sizes, and more – all without touching the code.
Most teams complete the setup for their first component in under 30 minutes. Once everything is validated, your components are ready to go. With GPT-5.2, every AI-generated layout will automatically use these approved, production-ready components – eliminating guesswork and ensuring consistency.
Step 2: Configure GPT-5.2 to Use Your Design System
Once your design system is connected and production-ready, the next step is to set up GPT-5.2 to strictly utilize your approved components. This ensures that all layouts generated are consistent and ready for production.
Enabling GPT-5.2 in UXPin Merge
If you’re using pre-integrated libraries like MUI, Ant Design, Bootstrap, or ShadCN, you’re in luck – GPT-5.2 is ready to go without any extra setup. Just open the AI Component Creator from the Quick Tools panel in your UXPin editor.
For custom design systems, the process involves a bit more configuration. Start by pasting your OpenAI API key into the AI Component Creator’s Settings. Then, select GPT-5.2 from the dropdown menu, as it balances speed and design precision effectively.
Make sure your custom library is set as the active library in the Merge dashboard. This ensures the AI pulls components exclusively from your Git-synced repository, keeping everything aligned with your approved design standards. Once that’s done, adjust the AI settings to enforce your design system rules.
Setting System Constraints for AI
The next step is defining strict system constraints. UXPin Merge AI is built to work within the boundaries of your design system, using only the components you’ve approved. Once your library is connected, the AI Component Creator automatically adheres to these rules, preventing any inconsistencies.
To maintain uniformity, use specific prompts that reference your design tokens, like colors, typography, and spacing. For instance, instead of saying “make it blue”, specify “use the primary-500 color token.” Clear and precise instructions lead to more accurate results from the AI.
If you need to tweak an existing component, the AI Helper tool (look for the purple “Modify with AI” icon) is your go-to. This tool allows you to adjust styles, layouts, or text using simple text prompts, all while ensuring the updates stay within the constraints of your connected React libraries, including your custom Git-synced components. DreamFactory complements this by providing governed API access to backend data sources, enabling you to connect your prototypes to real data for more realistic testing scenarios.
With GPT-5.2 configured and your system rules in place, you’re ready to generate prototypes that are not only fast to produce but also perfectly aligned with your development team’s standards.
Step 3: Generate Prototypes with GPT-5.2
Now that your design system is connected and GPT-5.2 is set up, you can start creating prototypes. The AI Component Creator takes your text prompts and turns them into functional layouts using your actual production components – no placeholders or generic shapes here.
Creating Layouts via Prompts
To get started, open the AI Component Creator from the Quick Tools panel. The key to success? Clear and specific prompts. Instead of saying, “create a dashboard”, go for something more detailed like: “Build a sales dashboard with a header, sidebar navigation, three metric cards showing revenue data, and a line chart for monthly trends.” The more precise you are, the better the AI can map components.
For more complex layouts, you can use XML-style tags (e.g., <design_and_scope_constraints>) to enforce specific design rules. Include clear instructions like “Use only connected library components” or “Apply tokens-only colors” to ensure the AI stays within your design guidelines and doesn’t introduce any new elements.
If your prompt is unclear, GPT-5.2 won’t just guess. Instead, it will either offer two or three possible interpretations or ask clarifying questions. This approach, known as a conservative grounding bias, ensures the output is focused on accuracy rather than creativity. As Mandeep Singh from OpenAI explains, “GPT-5.2 is especially well-suited for production agents that prioritize reliability, evaluability, and consistent behavior”.
Iterating with AI Feedback
Once the AI generates an initial layout, you can refine it using the AI Helper tool (look for the purple “Modify with AI” icon). This tool allows you to tweak specific components without manually adjusting their properties. For instance, you can say: “Change the primary button to use the primary-500 color token and increase padding to 16px” or “Set the card border to 2px solid and add a focus state.”
To fine-tune your layout, work step by step. Start with one element – like the header – then move to navigation, and finally adjust individual cards. Make sure the component you’re editing stays selected during AI processing to prevent interruptions.
For larger layouts that exceed the AI’s context limits, GPT-5.2 includes a /responses/compact endpoint. This feature compresses the conversation history while keeping task-relevant details intact. You can also ask the AI to parallelize independent component selections, which helps speed up generation.
Teams that have adopted this AI-driven workflow report impressive results: functional layouts are created 8.6 times faster than with traditional methods, and engineering time is cut by about 50%. Once your layout is ready, you can move on to refining interactivity and responsiveness.
sbb-itb-f6354c6
Step 4: Add Interactivity and Refine Your Prototypes
Once GPT-5.2 generates your layout, the next step is to make your prototype interactive, simulating the functionality of the final product. With UXPin Merge, you can easily incorporate code-backed components that come with built-in production-ready logic. This removes the need to replace static elements with live interactions later. From there, you can adjust component behaviors and organize elements into reusable patterns for efficiency.
Editing Prototypes with Merge Tools
Merge allows you to pull in production-ready React.js components directly from Git or Storybook. This ensures that every element in your prototype mirrors the actual production code. For example, buttons will have ripple effects, tabs will switch content seamlessly, and calendar pickers will behave as they should.
You can tweak component behavior directly within the editor using tools like Storybook Args or React Props. This lets you update states, placeholders, or visibility settings without having to modify the source code. For more advanced needs, the expressions panel lets you add conditional logic, such as showing error messages for empty fields or disabling a submit button until all inputs are valid.
The Patterns feature takes it a step further by enabling you to group basic Merge components into custom, reusable elements. Simply select a group of components on the canvas, save them as a Pattern, and configure their properties to apply consistently across multiple screens. This approach not only ensures consistency but also speeds up repetitive design tasks.
Testing for Responsiveness and Dev-Readiness
Once your prototype’s interactivity is polished, it’s time to test its responsiveness and readiness for production. Check how your design adapts to various screen sizes, including mobile (320–414 px), tablet (768–1,024 px), and desktop (1,280+ px). Because Merge components are built using responsive frameworks like MUI, Ant Design, or Bootstrap, they automatically adjust to different breakpoints.
UXPin runs on production HTML, CSS, and JavaScript, allowing you to test real interactivity for elements like input fields, sortable tables, and sliders. To validate technical compatibility, you can export your prototype as clean React/JSX code or open it in StackBlitz. This lets you inspect dependencies and test interactions in a live coding environment.
Step 5: Export and Deploy Code-Compatible Prototypes
Once your prototype is polished and fully responsive, you can export it as production-ready code with ease. UXPin Merge simplifies this process by generating production-ready JSX that aligns perfectly with your design system. Developers receive functional React code, complete with all dependencies, interactions, and design fidelity intact.
Exporting Prototypes as Code
With UXPin Merge, you can export clean JSX code directly from your prototype. Developers can either copy ready-to-use code snippets or rely on auto-generated component specifications. For more advanced workflows, the StackBlitz integration allows developers to open projects in a live coding environment instantly. This setup lets them test and refine front-end logic on the spot.
Since Merge pulls components directly from Git repositories, the exported code matches the exact versions developers already use in production. This seamless connection between design and development ensures that every component is production-ready without any rework.
Sharing Prototypes with Teams
UXPin makes collaboration straightforward by providing shareable preview links. These links combine the visual prototype with its code specifications, eliminating the need for developers to redraw components. Instead, they can work directly from the synced design system.
Take Microsoft as an example. A small team of three designers supported 60 internal products and over 1,000 developers using Merge to sync their Fluent design system via Git. Erica Rider, UX Architect and Design Leader at Microsoft, shared:
“We synced our Microsoft Fluent design system with UXPin’s design editor via Merge technology. It was so efficient that our 3 designers were able to support 60 internal products and over 1000 developers.”
For quicker reviews, these preview links also allow stakeholders to provide feedback on functional prototypes that behave like the final product. This ensures that designers, developers, and product managers are all working from the same source of truth, streamlining the entire process.
Example: Building an Enterprise Dashboard with GPT-5.2 and UXPin Merge
Prompting and Generating the Layout
To get started, open the AI Component Creator from the Quick Tools panel in UXPin. Select GPT-5.2 and set the Ant Design library – this works seamlessly with UXPin Merge, which is tailored for built-in React libraries configured in your connected design system.
In the Prompt tab, describe your dashboard with as much detail as possible. For instance, you might say: “Build an analytics dashboard with an AntD Sidebar, Header with Breadcrumb navigation, sortable Table of user metrics, and a KPI Card.” The more specific your prompt, the better the results.
The AI doesn’t just create a static design; it generates the layout using real, coded Ant Design components. Afterward, you can refine the design by applying your custom tokens and interactions to ensure it aligns perfectly with your team’s standards.
Refining with Custom Tokens and Interactions
Once the layout is ready, the AI Helper becomes your go-to tool for fine-tuning. Select any component, click the AI Helper icon, and describe the changes you need. For example, you could say, “Change the primary button color to brand blue” or “Add 20 pixels of padding to the container.” This eliminates the need for manual property adjustments.
For more advanced tweaks, you can apply your custom design tokens directly to the components. To ensure consistency, test these tokens on a dedicated page featuring key elements like buttons, inputs, and cards. You can also enhance functionality by adding conditional logic and UXPin variables. These allow for features like form validation, dynamic content updates, and branching user flows. To make your prototype even more dynamic, connect it to data collections for live simulations, such as pagination, filtering, and real-time chart updates.
Time-Saving Comparisons
The efficiency gains with this approach are impressive. Larry Sawyer, Lead UX Designer, noted:
“When I used UXPin Merge, our engineering time was reduced by around 50%.”
Here’s a quick comparison of traditional prototyping versus using UXPin Merge with GPT-5.2:
| Feature | Traditional Prototyping | UXPin Merge + GPT-5.2 |
|---|---|---|
| Component Source | Vector-based placeholders | Real, coded Ant Design components |
| Layout Creation | Manual placement of static shapes | Prompt-based generation |
| Iteration | Manual adjustment of every UI element | AI-driven updates via text descriptions |
| Developer Handoff | Developers recreate design in code | Export production-ready React code |
| Speed Metric | Baseline (1x) | 8.6x to 10x faster |
This approach boosts overall product development speed by 8.6x, leading to substantial cost savings for enterprise teams.
Conclusion
Pairing GPT-5.2 with UXPin Merge changes the game for enterprise prototyping. Instead of painstakingly piecing together layouts or manually converting static designs into code, you can now create production-ready prototypes with simple text prompts. These prototypes use pre-validated, code-ready components, cutting out traditional handoff delays and ensuring your designs translate directly into deployable products.
This streamlined workflow doesn’t just save time – it also reduces costs and accelerates time-to-market. For organizations managing teams of dozens of designers and hundreds of engineers, these improvements can significantly boost overall productivity.
But it’s not just about speed. This method ensures consistency at scale. By building prototypes with real, coded components pulled directly from your design system, you eliminate the risk of design inconsistencies. Every button, input field, or card automatically aligns with your established standards. As industry experts have noted, Merge empowers even small design teams to handle expansive product portfolios effectively.
The benefits extend to every level of prototyping. Whether you’re refining a single feature or maintaining design systems across multiple products, this AI-driven, code-compatible process scales effortlessly with your needs. From the very first step, your prototypes achieve functional accuracy – behaving just like the final product.
FAQs
How can GPT-5.2 improve prototyping with UXPin Merge?
GPT-5.2 takes prototyping in UXPin Merge to the next level by using AI-powered tools to turn natural language prompts into interactive, fully functional UI components. This means designers can create prototypes that closely resemble the end product in a fraction of the time, making the process faster and simpler.
By combining GPT-5.2 with UXPin Merge’s code-based design systems, teams can streamline their workflows, minimize reliance on engineering, and speed up the transition from design to development. This not only makes the process more efficient but also improves the precision of prototypes, potentially cutting development time by as much as 50%.
What are the advantages of using code-based design for prototyping?
Using code-based design in prototyping brings some clear benefits to the table. For starters, it enables teams to build functional prototypes that closely resemble the end product. By using production-ready components – like React elements or custom design systems – teams can test interactions, user flows, and data much earlier in the process. This means they can catch and resolve issues quickly, which ultimately saves time during development.
Another big plus is the consistency it offers. Code-based prototypes rely on the same components developers will use in the final build. This eliminates any gaps between design and development, ensuring both the visuals and functionality stay aligned. With everyone working from a shared source of truth, collaboration between designers and engineers becomes much smoother, helping to simplify workflows and speed up product delivery. For enterprise UX teams, this method is especially useful for improving both efficiency and precision in the design-to-development pipeline.
How do I prepare my design system for integration with UXPin Merge?
To get your design system ready for UXPin Merge, start by organizing and documenting your code-based components thoroughly. Make sure each component has clearly defined properties, examples of use cases, and consistent naming conventions. This groundwork will make the synchronization process much smoother.
If your components are stored in repositories like Git or Storybook, double-check that they are properly connected and version-controlled. This step ensures consistency across your system and simplifies updates as your design system grows and changes.
Lastly, make the most of UXPin Merge’s feature to auto-generate documentation for your components. Keeping this documentation current helps maintain alignment between your design system and codebase. This not only reduces design debt but also strengthens collaboration between your design and development teams.

