Prototyping just got faster and easier. By combining GPT-5.1, MUI components, and UXPin Merge, you can create high-fidelity, production-ready prototypes directly in React code – no coding expertise required. Here’s how:
- Generate layouts instantly: Use GPT-5.1 prompts to create coded UI designs in seconds.
- Work with real components: MUI’s 90+ interactive components include forms, buttons, and data tables that behave exactly as they would in production.
- Eliminate design-to-code handoff: Export clean JSX or test directly in tools like StackBlitz, saving developers from recreating designs.
- Streamline collaboration: Designers and developers work with the same components, ensuring consistency across teams.
This guide walks you through setting up UXPin Merge, using GPT-5.1 for layout generation, and refining designs with AI – all while reducing engineering time by up to 50%.
Why it matters: Faster prototyping means quicker feedback, fewer bottlenecks, and a smoother path to delivering polished products.
From Prompt to Interactive Prototype in under 90 Seconds
What You Need Before Starting
To access GPT-5.1 and the full MUI library, you’ll need to subscribe to the right UXPin plan. The Growth plan costs $40/month (billed annually) and includes GPT-5.1, full MUI access, and 500 AI credits per month. For $29/month (billed annually), the Core plan offers GPT-4.1, GPT-5-mini, and 20 MUI components. If your team needs custom libraries, Git integration, or unlimited AI credits, you’ll need to contact sales at sales@uxpin.com for an Enterprise plan. All subscriptions come with a 14-day free trial. For more information, visit uxpin.com/pricing.
Once you’ve subscribed, you’ll need to configure UXPin Merge to start using these features.
Setting Up UXPin Merge
After activating either the Growth or Enterprise plan, MUI components are automatically integrated – no need to install external libraries. You’ll have immediate access to over 90 interactive MUI components. These components are production-ready, complete with interactivity, state management, and responsiveness.
Here’s how to get started:
- Open a new project in UXPin.
- Navigate to the component library panel and select MUI to view the full catalog. You’ll find components like buttons, forms, data tables, and navigation elements.
- Drag any component onto your canvas, and it will behave exactly as it would in a live application.
UXPin’s Patterns feature allows you to combine multiple MUI components into reusable layouts without writing a single line of code. Save these patterns to quickly apply them across projects, ensuring both speed and consistency.
This integration streamlines your prototyping process, keeping everything efficient and ready for production.
What GPT-5.1 Can Do
Once UXPin Merge is set up, you can explore the full potential of GPT-5.1 as your AI Prototyping Assistant. For example, you can type a prompt like, "Create a dashboard with a data table, filter controls, and a summary card," and GPT-5.1 will generate a complete layout using real MUI components – not placeholders.
Here’s what else GPT-5.1 can do:
- AI Component Creator: Turn text descriptions or uploaded images into coded layouts.
- AI Helper: Use natural language commands to refine your designs. For instance, you can say, "Change the button color to match the primary theme" or "Add validation to this form field." All adjustments align with your MUI design system, ensuring only approved, production-ready components are used.
Since the output is React code, you can export clean JSX directly from UXPin or test it immediately in StackBlitz. This eliminates the usual back-and-forth between design and development. As Ljupco Stojanovski put it:
"Adding a layer of AI really levels the playing field between design & dev teams".
How to Build Prototypes with GPT-5.1 and MUI in UXPin Merge
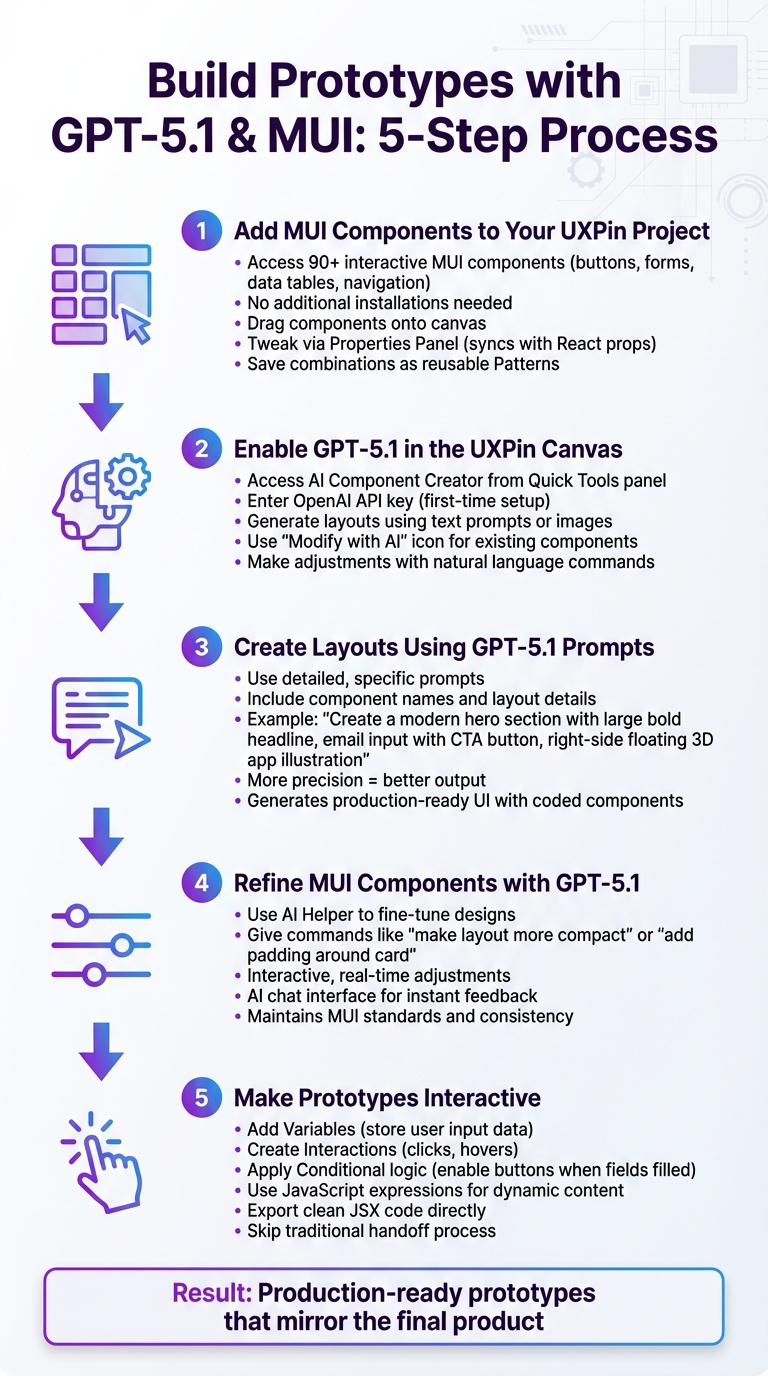
5-Step Process to Build AI-Powered Prototypes with GPT-5.1 and MUI in UXPin Merge
Ready to create your first AI-powered prototype? With GPT-5.1 and MUI components integrated into UXPin Merge, you can quickly build layouts that are production-ready. Here’s how to get started.
Step 1: Add MUI Components to Your UXPin Project
The MUI component library is already built into UXPin Merge, so there’s no need for additional installations or setups. Open your UXPin project, and in the component library panel on the left, select MUI from the dropdown. You’ll find over 90 interactive components, including buttons, forms, data tables, and navigation elements.
Drag any component onto the canvas, and it will function just like it would in a live React app. You can tweak components directly in the Properties Panel on the right, which syncs with React props. For example, you can change a button’s color, size, or variant without writing a single line of code. If you’re combining multiple components into a layout you’ll use again, save them as a reusable pattern for future projects.
Step 2: Enable GPT-5.1 in the UXPin Canvas
To use GPT-5.1, access the AI Component Creator from the Quick Tools panel. If it’s your first time, you’ll need to enter a valid OpenAI API key in the settings. Once enabled, you can generate layouts using text prompts or even images.
For components already on your canvas, click the "Modify with AI" icon to open the AI Helper. This tool allows you to make adjustments with natural language commands. For instance, you can say, "Change the button color to the primary theme" or "Add validation to this form field", and the AI will apply those updates instantly.
Step 3: Create Layouts Using GPT-5.1 Prompts
When creating layouts, detailed prompts are key. For example, in January 2026, UXPin CEO Andrew Martin showcased a "one-shot" prompt to design a modern hero section. The prompt read: "Create a modern hero section with a large bold headline using partial emphasis, supporting subheadline, email input with CTA button, right-side floating 3D-style app illustration, white background with light-gray grid or stat section below." GPT-5.1 generated a complete, production-ready UI using coded components from a design system.
Be specific in your prompts, including component names and layout details. The more precise you are, the better the output. Once the layout is generated, you can refine it further using GPT-5.1.
Step 4: Refine MUI Components with GPT-5.1
Use the AI Helper to fine-tune your design. Describe the changes you need, like "make this layout more compact" or "add more padding around the card." The AI will adjust the components while ensuring they remain consistent with MUI standards.
This process is interactive and real-time. Through the AI chat interface, you can give feedback and see updates instantly. This iterative approach saves time and ensures your designs align with your design system, all while maintaining the production-ready quality of MUI components.
Step 5: Make Prototypes Interactive
Once your design is refined, it’s time to add interactivity. UXPin offers features like variables, conditional logic, and expressions to simulate real-world functionality:
- Variables store user input data, enabling personalized experiences.
- Interactions trigger actions like clicks or hovers, mimicking actual product behavior.
- Conditional logic allows for actions based on specific criteria, such as enabling a submit button only when all required fields are filled.
- JavaScript expressions let you create dynamic content for high-fidelity prototypes.
For example, you can design a form where the submit button activates only after all fields are completed or a dashboard where clicking a filter updates a data table in real-time. Since MUI components are ready for production, you can export clean JSX code directly from UXPin, skipping the traditional handoff process entirely.
With these steps, you can create functional, interactive prototypes that closely mirror the final product.
sbb-itb-f6354c6
Tips for Getting Better Results with GPT-5.1 and MUI
Get the most out of GPT-5.1 and MUI by focusing on clear communication and leveraging the constraints of your design system.
Writing Better GPT-5.1 Prompts
The key to effective prompts is specificity. Instead of a vague request like "an input field", provide detailed instructions such as:
"Create an input field labeled ‘Email’ with 16px bold text above it, and a 2px solid bottom border that turns blue when focused."
Breaking down complex UI elements into smaller parts can also enhance accuracy. For instance, instead of asking for a complete card component, request individual elements like an avatar, a name field, and action buttons separately. If the results aren’t quite right, refine your prompts by adjusting details related to spacing, styles, or text. Experimenting with phrasing or adding extra context can lead to better outcomes.
You can also upload low-fidelity wireframes or high-fidelity mockups. This allows the AI to recognize design elements like typography and spacing more effectively. These detailed prompts help produce designs that align with the prototyping workflows discussed earlier.
Keeping Designs Consistent with Your Design System
With UXPin Merge, the AI uses only approved MUI components, ensuring every layout stays within the boundaries of your design system.
To maintain consistency, rely on the AI Helper for adjustments instead of manually tweaking elements. This ensures all modifications align with your design system and streamlines the development handoff. Start with pre-built MUI templates for common patterns like dashboards and forms. These templates provide a reliable layout foundation that GPT-5.1 can build upon.
If you create a component combination you’ll use frequently, save it as a Pattern in UXPin. This allows you to reuse it across your project without needing to re-prompt the AI.
Up next, we’ll explore common challenges and quick fixes to make your workflow even more efficient.
Common Problems and How to Fix Them
AI-generated prototypes can sometimes come with their own set of challenges. The good news? Most of these issues have straightforward solutions. Tackling them early ensures your prototypes are ready for production without unnecessary delays.
Don’t Rely Too Much on AI Suggestions
AI outputs, while helpful, are rarely perfect right out of the gate. Take GPT-5.1, for example – it’s a fantastic tool for generating layouts quickly, but it’s not a substitute for your design expertise. It doesn’t fully understand your users’ unique needs or your product’s strategic goals.
Always review AI-generated components to ensure they meet accessibility standards, align with your brand’s strategy, and fit seamlessly into user flows. If something feels off, don’t hesitate to tweak it. Tools like "Modify with AI" can help you refine visual elements like spacing, text, or styles.
If your text prompts aren’t delivering the results you need, try uploading a low-fidelity wireframe or a high-fidelity mockup. This gives GPT-5.1 the visual context it needs to better interpret your desired typography, colors, and spacing. Think of the AI as a helpful assistant for repetitive tasks, while you focus on the bigger picture.
Now, let’s dive into some common issues with MUI components and how to handle them.
Fixing MUI Component Issues
When working with MUI components, a great starting point is to simplify complex UI elements into smaller, manageable parts. For example, instead of requesting an entire dashboard card in one go, break it into sections like the header, content area, and action buttons.
If you’re working during peak usage times or require highly detailed layouts, switching to GPT-4.1 could offer better performance and smoother results.
For components missing specific properties or functionality, use UXPin’s Patterns to combine elements into functional variants. This eliminates the need to wait for developer assistance and keeps your workflow moving. Plus, it ensures your designs remain consistent with your system’s guidelines.
"When I used UXPin Merge, our engineering time was reduced by around 50%. Imagine how much money that saves across an enterprise-level organization with dozens of designers and hundreds of engineers." – Larry Sawyer, Lead UX Designer
Conclusion
By following these practical steps, integrating GPT-5.1 with MUI components in UXPin Merge transforms the prototyping process. It brings together speed and consistency, allowing designers to work directly with the same React-based components developers use in production. This eliminates unnecessary rework and reduces communication gaps between design and development teams. For developers building backend systems to support these frontend prototypes, DreamFactory provides a self-hosted platform for governed API access to any data source, enabling secure integration between your production apps and backend services.
Teams leveraging UXPin Merge have seen impressive results, including engineering time savings of nearly 50% and product development workflows that are 8.6x to 10x faster compared to traditional methods.
"It used to take us two to three months just to do the design. Now, with UXPin Merge, teams can design, test, and deliver products in the same timeframe."
– Erica Rider, UX Architect and Design Leader
The true game-changer lies in how AI-generated layouts integrate seamlessly with production-ready components. There’s no need to rebuild designs from scratch, worry about spacing or behavior inconsistencies, or deal with design drift between what’s approved and what ultimately reaches users.
FAQs
How does GPT-5.1 simplify prototyping with MUI components?
GPT-5.1 simplifies the process of prototyping by leveraging its generative AI capabilities to transform basic text prompts or sketches into fully functional UI components and layouts. When combined with MUI’s React-based component library, it enables the development of ready-to-implement designs that adhere to Material Design principles. This eliminates the reliance on static mockups and speeds up design workflows significantly.
Through integration with UXPin Merge, GPT-5.1 links AI-generated components directly to real React code. This ensures that prototypes not only look but also behave like the final product. This setup allows for faster iterations, easy customization, and detailed, interactive designs, making team collaboration smoother and delivering prototypes that are closer to the finished experience.
What are the main advantages of using UXPin Merge for prototyping?
Using UXPin Merge makes prototyping faster and easier by letting designers use production-ready components straight from design systems like MUI. This approach keeps designs perfectly synced with actual code, cutting down on errors and removing the need to rebuild prototypes manually. Plus, prototypes behave just like the finished product, allowing for realistic testing and quicker validation.
Another major advantage is better teamwork. Designers and developers use the same up-to-date components, creating a shared source of truth. This alignment not only improves consistency but also speeds up handoffs and increases productivity – a game-changer for enterprise teams looking to streamline their workflows and deliver top-quality products more efficiently.
How can I keep my designs consistent with the MUI design system when prototyping?
To keep your prototypes aligned with the MUI (Material-UI) design system, UXPin Merge lets you integrate MUI’s pre-built, customizable components. Since these components are based on Google’s Material Design standards, your prototypes will match the visual and functional aspects of the final product.
By setting up your design system in UXPin with the MUI library, you create a single source of truth. This approach makes updates more efficient and ensures a unified style throughout your designs. On top of that, UXPin’s AI tools – like the AI Component Creator – can generate components that automatically follow your design rules, cutting down on errors and saving time.
These tools make it easier to maintain consistency and accuracy while fostering smooth collaboration between design and development teams.

