Design faster and smarter with GPT-5 Mini, shadcn/ui, and UXPin Merge. This trio allows you to create functional prototypes directly from production-ready React components, eliminating design-to-development inconsistencies. Here’s how it works:
- GPT-5 Mini: Generates layouts and components based on your prompts or uploaded mockups.
- shadcn/ui: Provides a React component library with theming support for consistency.
- UXPin Merge: Brings it all together, allowing you to design with real code components, add interactivity, and export production-ready React code.
With this setup, you can cut prototyping time by over 8x and reduce engineering effort by 50%. Whether you’re a designer or developer, this workflow simplifies collaboration and speeds up delivery without compromising quality.
Ready to transform your prototyping process? Let’s dive in.
From Prompt to Interactive Prototype in under 90 Seconds
What You Need to Get Started
To dive in, you’ll need a few key tools and some basic understanding of how they work together. UXPin brings these elements together effortlessly. Let’s break down what’s required.
Tools and Accounts You’ll Need
First, you’ll need a UXPin account with access to its Merge technology. UXPin offers three paid plans:
- Core: Around $29/month, includes 200 AI credits.
- Growth: Around $40/month, includes 500 AI credits.
- Enterprise: Custom pricing tailored to your needs.
To work with shadcn/ui and GPT-5 Mini in UXPin, you’ll use the AI Component Creator tool. To enable AI features, you’ll need an OpenAI API key. This key links your UXPin account to OpenAI’s models, including GPT-5 Mini.
Understanding GPT-5 Mini and UXPin Basics

You don’t need coding experience, but crafting effective AI prompts can make all the difference. GPT-5 Mini is known for being “fast and efficient” in UXPin, making it perfect for testing ideas or generating layout variations quickly. For better results, include detailed instructions in your prompts, like specific color codes, typography choices, and layout details.
You can refine outputs by adjusting your prompts or breaking down complex components into smaller, manageable tasks. Another option? Upload low-fidelity wireframes or high-fidelity mockups to guide the AI in understanding structure, typography, and spacing. Familiarity with UXPin’s interface will also be helpful, especially when switching between the AI Component Creator and the AI Helper tool. The latter allows you to update components using straightforward text commands.
Setting Up Your Design System
For seamless integration, select shadcn/ui as your design library. This ensures that AI-generated components adhere to its design standards. If you’re using a custom version, you can sync it through Git, Storybook, or npm.
When using the AI Component Creator, choose GPT-5 Mini for quick prototyping. The generated components will automatically align with your design system’s tokens, spacing, and styles. This keeps everything consistent and on-brand.
How to Create Prototypes with GPT-5 Mini + shadcn/ui

Jump straight into prototype creation by setting up a project, generating AI-driven components, and tailoring them to your needs. This process seamlessly connects setup with creation, paving the way for rapid prototype development.
Creating a New Project in UXPin Merge
Start by opening the UXPin Editor and selecting shadcn/ui from the available React component libraries. This ensures that the AI works with the correct design system components. From there, choose the components you’ll need for your project. Next, access the AI Component Creator from the Quick Tools panel. In the Settings tab, paste your OpenAI API key to enable AI-powered features. Then, select GPT-5-mini from the model dropdown to prioritize speed during generation. Once this setup is complete, your project is ready for prototype creation.
Generating Prototypes with GPT-5 Mini
Navigate to the Prompt tab and provide clear, specific instructions. For example, you could write: "Create a responsive dashboard header with a search bar and user profile icon using shadcn/ui." The more details you include – like color codes, typography preferences, or layout specifics – the better the results. You can also upload wireframes or mockups directly from your clipboard. The AI will analyze elements such as structure, typography, and spacing to generate components that align with your design system. If the output isn’t quite right, tweak your prompt or break down complex elements into smaller tasks instead of starting over.
Editing and Customizing Generated Prototypes
Once the AI generates your prototype, you can fine-tune it directly in the UXPin canvas. Use the AI Helper (the purple icon in the component info section) to make quick edits with text commands. For example, type something like "increase padding to 16px" or "change button label to ‘Submit’." Everything – from visual styles to layout and content – remains fully adjustable. This blend of AI automation and manual editing gives you both speed and control, ensuring your final prototype meets your exact needs.
Adding Interactivity to Your Prototypes
Taking AI-generated designs to the next level means adding interactivity. This step transforms static prototypes into dynamic, testable experiences that closely mimic real-world product behavior. Static prototypes are limited – they can’t validate design decisions effectively. But with interactive prototypes, you can simulate functionality, making it easier for stakeholders and users to engage with and evaluate your designs. UXPin’s prototyping engine equips you with tools like conditional logic, variables, and expressions to turn AI-generated components into fully interactive experiences.
Using Conditional Logic and Variables
Variables are the backbone of dynamic prototypes. They store data like usernames, cart totals, or menu states, allowing you to create more personalized and responsive interactions. In UXPin, you can set up variables in the Variables panel, assigning them initial values to get started. Once configured, these variables can be linked to components using "if-then" rules. For example, you can trigger an error state for a shadcn/ui input field when required fields are left blank.
"UXPin is packed with advanced features like states, variables, and expressions, making it ideal for designers looking for powerful design and prototyping tools."
- Jana Filusova, Marketing Executive, UXtweak
States add depth and realism to your prototypes. By selecting a shadcn/ui component on your canvas and using the "States" button in the Properties Panel, you can define states like hover, active, disabled, or error. These states can then be tied to user actions, such as clicks or focus events. For even more complex interactions, Expressions come into play. They enable you to perform calculations (like adding tax to a total) or manipulate strings, giving your prototype a level of functionality that feels like the real thing. Once your interactions are set up, you can test everything in Preview mode to ensure it works as intended.
Testing and Previewing Your Prototype
After configuring variables and states, it’s time to test your prototype. Click Preview to interact with your design and confirm that all states and conditional flows behave as expected. If something isn’t working, you can easily return to the editor to tweak your configurations without starting from scratch.
For an in-depth look at your design’s technical details, switch to Spec Mode in the preview window. Here, you’ll find JSX code, CSS properties, spacing measurements, and component specifications – everything developers need to bring your prototype to life. You can also generate a shareable preview link, making it simple for stakeholders and team members to explore your high-fidelity design and provide feedback before moving to production.
sbb-itb-f6354c6
Exporting and Syncing Code
Once your prototype has been tested, the next step is to connect it to your development workflow. UXPin Merge simplifies the design-to-development process by using code as the single source of truth. The components you create are exported as production-ready React code, complete with all necessary dependencies and interactions. This approach is at the heart of UXPin Merge’s mission to close the gap between design and development.
Syncing Prototypes with Your Code Repository
UXPin Merge works seamlessly with platforms like GitHub, GitLab, and Bitbucket, ensuring that both designers and developers are working with the same components. Any updates to components are automatically synced to the UXPin Editor. For teams using CI/CD pipelines, you can automate syncing by setting the UXPIN_AUTH_TOKEN variable. Additionally, version control is easy to manage with Git branches and tags, allowing teams to test new component updates in UXPin without interfering with the main design library. This integration ensures a smooth and efficient handoff process.
"We synced our Microsoft Fluent design system with UXPin’s design editor via Merge technology. It was so efficient that our 3 designers were able to support 60 internal products and over 1,000 developers."
- Erica Rider, UX Architect and Design Leader
Exporting HTML, CSS, and React Code
Once your prototypes are synced with your code repository, you can export production-ready code for developers. UXPin generates complete React (JSX) code, including CSS and detailed component specifications, directly in Spec Mode. The "Copy to StackBlitz" feature makes it even easier by exporting your design to a live, browser-based IDE in just one click. Developers can then view, edit, and test the code without needing to switch tools.
"Your design IS code! It works as simple as Google Translator and you don’t need to double-check anything."
- UXPin
This workflow has had a major impact on product teams. Larry Sawyer, Lead UX Designer, shared that using UXPin Merge helped reduce engineering time by approximately 50%.
Benefits of Using GPT-5 Mini + shadcn/ui in UXPin Merge
Standard Workflow vs UXPin Merge Workflow Comparison
Integrating GPT-5 Mini with shadcn/ui in UXPin Merge transforms the way design teams tackle common challenges like handoff inefficiencies and the dreaded "blank canvas" problem. With AI-generated, production-ready components created from simple text prompts or images, teams can skip tedious setup and dive straight into building. The use of real React code ensures that prototypes aren’t just static mockups – they’re fully interactive and responsive.
Prototyping with Merge is 8.6 times faster than traditional vector-based design tools, giving teams more time to focus on delivering features instead of reworking designs.
Another game-changer? Designing with the same shadcn/ui components used in production eliminates the dreaded design-to-code drift. Erica Rider, UX Architect and Design Leader, highlighted this efficiency when her team seamlessly synced the Microsoft Fluent design system with UXPin Merge:
"It was so efficient that our 3 designers were able to support 60 internal products and over 1,000 developers."
The AI Helper further streamlines the process by refining colors, spacing, and layouts instantly, making iterations faster and smoother. GPT-5 Mini’s optimization for speed and precision makes it perfect for quick tests and layout tweaks.
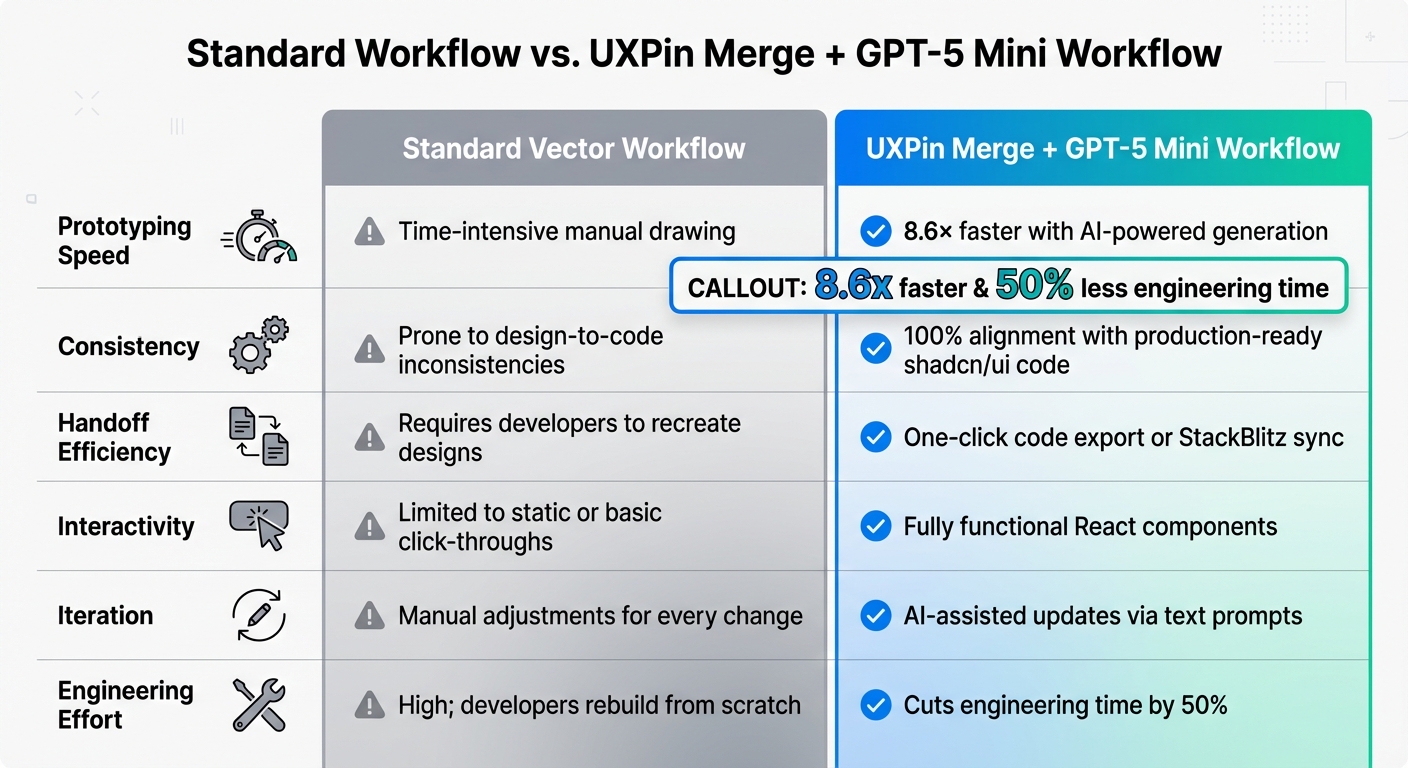
Standard Workflow vs. UXPin Merge Workflow
Here’s a clear comparison of how UXPin Merge + GPT-5 Mini stacks up against traditional workflows:
| Feature | Standard Vector Workflow | UXPin Merge + GPT-5 Mini Workflow |
|---|---|---|
| Prototyping Speed | Time-intensive manual drawing | 8.6x faster with AI-powered generation |
| Consistency | Prone to design-to-code inconsistencies | 100% alignment with production-ready shadcn/ui code |
| Handoff Efficiency | Requires developers to recreate designs | One-click code export or StackBlitz sync |
| Interactivity | Limited to static or basic click-throughs | Fully functional React components |
| Iteration | Manual adjustments for every change | AI-assisted updates via text prompts |
| Engineering Effort | High; developers rebuild from scratch | Cuts engineering time by 50% |
"Being able to jump straight from design to having code ready is going to be a huge time-saver for our team."
- Allison Barkley, Director of Operations at Baremetrics
Conclusion
The combination of GPT-5 Mini, shadcn/ui, and UXPin Merge transforms prototyping from a tedious process into a streamlined workflow. By using the same React components developers rely on, this approach removes the typical handoff challenges that slow teams down.
With AI-powered tools, prompts turn into prototypes in minutes, and real code ensures a smooth transition from design to deployment. This eliminates design drift and keeps design and development perfectly aligned.
"Designers who can think in components and contribute to the codebase are becoming 10x more valuable. Code-based design isn’t just a workflow shift – it’s a career advantage." – Andrew Martin, CEO, UXPin
Teams adopting this method have reported cutting engineering time by 50%, enabling them to manage extensive product portfolios even with limited design resources. This efficiency underscores UXPin Merge’s ability to bridge the gap between design and development.
Want to take your prototyping to the next level? Start using UXPin Merge today and experience a faster, AI-driven workflow that keeps your design and development teams in sync.
FAQs
How does GPT-5 Mini enhance prototyping with UXPin Merge?
GPT-5 Mini revolutionizes how designers approach prototyping in UXPin Merge. With just natural language prompts, it enables the creation of functional, interactive UI components. This means designers can skip much of the manual effort traditionally required for design and coding, producing detailed, production-ready React components that mimic the behavior of the final product.
By blending AI-driven tools with a component-based design approach, GPT-5 Mini helps teams streamline workflows, improve precision, and cut engineering time by as much as 50%. The result? Faster, more consistent prototypes that are simpler to refine and align seamlessly with development efforts – speeding up the entire product development cycle.
What are the advantages of combining GPT-5 Mini with shadcn/ui for prototyping?
Combining GPT-5 Mini with shadcn/ui creates a powerful setup for prototyping in UXPin. By leveraging fully functional React components, your prototypes not only look like the final product but also behave like it, offering a higher level of precision in both design and functionality. This minimizes discrepancies between the prototype and the actual application.
What’s more, shadcn/ui components simplify workflows by cutting down on manual handoffs. Developers can work with auto-generated JSX and access detailed specs, making development faster and collaboration smoother. With GPT-5 Mini, you can quickly generate, tweak, and test components directly in UXPin, saving time while keeping designs consistent. Together, these tools boost efficiency, precision, and teamwork, helping you build better products faster.
How do I make sure AI-generated components fit my design system?
To make sure AI-generated components match your design system, it’s crucial to use production-ready components that mirror the final implementation. By combining tools like GPT-5 Mini with the shadcn/ui library through UXPin Merge, you can work directly with real React components. These components maintain their styling, props, and interactions exactly as they would function in production, ensuring a seamless connection between design and development.
Start by setting up your project with tools like Tailwind CSS, React, and the UXPin Merge CLI. Then, configure your components in the uxpin.config.js file. This setup ensures your components are synced, fully customizable, and testable within the prototyping environment. Using these components streamlines the design process, reduces manual handoffs, and keeps your AI-driven prototypes aligned with your design system’s standards.

