Prototyping just got faster and more efficient. By combining GPT-5.2, Bootstrap, and UXPin Merge, you can create functional, code-backed prototypes that mirror the final product. Here’s how it works:
- GPT-5.2 generates Bootstrap components from text prompts or images.
- Bootstrap ensures these components are consistent with production-ready code.
- UXPin Merge lets you design, test, and export interactive prototypes directly into production.
This approach eliminates static mockups, reduces design-to-development friction, and speeds up workflows by up to 8.6x. Designers and developers work with the same components, ensuring accuracy and saving time.
Ready to streamline your prototyping process? Dive into the details below.
UXPin Merge Tutorial: Intro (1/5)
What You Need to Get Started
Before diving into prototype building, make sure you have the following essentials:
First, you’ll need a UXPin account with a Merge AI plan. This plan provides access to the Merge editor, design canvas, and the AI Component Creator powered by GPT-5.2. Additionally, you’ll need an OpenAI API key to enable AI-driven component generation.
One of the standout features of UXPin is its seamless integration with Bootstrap. There’s no need to import external libraries or wrestle with configurations – Bootstrap is ready to use directly on the design canvas. If you’re working with a custom design system, you can add react-bootstrap and bootstrap via npm and include the necessary CSS path as outlined in the React Bootstrap documentation.
Larry Sawyer, Lead UX Designer, shared his experience with this setup:
"When I used UXPin Merge, our engineering time was reduced by around 50%."
Once you’ve gathered these tools, you’re ready to set up your UXPin Merge project.
Setting Up Your UXPin Merge Project
Start by logging into UXPin and creating a new Merge project. You’ll find Bootstrap listed among the available libraries – select it to instantly include Bootstrap components in your design canvas.
For those using a custom library, integration is straightforward. Install react-bootstrap and bootstrap via npm, then configure the library settings in UXPin Merge to connect your code components. This ensures your components sync seamlessly with the visual editor, keeping everything aligned.
To enable AI-powered component creation, configure the AI Component Creator in your project settings. Enter your OpenAI API key, and you’ll be all set to generate Bootstrap components through GPT-5.2.
How GPT-5.2 Works in Prototyping
GPT-5.2 simplifies prototyping by generating production-ready UI components based on your text prompts. For example, if you need "a responsive navigation bar with dropdown menus", simply describe it, and GPT-5.2 will generate the Bootstrap code instantly. These components will appear directly in your UXPin canvas, ready for you to drag, drop, and customize.
What sets GPT-5.2 apart is its ability to work within your design system constraints. It doesn’t create random patterns or unusable code. Instead, it generates components that align perfectly with your existing Bootstrap library, ensuring consistency throughout your prototypes. Ljupco Stojanovski highlighted this advantage:
"Adding a layer of AI really levels the playing field between design & dev teams."
Since UXPin Merge is code-based, the components you design are exactly what developers will use in production. There’s no need for translation, guesswork, or rebuilding. What you prototype is precisely what gets shipped.
Step-by-Step Guide: Creating Prototypes with GPT-5.2, Bootstrap, and UXPin Merge
Step 1: Generate Bootstrap Components with GPT-5.2
Start by opening the "Quick Tools" panel in your UXPin Merge project and selecting the AI Component Creator. This tool lets you generate Bootstrap components through text prompts or image uploads. For instance, you can type a prompt like, "Create a Bootstrap input field with a 16px bold label and a blue focus border." Alternatively, upload a wireframe or mockup image – the AI will convert it into functional Bootstrap code. Keep in mind, the higher the image quality, the more accurate the typography and spacing will be.
For quick variations or layout tests, you can use GPT-5-mini, which is optimized for speed. If your design involves complex UIs, try generating components one at a time and combining them later. Need tweaks? Use the "Modify with AI" button to adjust styles, layouts, or text without starting over. Once your components are ready, move to the canvas to organize them.
Step 2: Build Layouts in UXPin Merge
Now, drag and drop the components onto your UXPin canvas to create complete screens, like navigation bars, forms, or footers. Use the Patterns feature to save and reuse groups of elements, speeding up your workflow. All generated components are responsive, automatically adapting to different screen sizes.
Step 3: Add Interactivity and Logic
With your layout in place, it’s time to make it functional. UXPin Merge offers tools like States, Variables, Expressions, and Conditional Interactions to add interactivity:
- States: Define multiple versions of a component (e.g., hover, active, or disabled) in the Properties Panel.
- Variables: Capture user input data to create personalized interactions.
- Expressions: Use these to add advanced logic, similar to JavaScript functions, without needing to code manually.
- Conditional Interactions: Implement if-then scenarios based on user actions.
Since UXPin Merge uses code-backed components, the logic you build will seamlessly translate into production-ready code.
Step 4: Test and Refine Your Prototype
Switch to Preview mode to test your prototype’s functionality. Check interactions, forms, and navigation, and ensure your Bootstrap components perform well across various screen sizes. UXPin’s preview mode lets you view desktop, tablet, and mobile layouts side by side, so you can verify responsiveness.
For a deeper review, use Spec mode to ensure the generated JSX code aligns with your development team’s requirements. If something seems off, tweak component properties, states, or logic as needed. The real-time preview feature makes it easy to spot and fix issues quickly.
Step 5: Export Code-Ready Prototypes
Once you’ve validated your prototype, export it as production-ready code directly from UXPin Merge. Use the built-in sharing tools to let your team inspect components, copy code snippets, and review specifications like spacing, colors, typography, and interaction logic.
If your team has Git integration (available in Enterprise plans), you can sync designs with your code repository. This ensures that updates to your Bootstrap components are reflected in both the design library and the codebase. This streamlined process helps move products from design to production in record time, eliminating surprises for engineers and avoiding the need for rebuilding.
sbb-itb-f6354c6
Why Use GPT-5.2, Bootstrap, and UXPin Merge Together
Faster Workflows
Pairing GPT-5.2, Bootstrap, and UXPin Merge can drastically speed up prototyping by cutting down on manual labor. Instead of painstakingly creating each component from scratch, you can use AI prompts to generate code-backed Bootstrap elements and assemble them directly on the canvas. This method can make product development up to 8.6 times faster compared to traditional image-based design tools.
The AI Component Creator tackles the often-daunting "blank canvas" problem by generating layouts that adhere to Bootstrap standards right out of the gate. This means less time spent creating individual states and more time focusing on refining interactions and testing user flows. The result? A faster development process and consistent designs that align seamlessly across teams.
Consistency Across Teams
When you design with Bootstrap components in UXPin Merge, you’re working with the same production-ready code that developers will implement. This approach eliminates the common design-to-development disconnect of static mockups. Every detail – spacing, color tokens, interaction patterns – stays aligned across the board.
Take Microsoft as an example. UX Architect Erica Rider spearheaded a project that integrated the Fluent design system with UXPin Merge. This setup allowed a small team of just three designers to support 60 internal products and over 1,000 developers. The result was fewer revisions and faster approvals, showcasing the power of aligned workflows.
Better Collaboration Between Design and Development
By aligning code and standards, these tools naturally encourage stronger collaboration between design and development teams. UXPin Merge replaces the typical handoff process with a single link containing production-ready code and detailed specs. Developers no longer have to interpret static images – they get auto-generated specs tied to real JSX components, eliminating the need for constant back-and-forth over spacing, states, or behaviors.
Prototypes built with Bootstrap in Merge come with interactivity, responsiveness, and data-handling baked in. This allows stakeholders to test realistic scenarios before development even starts. Designers can trust their vision will translate accurately, and engineers gain clarity on exactly what to build, minimizing misunderstandings and inefficiencies.
Traditional Prototyping vs. UXPin Merge with GPT-5.2 + Bootstrap
Traditional Prototyping vs UXPin Merge Workflow Comparison
Traditional prototyping tools follow an image-based approach – designers create static vector graphics that developers later recreate in code. UXPin Merge takes a different path, using a code-based approach where the design tool renders actual HTML, CSS, and JavaScript. This means designers are working directly with the same React components that developers will use in production.
This shift leads to clear, measurable benefits. Larry Sawyer, Lead UX Designer, shared that his team cut engineering time by about 50% after adopting UXPin Merge.
Workflow Comparison Table
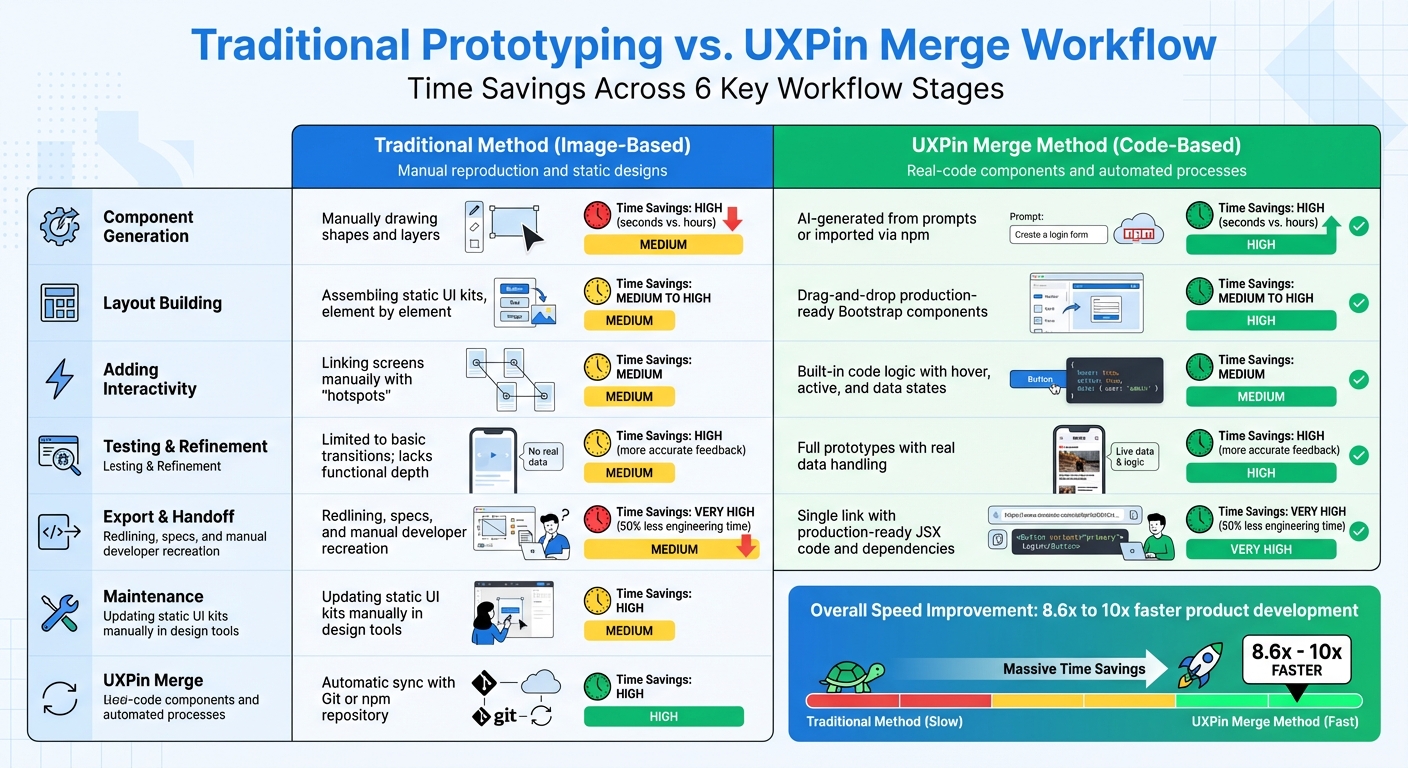
These differences in approach result in significant time savings and smoother workflows:
| Workflow Stage | Traditional Method | UXPin Merge Method | Time Savings |
|---|---|---|---|
| Component Generation | Manually drawing shapes and layers | AI-generated from prompts or imported via npm | High (seconds vs. hours) |
| Layout Building | Assembling static UI kits, element by element | Drag-and-drop production-ready Bootstrap components | Medium to High |
| Adding Interactivity | Linking screens manually with "hotspots" | Built-in code logic with hover, active, and data states | Medium |
| Testing & Refinement | Limited to basic transitions; lacks functional depth | Full prototypes with real data handling | High (more accurate feedback) |
| Export & Handoff | Redlining, specs, and manual developer recreation | Single link with production-ready JSX code and dependencies | Very High (50% less engineering time) |
| Maintenance | Updating static UI kits manually in design tools | Automatic sync with Git or npm repository | High |
This level of efficiency transforms team capabilities. For instance, Erica Rider’s team of just 3 designers managed to support 60 internal products and over 1,000 developers by syncing the Microsoft Fluent design system with UXPin Merge. Such scalability is simply unattainable when every component must be redrawn and re-coded manually.
Conclusion
By combining GPT-5.2, Bootstrap, and UXPin Merge, teams can seamlessly connect design and development. Instead of relying on static mockups that often require extensive rework, this approach uses production-ready React components. The result? Prototypes that aren’t just visual placeholders – they’re functional designs that mirror the final product.
The impact on efficiency is striking. Some teams report completing product development up to 8.6x to 10x faster. Tasks like design, testing, and delivery now fit into the same timeframe that previously only covered the design phase. This shift represents a move from static workflows to dynamic, code-based design processes.
Collaboration becomes smoother too. Designers can drag and drop the same Bootstrap components developers use, ensuring consistency across teams. With GPT-5.2 generating layouts in seconds, developers receive JSX code and specs directly – eliminating the need for manual handoffs or translations.
This streamlined workflow tackles common bottlenecks head-on. For teams struggling with inefficiencies in turning designs into code, it offers a clear, proven solution. A code-based design approach ensures everyone – designers, developers, and stakeholders – works from the same live prototype.
Want to revolutionize your prototyping process? Check out UXPin Merge and discover how code-based design can speed up your team’s workflow.
FAQs
How does GPT-5.2 streamline prototyping with UXPin Merge?
GPT-5.2 takes prototyping in UXPin Merge to a new level by allowing the creation of AI-generated, production-ready UI components. These components integrate effortlessly into interactive prototypes, bridging the gap between design and development. The result? Teams can produce high-fidelity prototypes faster and more efficiently.
On top of that, GPT-5.2 streamlines tasks like turning static designs into functional UI elements and maintaining consistent theming, cutting down on tedious manual work. By pairing its AI capabilities with UXPin Merge’s powerful tools, teams can work together more effectively, concentrating on crafting precise, functional prototypes that mirror the final product.
What are the benefits of using Bootstrap components with UXPin Merge?
Using Bootstrap components with UXPin Merge brings several benefits to prototyping. Bootstrap offers ready-made, responsive UI elements like buttons, forms, and navigation bars, saving you the hassle of building these elements from scratch. Its grid system ensures your prototypes look great and function properly on any screen size.
On top of that, Bootstrap components are easy to tweak using SCSS variables and utility classes, making it simple to match designs to your brand while keeping everything consistent. When paired with UXPin Merge, these components allow for interactive, code-based prototypes that feel close to the final product. This setup enhances collaboration between designers and developers, simplifies workflows, and makes the shift from prototype to production much smoother.
How does UXPin Merge help align design and development teams?
UXPin Merge brings designers and developers closer together by enabling teams to use real, production-ready components directly within prototypes. This means designers can create with the exact coded elements that will appear in the final product, ensuring the design aligns perfectly with the finished result. For developers, it provides a unified source for components, eliminating guesswork.
With automatic syncing of these components, UXPin Merge ensures prototypes not only look but also function like the final product. This approach minimizes inconsistencies, streamlines collaboration, and accelerates the handoff process, allowing teams to concentrate on delivering polished results more efficiently.

