Building modern UIs is now faster and more efficient with GPT-5 Mini and UXPin Merge. GPT-5 Mini, with its 400,000-token context window and advanced tool-calling capabilities, helps generate UI components that align perfectly with your design system. Pair it with UXPin Merge to directly integrate these components into production-ready prototypes, eliminating common handoff issues between design and development.
Key Takeaways:
- GPT-5 Mini: Processes entire codebases and design docs for consistent, code-compatible components.
- UXPin Merge: Syncs these components with your design system for interactive prototyping.
- Cost: Input tokens cost $0.25/million, output tokens $2.00/million, making it budget-friendly for scaling.
- Setup: Requires an OpenAI API key, a defined design system, and basic CLI knowledge.
- Automation: Use CI/CD pipelines to keep components updated in UXPin Merge.
This combination ensures faster workflows, consistent designs, and production-ready outputs from day one.
What You Need Before Getting Started
Before jumping into the integration process with UXPin Merge, it’s important to set yourself up properly from the start.
First, secure an active OpenAI API key for GPT-5 Mini. If you’re new to this, consider starting with Tier 1 access, which costs $5 for 500,000 tokens per minute. Input tokens are priced at $0.25 per million, while output tokens cost $2.00 per million. For higher usage, you can save money by opting for the Batch API, which reduces costs to $0.125 per million input tokens and $1.00 per million output tokens. Once you’ve got your API key, the next step is to ensure your design system is ready to go.
Second, define your UI design system. Make sure you’ve outlined your tokens, components, and visual rules before you start generating screens. This groundwork is essential – it prevents AI from making errors and helps maintain consistency in your prototypes. Nishkarsh Gupta, a UI/UX Designer, emphasizes that creating a mini design system early can significantly streamline your workflow. With this in place, you can move on to preparing your development tools.
Third, familiarize yourself with the Command Line Interface (CLI). The CLI will be your go-to tool for syncing component libraries with UXPin Merge and setting up CI/CD pipelines. If you’re working with a custom React library, ensure it’s properly structured and ready for implementation. For those using libraries like MUI, Ant Design, Bootstrap, or ShadCN, UXPin offers native integration, so you can skip the hassle of importing them.
Finally, sharpen your prompt engineering skills. Nick Babich, a Product Designer, highlights the importance of this step:
"Prompt writing is one of the most (if not the most) challenging parts of the design process with AI"
When crafting prompts, use Markdown headers to create clear layout hierarchies (up to three levels deep). Be explicit about functional details, such as "horizontally scrollable cards" or "rounded icon, 32px". Precision is key – GPT-5 Mini performs exceptionally well, with a success rate of over 95% on complex tasks, as long as the prompts are structured clearly.
sbb-itb-f6354c6
How to Set Up UXPin Merge with GPT-5 Mini
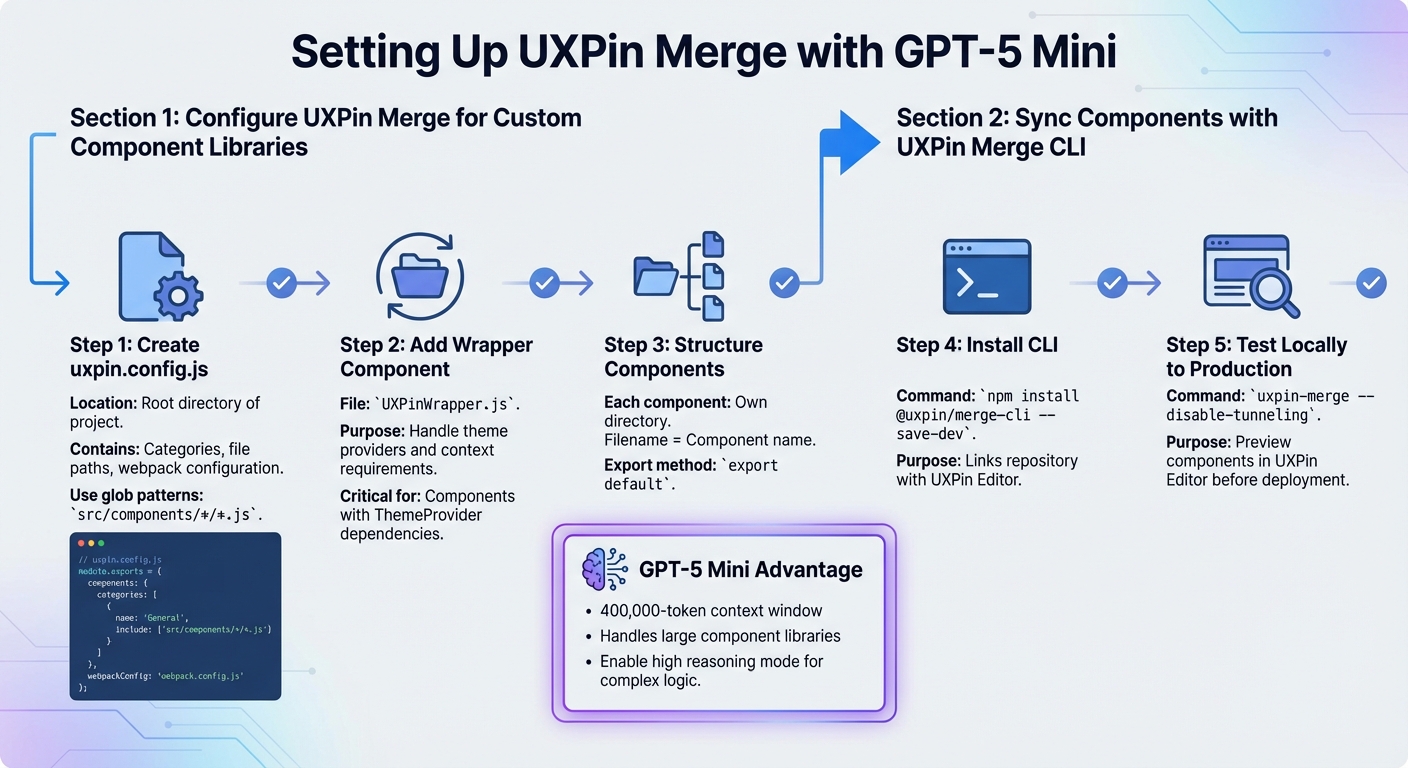
GPT-5 Mini and UXPin Merge Setup Workflow Guide
The setup process involves two main steps: configuring your project files and syncing the components to the UXPin canvas.
Configure UXPin Merge for Custom Component Libraries
Start by creating a uxpin.config.js file in the root directory of your project. This file serves as a blueprint, defining the source and structure of your AI-generated components. It requires three main elements: categories for components, the file path to your components, and the webpack configuration path.
The uxpin.config.js file should export a JavaScript object that mirrors your component structure. Use glob patterns like src/components/*/*.js to automatically include any new components generated by GPT-5 Mini.
Add a wrapper component to handle theme providers or specific context requirements. This is done through a UXPinWrapper.js file, which ensures proper rendering of AI-generated components in the UXPin Editor. This step is particularly crucial for components that rely on a ThemeProvider or other context dependencies.
Each component should reside in its own directory, with the filename serving as the component name. Use export default to make the components accessible to UXPin Merge.
Once the configuration is complete, you can use the CLI to connect and push your components.
Sync Components with UXPin Merge CLI
This step ensures that GPT-5 Mini’s components integrate smoothly with your production design system.
First, install the UXPin Merge CLI as a development dependency using the command:
npm install @uxpin/merge-cli --save-dev.
The CLI links your repository with the UXPin Editor, allowing you to push components directly from Git or npm.
Before deploying your library, test locally by running:
uxpin-merge --disable-tunneling.
This lets you preview how GPT-5 Mini’s generated components will appear in the UXPin Editor. When you’re ready to push to production, store your UXPin Auth Token as an environment variable (UXPIN_AUTH_TOKEN) to keep it secure, instead of embedding it directly in your scripts.
Thanks to GPT-5 Mini’s 400,000-token context window, it can handle large component libraries and documentation with ease. For tasks like generating the uxpin.config.js structure or handling complex component logic, enable GPT-5 Mini’s high reasoning mode to better align with your design system’s constraints.
How to Build UI Prototypes with GPT-5 Mini and UXPin Merge
Once your components are synced, you can start creating prototypes that combine AI-generated layouts with your production-ready design system.
Generate Code-Based Components with GPT-5 Mini
GPT-5 Mini works best with structured Markdown prompts. For example, you can use up to three header levels (like ## Hero Section and ### CTA Button) and include clear visual instructions such as "rounded corners, 32px icons, soft shadow" to guide the model in generating components that align with your design system. Thanks to its 400,000-token context window, you can include your entire component library guidelines and token definitions in a single prompt.
"GPT‑5 produces high-quality code, generates front-end UI with minimal prompting, and shows improvements to personality, steerability, and executing long chains of tool calls." – OpenAI
The model generates code for a "code canvas" or preview mode, allowing you to see a functional product rather than just a static image. Before outputting the final code, GPT-5 Mini describes the design, giving you a chance to verify its alignment with your design system. Once finalized, the generated code integrates seamlessly with UXPin Merge, enabling you to create interactive prototypes.
Design and Prototype with Real Components
After generating the code, UXPin Merge transforms AI-generated components into interactive prototypes using your synced design system. Since your component library has already been configured, you can simply drag and drop these code-backed elements onto the canvas. Unlike traditional design tools that require developers to rebuild designs, UXPin Merge ensures that what you design is exactly what developers will ship.
The platform includes integrated design libraries like MUI, Ant Design, ShadCN, and Bootstrap, so you can use them without needing to import anything. If you’re working with a custom library, GPT-5 Mini can generate components tailored to your specific patterns by applying "Code Editing Rules Patterns" that reflect your coding style and UI guidelines. This ensures the AI-generated code fits seamlessly into your existing design system.
You can adjust GPT-5 Mini’s reasoning_effort and verbosity settings to suit your needs. For quick drafts, use the standard reasoning mode. For more complex components with intricate state management, switch to high reasoning mode. With a 128,000-token max output, GPT-5 Mini can even generate entire multi-screen application codebases in one go. This makes it a powerful way to build comprehensive prototypes while maintaining design consistency from start to finish.
"It’s no longer just ‘vibe coding’ but rather ‘vibe product building.’ In the not-so-distant future, we will spend less time on tools like Figma or VS Code and more time on tools like ChatGPT." – Nick Babich, Product Designer
How to Maintain Consistency with Automated Workflows
Automated workflows play a key role in leveraging GPT-5 Mini and UXPin Merge to keep your design and development efforts aligned. While prototyping with GPT-5 Mini is a great starting point, the real challenge lies in ensuring your design system stays synchronized throughout the project. Automated workflows address this by seamlessly channeling updates from your codebase into UXPin Merge, so designers always have access to the latest production-ready components.
Set Up CI/CD Pipelines for UXPin Merge
To integrate UXPin Merge with a CI server like GitHub Actions, CircleCI, or Travis CI, you can use the UXPin Merge CLI tool to push component updates directly from your repository to the UXPin Editor.
Here’s how to get started:
- Generate an Auth Token: Open the UXPin Editor, create a new library using the "import React components" option, and generate your unique token. Set this token as the environment variable
UXPIN_AUTH_TOKENin your CI settings. Be sure not to commit this token to your repository. - GitHub Actions Setup:
- Create a workflow file at
./.github/workflows/config.yml. - Set the trigger to
on: pushfor your main or master branch. - Add a step to run
yarn pushornpm run push. Ensure yourpackage.jsonincludes the script:"push": "uxpin-merge push".
- Create a workflow file at
- CircleCI Setup:
- Create a configuration file at
./.circleci/config.yml. - Use a Node-compatible Docker image, such as
circleci/node:10.15-stretch-browsers. - Add the command:
./node_modules/.bin/uxpin-merge push --webpack-config ./webpack.config.js --wrapper ./src/Wrapper/UXPinWrapper.js.
- Create a configuration file at
Here’s a quick reference table for both setups:
| CI Provider | Configuration File Path | Key Command/Script |
|---|---|---|
| GitHub Actions | ./.github/workflows/config.yml |
uxpin-merge push (via yarn push) |
| CircleCI | ./.circleci/config.yml |
./node_modules/.bin/uxpin-merge push |
Once your pipeline is in place, every component update will automatically reflect in UXPin Merge, keeping your design tools up to date.
Enable Real-Time Updates from Component Libraries
With your CI/CD pipeline configured, every code commit triggers automatic updates to your UXPin library. Linking your design system to your design files ensures that pre-defined tokens and components remain consistent, cutting down on visual inconsistencies and reducing potential AI errors. This synchronization results in smoother developer handoffs and faster MVP launches – some teams have reported up to a 10x speed improvement compared to traditional AI-driven design processes.
GPT-5 Mini’s performance further enhances these workflows. With a success rate exceeding 95% on complex, multi-step tool-calling tasks, it ensures updates across large codebases remain contextually accurate. Its cost efficiency is another advantage: at $0.25 per million input tokens and $2.00 per million output tokens, it’s five times more affordable than alternatives like Gemini 2.5 Pro, making it a practical choice for scaling automated workflows.
Conclusion
Pairing GPT-5 Mini with UXPin Merge is changing how enterprise teams tackle UI development. With costs as low as $0.25 per million input tokens, this approach blends efficiency with cutting-edge functionality, enabling a streamlined and integrated design process.
The key lies in working within defined constraints. UI/UX Designer Nishkarsh Gupta put it best:
"Structuring AI intentionally, rather than using it randomly, created the real speed advantage".
By defining design system tokens and components upfront, GPT-5 Mini operates within established guidelines. This approach reduces visual inconsistencies and helps avoid unnecessary design debt.
UXPin Merge takes this further by keeping designers and developers aligned through code-based components. Feeding the AI with your complete design system documentation ensures it understands your component library inside and out. The result? AI-generated outputs that align perfectly with your production code. This seamless connection allows component updates to flow smoothly from design to production.
Adopting system-first AI workflows can drastically speed up MVP development. This process bridges the gap between design and development, ensuring prototypes are ready for production from the start.
FAQs
What should I share with GPT-5 Mini so it follows my design system?
To ensure GPT-5 Mini aligns seamlessly with your design system, you’ll need to share the key elements that define your system, such as components, libraries, and standards. This will help the model generate outputs that are consistent with your brand’s visual and functional identity.
Key Integration Methods
Here are a few ways to connect GPT-5 Mini to your design system effectively:
- npm Packages: Share your component libraries as npm packages. For example, if you’re using libraries like MUI or Ant Design, provide access to these packages so GPT-5 Mini can reference them when generating UI components.
- Git Repositories: Host your design system in a Git repository. This allows GPT-5 Mini to access your components, utilities, and style definitions directly, ensuring alignment with your standards.
- Storybook: If you use Storybook to document and showcase your components, share its URL or configuration. This gives GPT-5 Mini a clear understanding of how your components look and behave.
Providing Design System Details
To maintain consistency, provide GPT-5 Mini with the following details:
- Design Tokens: Share tokens for colors, typography, spacing, and other styles. For example:
- Primary color:
#007BFF - Font family:
"Roboto", sans-serif - Spacing unit:
8px
- Primary color:
- Component Libraries: Specify the libraries you’re using (e.g., MUI, Ant Design) and any custom components you’ve built. This ensures the model generates UI elements that match your existing toolkit.
- Style Guidelines: Include your rules for layout, responsiveness, and accessibility. For example, define breakpoints, padding standards, or ARIA practices to ensure generated UIs follow your standards.
Example Prompts for Consistency
When working with GPT-5 Mini, craft prompts that clearly reference your design system. For instance:
- "Generate a login form using MUI components, with a primary button styled according to our design tokens (primary color: #007BFF, border radius: 4px)."
- "Create a responsive navigation bar using Ant Design, following our spacing unit of 8px and font family ‘Roboto’."
By providing these resources and prompts, GPT-5 Mini can produce outputs that not only look polished but also align perfectly with your design system.
How do I turn GPT-5 Mini output into UXPin Merge components?
To turn GPT-5 Mini outputs into UXPin Merge components, start by using natural language prompts in GPT-5 Mini to generate UI layouts or components. Once you have the generated designs, link them to production-ready React components in UXPin Merge. This connection allows you to refine the designs, introduce interactivity, and ensure they are responsive – all within UXPin.
The best part? These components are real React elements that align with your production code. Plus, they can be exported as JSX, making the design-to-development process smooth and efficient.
How can I auto-sync component updates to UXPin Merge with CI/CD?
When you integrate your design system repository (like GitHub) with UXPin Merge and set up your CI/CD pipeline, you can enable auto-sync for component updates. By using automation scripts, updates are triggered automatically whenever changes are made to your component libraries or design tokens. This approach minimizes manual work, keeps everything up-to-date, and ensures smooth alignment between design and development processes.

