Prototyping with GPT-4.1 and UXPin Merge is fast and precise. By combining GPT-4.1’s AI capabilities with MUI‘s React component library, you can create interactive, production-ready prototypes directly in UXPin. This method eliminates design-to-development gaps, saving time and ensuring consistency.
Key Takeaways:
- AI-Driven Prototyping: Use GPT-4.1 to generate layouts with MUI components based on your prompts.
- Code-Backed Components: Work with React components that mirror production code, reducing rework.
- Streamlined Workflow: Test and refine designs in UXPin, then export production-ready JSX for developers.
- Team Alignment: A shared design system ensures consistency across projects.
This approach is ideal for enterprise teams looking to speed up design cycles while maintaining high-quality outputs.
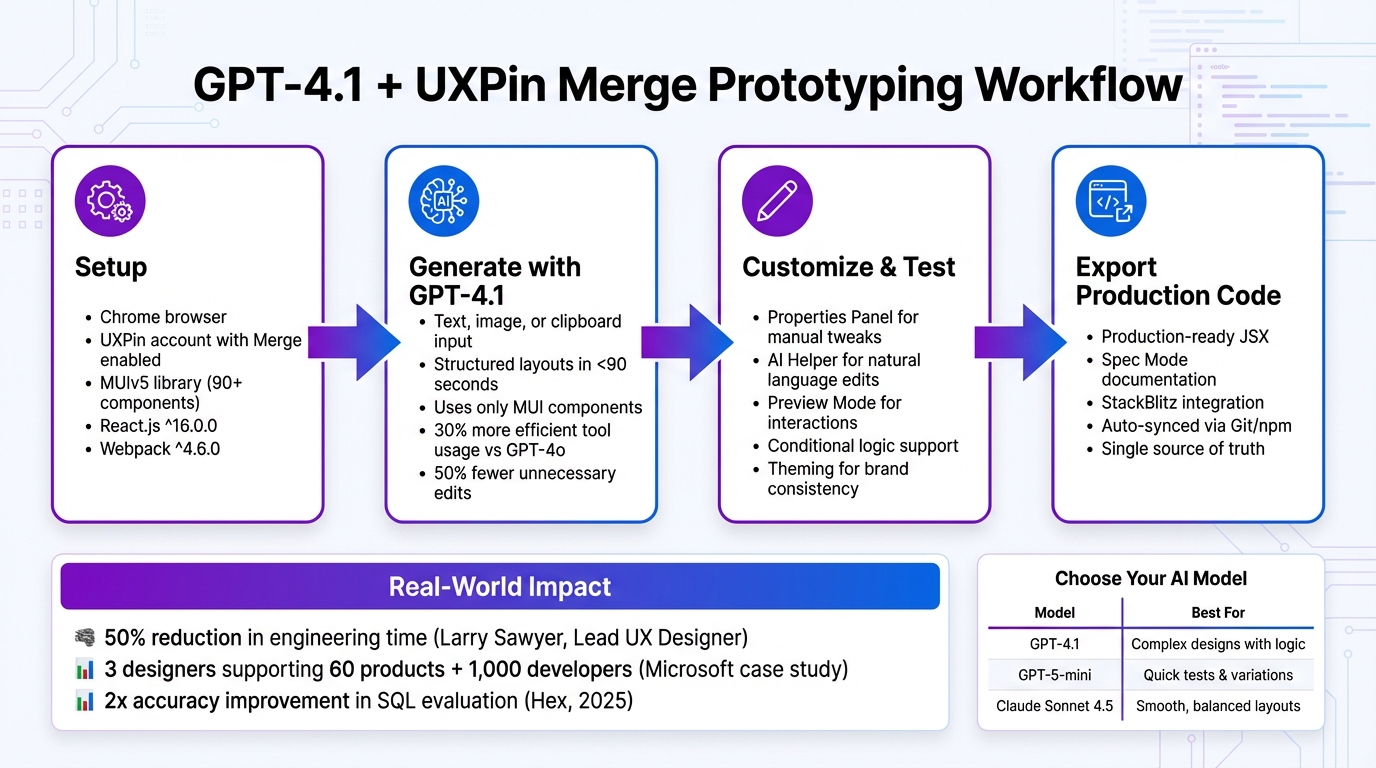
GPT-4.1 and UXPin Merge Prototyping Workflow: From Setup to Production
Setting Up UXPin Merge with MUI
What You Need to Get Started
To get started, ensure you’re using Chrome, as UXPin Merge performs best in this browser. You’ll also need a UXPin account with Merge enabled. Since MUI is already integrated into UXPin, there’s no need for extra imports or configurations.
If you’re using a custom component library instead of the pre-built MUI setup, your components must be built with React.js version ^16.0.0 and bundled using Webpack version ^4.6.0. Additionally, your team will need access to the UXPin Merge environment within the platform.
Accessing the MUI Component Library
Once inside UXPin, create a new project and head to the Design System Libraries tab. You’ll find MUIv5 ready to use – no installation required. Simply drag components like Button, TextField, or BottomNavigation directly onto your canvas.
These interactive components are code-backed, rendering production-level HTML, CSS, and JavaScript. This ensures that your prototype behaves just like the final React application. For example, when you modify properties like variant (contained, outlined, text) or toggle disabled, you’re working with the same props developers use in production.
Larry Sawyer, Lead UX Designer, highlighted the benefits:
"When I used UXPin Merge, our engineering time was reduced by around 50%."
In 2024, Microsoft leveraged UXPin Merge to align its Fluent design system with the editor. With just 3 designers, they supported 60 internal products and over 1,000 developers, maintaining a unified source of truth between design and code. Similarly, PayPal adopted Merge and found code-backed prototypes far superior to static mockups for internal tool development.
Once your library is connected, you can use GPT-4.1 to create layouts. The AI works exclusively with the MUI components you’ve loaded, ensuring every design it generates aligns perfectly with your codebase. With your library ready, you’re all set to build intelligent prototypes using GPT-4.1.
sbb-itb-f6354c6
Using GPT-4.1 to Generate Prototypes
Enabling GPT-4.1 in the UXPin Canvas
Once your MUI library is loaded, you can activate GPT-4.1 right inside the UXPin canvas. Start by opening the AI Component Creator tool and selecting GPT-4.1 from the model dropdown menu. This model is built to create structured layouts that can handle intricate designs involving logic, text, and visuals.
You can provide input in multiple ways: through text descriptions, image uploads, or even by pasting from your clipboard. For instance, you might describe a dashboard layout in plain text, upload a hand-drawn sketch, or paste a screenshot. GPT-4.1 will interpret your input and populate the canvas with functional MUI components.
The AI works exclusively with the MUI library you’ve connected, ensuring your designs stay consistent with your production codebase. This eliminates the trial-and-error process and minimizes the rework often required with AI-generated designs.
Once GPT-4.1 is active, the next step is to focus on crafting accurate and clear prompts for generating your designs.
Writing Prompts for Design Generation
With GPT-4.1 ready to go, your focus shifts to providing it with well-structured prompts. The model takes instructions literally, so clarity and precision are key. For example, instead of saying, "create a form", you could specify, "create a sign-up form using MUI TextField components for email and password, with a contained primary MUI Button labeled ‘Sign Up’ at the bottom."
Using exact MUI component names like "MUI AppBar", "MUI Card", or "MUI DataGrid" helps the model choose the correct elements for your layout. You can also include negative instructions, such as "Do not use custom CSS; rely exclusively on MUI system props and theme overrides".
For more complex designs, break your instructions into smaller sections. For instance, start by generating the navigation, then move on to the content area, and finish with the footer. This step-by-step approach ensures accuracy and alignment with your system. After GPT-4.1 generates a layout, you can fine-tune it using the AI Helper (marked by the purple "Modify with AI" icon). This tool allows you to adjust properties like spacing, colors, or typography without manually editing each component.
This method ensures seamless integration of MUI components, speeding up the process from prototype to production.
Real-world examples highlight the benefits of GPT-4.1. In early 2025, Hex implemented the model and achieved nearly double the accuracy in SQL evaluation sets. The model’s improved reliability in selecting the right tables from ambiguous schemas significantly reduced manual debugging. Similarly, Windsurf reported in April 2025 that GPT-4.1 was 30% more efficient in tool usage and 50% less likely to repeat unnecessary edits compared to GPT-4o.
| AI Model | Strength in UXPin | Best Use Case |
|---|---|---|
| GPT-4.1 | Structured layouts | Complex designs combining logic, text, and visuals |
| GPT-5-mini | Speed and efficiency | Quick tests and layout variations |
| Claude Sonnet 4.5 | Smooth, consistent designs | Layouts requiring clear structure and balance |
Customizing and Testing Your Prototypes
Editing AI-Generated Designs
Fine-tuning AI-generated prototypes to match your exact design specifications is simple with UXPin. The platform offers two primary ways to refine designs without needing to write code. First, the Properties Panel lets you manually tweak specific MUI properties like color, size, or variant for individual components. This gives you precise control over each design element.
For quicker iterations, you can rely on the AI Helper. Instead of navigating through menus, you can type natural language commands such as "make this denser" or "increase the spacing between these cards." To get the best results, be as specific as possible. For instance, instead of saying, "make the label bigger", try something like, "The label should have a font size of 16px and be bold".
Additionally, the Theming feature allows you to apply brand-wide styles to all AI-generated elements in one go. This ensures consistency across your prototype without needing to edit each component individually.
Testing Interactions and Logic
After completing the visual adjustments, it’s time to test the functionality of your design. UXPin’s Preview Mode enables you to interact with your prototype – click buttons, fill out forms, and navigate between screens to confirm everything behaves as intended. The platform also supports conditional logic, allowing you to build "if/then" scenarios. For example, you can display an error message if a form field is left empty or show different content based on user selections.
Thanks to GPT-4.1’s capabilities in managing complex designs that combine logic, text, and visuals, your prototypes can include advanced behaviors right from the start. Test all user paths and edge cases thoroughly. If something doesn’t work as expected, you can either use the AI Helper to adjust the logic or manually edit the component’s properties. This ensures any usability issues are addressed before handing the prototype over to your development team.
Exporting Production-Ready Code
Moving from Prototype to Production
Once your prototype has been thoroughly tested and refined, exporting production-ready code becomes straightforward. With Adalo and UXPin Merge, you can generate production-ready JSX directly from your MUI-based designs. This means developers receive functional React code that perfectly matches the design specifications.
By opening your project in Spec Mode or StackBlitz, you can access live, production-ready code along with detailed documentation. Spec Mode provides developers with everything they need, including component properties, assets, and style guides. This eliminates the design handoff challenges where developers spend hours translating static designs into code.
UXPin Merge uses a MUI library containing over 90 interactive, front-end-ready components. This seamless transition from design to deployment is supported by GPT-4.1’s precise, code-driven outputs. Developers get immediate access to dependencies, interactions, and auto-generated JSX specifications – tools that are essential for speeding up the deployment process.
Maintaining Consistency Across Teams
Once the code export is complete, enterprise teams can depend on consistent, up-to-date components. For large teams, maintaining consistency is critical. UXPin Merge ensures that every component in the design phase is exactly the same as what developers use in production. This single source of truth prevents design drift and keeps teams aligned as projects grow.
Custom MUI libraries connected through Git automatically sync updates in the design editor. This ensures that designers always work with the latest components, reducing errors and improving efficiency.
Erica Rider, a UX Architect, shared her experience:
"We synced our Microsoft Fluent design system with UXPin’s design editor via Merge technology. It was so efficient that our 3 designers were able to support 60 internal products and over 1,000 developers".
This kind of scalability is only achievable when design and development work from the same set of production-ready components, ensuring a streamlined and efficient workflow from start to finish.
From Prompt to Interactive Prototype in under 90 Seconds
Conclusion
By leveraging GPT-4.1 alongside MUI components in UXPin Merge, product teams can revolutionize their prototyping process. Forget static mockups – this method lets you work directly with production-ready components from the start, cutting out the inefficiencies of traditional handoffs.
With GPT-4.1, you can generate layouts in under 90 seconds using code-backed components. Paired with MUI’s robust library and automatic Git/npm syncing, every element aligns perfectly with what developers ship. This ensures your team operates with a single source of truth, maintaining consistency across projects.
For enterprise teams, this approach eliminates design drift entirely. Updates to the design system automatically reflect across all projects, paving the way for faster deployment and tighter collaboration. The result? Seamless alignment between design and code, enabling quicker, more efficient workflows.
FAQs
How does GPT-4.1 simplify prototyping with UXPin Merge?
GPT-4.1 works seamlessly with UXPin Merge to simplify prototyping by using AI to craft smart UI layouts and design ideas from straightforward text prompts. This eliminates repetitive tasks, accelerates the design workflow, and ensures prototypes are built with production-ready MUI components.
With GPT-4.1, teams can quickly create interactive, code-based prototypes while keeping designs consistent and fostering better collaboration between designers and developers.
What are the advantages of using code-backed components in UXPin?
Using code-backed components in UXPin brings several standout benefits:
- Prototypes That Feel Real: These prototypes mimic the actual product’s behavior, offering real interactivity. This makes testing and validation more accurate and insightful.
- Seamless Alignment: By keeping designs and code perfectly in sync, teams can avoid mismatches during handoffs, ensuring smoother collaboration between designers and developers.
- Quicker Development Cycles: Leveraging production-ready components simplifies workflows, speeds up deployment, and cuts down on rework.
This method streamlines processes, bridges the gap between design and development, and helps teams deliver polished products more efficiently.
How can I maintain consistency across projects with UXPin Merge?
With UXPin Merge, you can maintain consistency across all your projects by relying on a centralized design system that directly integrates with your prototypes. This tool allows you to sync real React components – such as MUI – into your designs. The result? Every project adheres to the same standards and uses identical components. Plus, when the component library gets updated, those changes are automatically applied across all prototypes, keeping everything perfectly aligned.
By treating code as the single source of truth, designers and developers work with the same components. This approach improves collaboration, reduces errors, and ensures everyone is on the same page. The streamlined workflow makes it easier for teams to deliver consistent, polished designs that stay faithful to the original vision throughout the product’s development.

