Building user interfaces has never been more efficient. By combining Claude Sonnet 4.5, shadcn/ui, and UXPin Merge, you can quickly create production-ready UIs without the usual design-to-development friction. Here’s how these tools work together:
- Claude Sonnet 4.5: Generates UI layouts from natural language prompts.
- shadcn/ui: A library of React components that are accessible, customizable, and ready for production.
- UXPin Merge: Lets you design with actual code-based components, eliminating the need for developers to recreate designs.
This workflow ensures that what you design is exactly what gets shipped. Whether you’re generating layouts, assembling prototypes, or refining designs, these tools simplify the process while maintaining consistency across your team. Ready to learn how to set up and use them? Let’s dive in.
Design with Claude Code: The Designer’s Guide
sbb-itb-f6354c6
Setting Up Your Tools
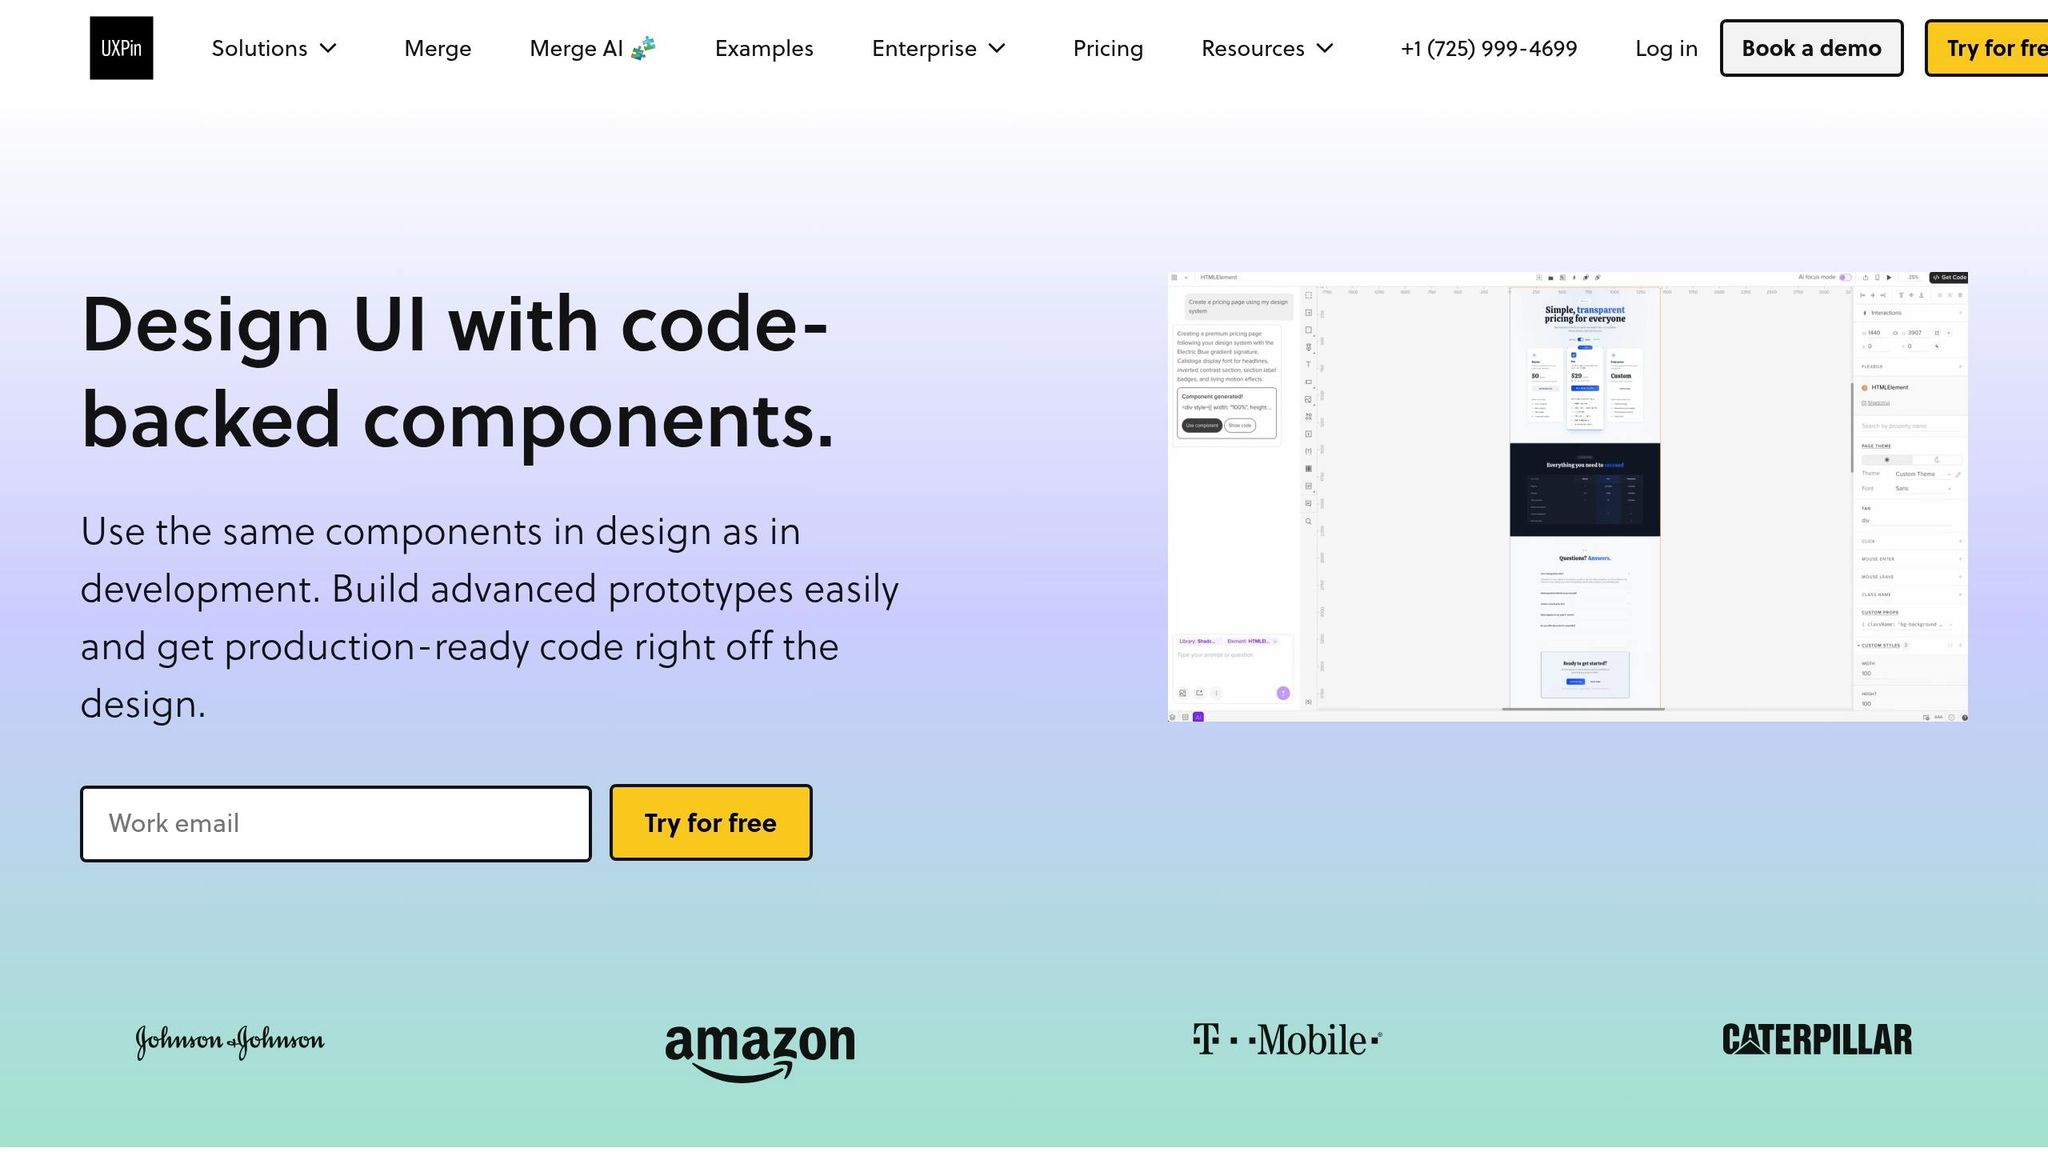
UXPin seamlessly integrates Claude Sonnet 4.5 and shadcn/ui into its platform, so you don’t need separate accounts or API keys for basic workflows.
How to Access and Configure Claude Sonnet 4.5
With UXPin, you can access Claude Sonnet 4.5 directly from the canvas – no need for an Anthropic account for standard use. UXPin plans include AI credits: Core users get 200, Growth users 500, and Enterprise plans offer custom limits.
For developers working with Claude Sonnet 4.5 outside of UXPin, an Anthropic account is required. The API pricing is $3 per 1 million input tokens and $15 per 1 million output tokens. One standout feature of Claude Sonnet 4.5 is its token tracking, which prevents context overflow and allows it to stay focused on tasks for 30+ hours – a significant improvement over earlier models, which managed around 7 hours. Developers can also use the VS Code beta extension, which offers handy features like inline diffs and a searchable prompt history for smoother workflows.
When crafting prompts for UI generation, be as specific as possible. For example, instead of saying, "create a dashboard", try something like, "create a three-column dashboard layout with a sidebar navigation, a central data table, and stats cards on the right using shadcn/ui components." This level of detail ensures better results.
Next, let’s look at how shadcn/ui integrates effortlessly with UXPin Merge.
Connecting shadcn/ui with UXPin Merge
shadcn/ui is already built into UXPin Merge, so there’s no need for manual setup. Open UXPin, and you’ll find shadcn/ui components ready to use in the design library, alongside other options like MUI, Ant Design, and Bootstrap.
These aren’t just static mockups – they’re fully functional React components. For example, when you drag a Button or Card into your canvas, you’re working with real code that includes props, states, and behaviors. Any changes you make in UXPin will reflect exactly how the component will behave in the final product.
For teams with custom component libraries, UXPin’s Enterprise plan supports Git integration and custom library connections. This allows you to import your own design system into UXPin Merge and use it alongside – or instead of – the built-in libraries. For more details or to set up custom integrations, email sales@uxpin.com.
Now, let’s ensure these tools work together smoothly in your design environment.
Making Sure Your Tools Work Together
When generating layouts with Claude inside UXPin, the AI only suggests components already available in your library. This ensures that all AI-generated designs align with your design system.
To test the integration, try generating a simple form layout using Claude and confirm that shadcn/ui components appear correctly. Check that the props are editable and the interactive states function as expected.
Here’s a tip: Claude Sonnet 4.5 performs 61.4% on the OSWorld benchmark for computer-use skills, a major leap from the 42.2% scored by earlier models. This means it has a much better grasp of UI structure and component relationships. Take advantage of this by asking it to explain its layout choices or suggest alternative designs. It can serve as a collaborative design partner, not just a tool for generating code.
How to Build UIs: Step-by-Step
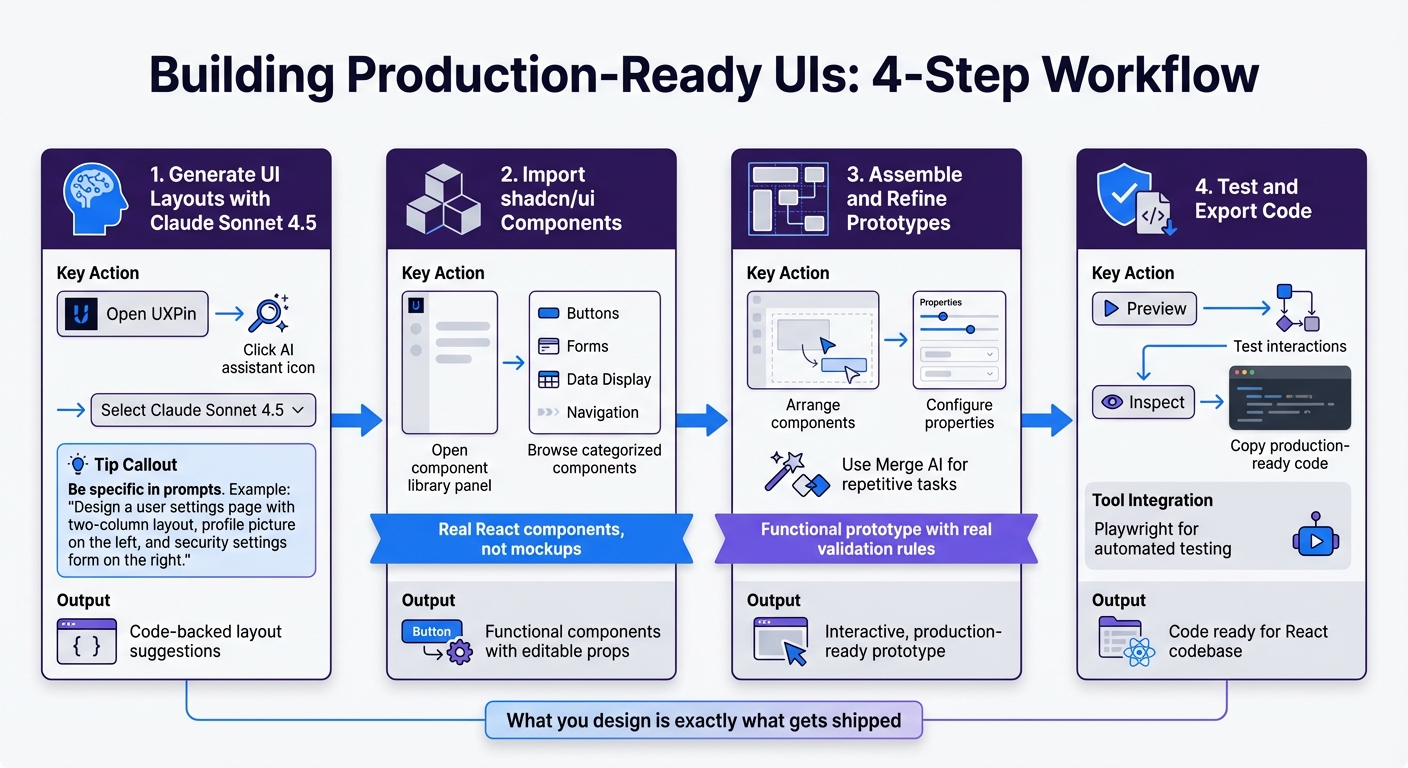
4-Step Process to Build Production-Ready UI with Claude Sonnet 4.5 and shadcn/ui
Now that your tools are ready, let’s dive into the workflow. This guide will show you how to use Claude Sonnet 4.5, shadcn/ui components, and the UXPin Merge code-backed canvas to create interfaces that are ready for production.
Step 1: Generate UI Layouts with Claude Sonnet 4.5
Start by opening UXPin and clicking the AI assistant icon in the canvas toolbar. From there, select Claude Sonnet 4.5 – no need for a separate login.
To get the best results, write a detailed prompt describing your UI requirements. For example, instead of a vague request like "create a settings page", be specific: "design a user settings page with a two-column layout. The left sidebar should have navigation tabs for Profile, Security, and Notifications, while the right section includes form fields using shadcn/ui Card and Input components." The more precise your description, the better Claude will interpret your needs.
Claude will create a layout using only the shadcn/ui components from your UXPin library. These suggestions are fully code-backed and ready to use. If the layout isn’t quite right, refine your prompt to generate improved versions.
Once your layout is ready, you can move on to integrating the shadcn/ui components.
Step 2: Import shadcn/ui Components into UXPin Merge
Since shadcn/ui is already part of UXPin, there’s no need for extra setup. Simply open the component library panel on the left side of your canvas, where you’ll find shadcn/ui components neatly categorized – Buttons, Forms, Data Display, Navigation, and more.
These components are real React elements. For instance, dragging a Button onto the canvas allows you to adjust properties like size, variant, or disabled state directly in the properties panel. Any changes you make here will behave exactly as they will in the final product.
Step 3: Assemble and Refine Your Prototypes
Using your generated layout and the shadcn/ui components, start building your prototype on the UXPin canvas. Arrange components to match the layout, and configure their actual properties. This isn’t just a static mockup – it’s functional.
For example, if you’re creating a data table, you can set real column definitions, sorting options, and pagination. For forms, you can configure validation rules and error states that will work seamlessly in production.
To speed up repetitive tasks, use Merge AI. It can duplicate layouts, adjust spacing, or suggest alternative component arrangements, all while staying within your design system’s guidelines.
Step 4: Test Interactivity and Export Code-Ready Designs
Click Preview to test your live prototype. You’ll be able to interact with elements like form inputs, buttons, and navigation tabs, just as users will in the final product. Test flows, fill out forms, and ensure conditional logic functions correctly.
For more thorough testing, tools like Playwright can validate UI interactions programmatically. This helps reduce automation errors, increase test coverage, and streamline the design handoff to development.
Once the prototype meets your expectations, click Inspect on any element to view its production-ready code. Developers can copy this code directly into the React codebase without needing to rebuild components. Since UXPin uses the same components that developers will deploy, what you design is exactly what gets shipped.
Practical Applications and Best Practices
Use Case: Speeding Up Enterprise UI Development
Enterprise teams often face the challenge of delivering projects quickly without compromising quality. By combining tools like Claude Code agents, shadcn/ui, and UXPin Merge, teams can bypass the traditional design-to-development translation process and accelerate workflows.
In August 2025, developer Thakur Hansraj Singh led a 5-day sprint for the "InterviewAgent" project. The goal? Transform an unstable prototype into a fully deployable job automation platform. Using Claude Code agents, shadcn/ui components, and Playwright for automated testing, the team achieved impressive results:
- Test coverage jumped from 23% to 89%.
- Automation success hit 100%.
- UI load times improved by 44% (from 3.2 seconds to 1.8 seconds).
- The code quality score rose from B- to A+.
"Claude Code’s specialized agents eliminated weeks of manual development work. The Bug-Hunter agent alone saved 3–4 days of debugging." – Thakur Hansraj Singh, Developer
This success highlights a key takeaway: start with production-ready components. Instead of creating mockups that developers need to rebuild, the team used shadcn/ui elements directly within UXPin, ensuring designs were aligned with the actual codebase. Validating design decisions with the component library also made it possible to extract code directly, streamlining the entire process.
Best Practices for Component-Driven Design
The lessons from the InterviewAgent project offer valuable insights for refining component-driven workflows:
- Focus on reusable components: When you use shadcn/ui elements like Buttons or Forms in UXPin, you’re working with the same React components that developers will deploy. This creates a unified workflow and ensures consistency across design and development.
- Automate testing early: Tools like Playwright can catch issues with interactive elements or visual regressions before they make it to production. This is especially important for complex UI effects or animations.
- Standardize validation patterns: Avoid generic error messages like "invalid input." Instead, implement specific validation rules – for example, using user_id validation to prevent system crashes while providing clear, actionable feedback.
- Integrate real data early: Swap out mock data for actual API responses during the refinement phase. This approach helps uncover edge cases and ensures the prototype delivers real value to users from the start.
Conclusion
Creating UIs with Claude Sonnet 4.5, shadcn/ui, and UXPin Merge brings design and development closer together by starting with production-ready components. This approach helps enterprise teams go from initial concepts to deployment in just days instead of months.
One standout benefit of this workflow is its focus on component-driven design. By using the same React components for both prototyping and production, you avoid unnecessary translation steps and reduce the typical friction during design handoffs.
For teams working under tight deadlines and aiming for high-quality results, this stack offers a practical solution. It combines the speed of AI-assisted layouts, the dependability of well-established component libraries, and the accuracy of code-based design systems – all within a unified process.
With this approach, UI development no longer requires a choice between speed and quality. These tools make it possible to achieve both, helping teams accelerate their workflows and launch products faster with consistent results.
FAQs
How do I connect my own component library to UXPin Merge?
To link your component library to UXPin Merge, you’ll need to sync it with UXPin using your Git or npm repository. This setup allows you to bring production-ready components directly into UXPin, ensuring they’re always up to date and ready for use in prototypes. Once connected, you can simply drag and drop components, making the design-to-development workflow smoother and more efficient with code-based design systems.
Can Claude use only the shadcn/ui components in my library?
Claude is compatible with component libraries like shadcn/ui, Ant Design, and Bootstrap when used with UXPin Merge. However, there’s no indication that Claude is restricted to just shadcn/ui components. Instead, it can generate and incorporate shadcn/ui components into your design system for seamless prototyping and development within UXPin.
How do developers copy production-ready React code from UXPin?
Developers can generate production-ready React code directly from UXPin using UXPin Merge. This feature integrates React components with designs, enabling the export of clean, structured JSX code that mirrors the prototype. By removing the need for manual handoffs, it ensures the exported code perfectly aligns with the design and is ready for deployment.