Wireframes: What They Are & How They Support UX

What Is A Wireframe? The Backbone of UX & Design
The logical place to start any design process is with a rough wireframe to begin laying the foundation of visual design, user interface and user experience.
This basic documentation is simple enough to start from scratch but complex enough to act as a solid foundation going forward. The wireframe creates the structure—the backbone—of your entire project layout, making it easier to later build individual parts.
UX designers seem to have mixed opinions about wireframing, with some calling them a waste of time. But now that new technology enables designers to add interactivity within seconds, letting them quickly create low-fidelity prototypes, static wireframes are no longer dead-end deliverables.
What Is a Wireframe?
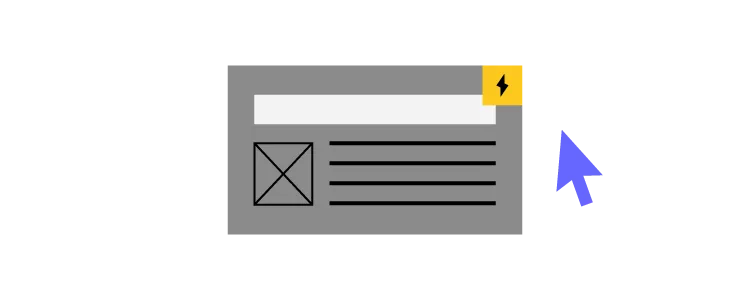
A wireframe is a low-fidelity, simplified outline of your product. You can usually recognize them by their distinctive block layouts, use of lines to represent text, and “✕” squares indicating placeholders for future images.
This barebones style makes wireframes a great tool early on, giving you time to cement your content architecture before diving into the details. Moreover, their simplicity is forgiving of mistakes and allows you to experiment, which takes some of the hassle out of designing the overall structure.
Wireframes Compared to Other Design Documents
The terminology used in design documentation often gets used interchangeably, so let’s clarify the differences.
Think of wireframes as the skeleton. They loosely shape the final product, giving you a reliable idea of where everything will eventually go. The content is the muscle (and can be as meaty or trim as you want).
Wireframes vs. Mockups
Next comes the mockup — the skin. Mockups are strictly visual. This is the documentation where you solidify your visual decisions, experiment with variations, and (optionally) create pixel-perfect drafts. With things like UI kits, you can speed up user interface design so much that the mockup is built within minutes.
Wireframes vs. Prototypes
With the prototype, you breathe life into your creation. Prototypes test your interface ideas and generate the feedback necessary to keep the design headed in the right direction. Prototypes can (and should) be used during every stage of the design process, and can be in any fidelity. As we’ll discuss below, you can even make a lo-fi prototype by adding interactivity to a wireframe.
Remember that wireframes are only a means to a prototype. In other words, prototypes are the most functional, useful documentation you can create. Wireframes just help you focus the placement of content for your prototype.
Types of Wireframes
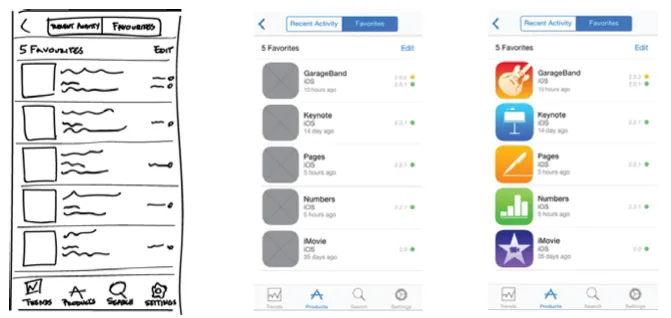
Most designers start by sketching wireframes on paper. Paper is faster and easier, but makes sharing with teams more difficult. And if you need to reference them often, the process inevitably takes longer.

Since wireframes are stepping stones to prototypes, you will eventually throw away your paper wireframes. One way to keep them useful is converting them into paper prototypes for usability testing: one person plays the role of the human computer, while the other person takes notes. This form of prototyping works well if you want to explore experimental concepts quickly and with minimal risk.
Some digital tools actually allow you to convert paper wireframes and prototypes into a collaborative digital tool.
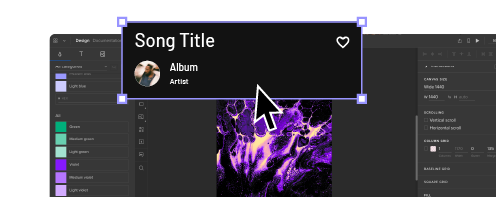
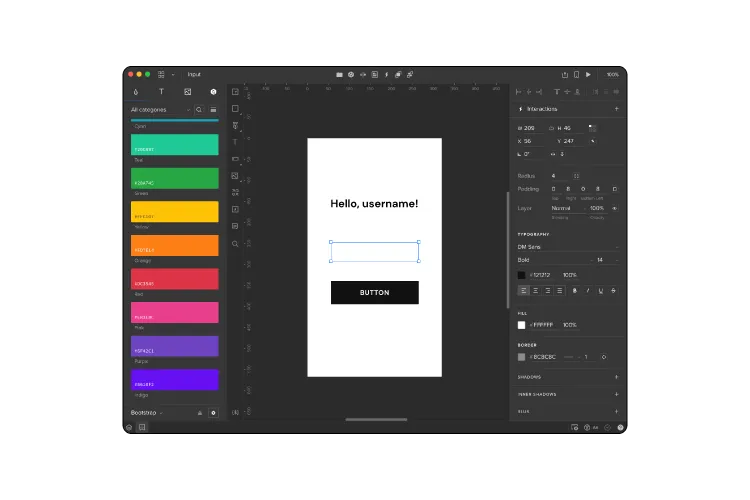
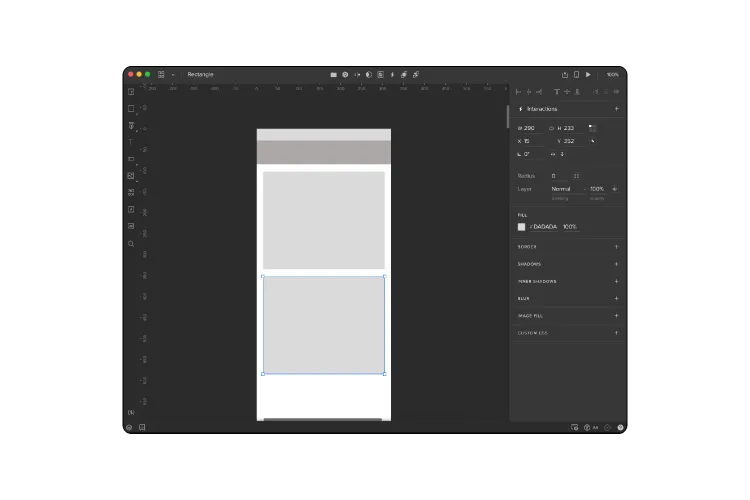
The advantages of digital wireframes are clear: they can be shared instantaneously and convert into digital prototypes easier. As shown above, you can also add interactions directly by using simple and easy drag-and-drop, turning your wireframe into a lo-fi prototype in a matter of minutes. This lets you use (and test) the same document throughout the entire design process, making tools like Adalo — which pairs AI-powered generation with a visual multi-screen canvas — particularly valuable for teams looking to move from wireframe concepts directly into functional, database-driven applications.
Join the world’s best designers who use UXPin.
Sign up for a free trial. Try it for free!
When Should You Wireframe?
Wireframing is most useful at the beginning, when much of the product’s structure is still up in the air.
The benefit lies in visualizing the structure of a concept, but at a step above sketching. For example, you can sketch five different layouts for a product page, compare them side-by-side, and then narrow them down to three based on the visual flow for a wireframe.
In later stages, the details have already been hammered out, so this kind of experimental structuring isn’t as useful.
Design Processes That Incorporate Wireframes
Sketch To Code Process
- Sketch
- Wireframe
- Lo-Fi Prototype
- Hi-Fi Mockup
- Hi-Fi Prototype (Rapid)
- Code
The standard (and safest) design process doesn’t cut any corners.
Initial sketching eliminates some of the less promising ideas prior to wireframing. The wireframe then sets the stage, suggesting the best proposals for content structure. Next, a lo-fi prototype is created from the wireframe itself by adding interactivity; this is tested for valuable early-stage feedback that can be incorporated before fine-detailing takes place.
A high-fidelity mockup would then finalize the visuals that are incorporated into a new prototype. A series of rapid prototyping (multiple quick prototypes that integrate feedback with each iteration) prepares the product for its final stages in coded development.
Wireframe to Code Process
- Wireframe
- Lo-Fi Prototype
- Hi-Fi Mockup
- Code
While the scenario above is a more complete process, some teams don’t have the necessary resources. Here is the leanest possible design process we’d recommend.
First, all concepts are illustrated in the wireframe instead of sketching. From there, we transform the wireframe concepts into a lo-fi prototype so we can test the interaction design as early as possible. You want to test these user flows first to ensure that your design actually functions properly.
The project moves directly into finalizing the visuals with a mockup, then moving straight to production code. At this point, the designer and developer can continue testing and iterating in code.
Source: UXPin
Sketch To Code Cleanup Process
- Sketch
- Wireframe
- Coded Lo-Fi Prototype
- Coded Hi-Fi Prototype
- Code Cleanup
If you’re a designer with coding chops, you can start building your product’s technical foundation right from the beginning stages.
As before, initial concepts are honed through sketching and wireframing, but this time, the wireframe is then built as a coded, lo-fi prototype. The prototype is successively tested and reiterated into coded, hi-fi prototypes.
Toward the end, all residual dead weight code from the iterations is cleaned up.
Wireframe To Code Cleanup
- Wireframe
- Lo-Fi Prototype
- Coded Hi-Fi Prototype
- Code Cleanup
For designers who are comfortable coding high-fidelity elements, this process allows them to bypass Photoshop and Sketch. The wireframe is turned into a lo-fi prototype and tested repeatedly until core usability issues are resolved.
Once that happens, a hi-fi prototype is created in code and again tested until a satisfactory version is reached. The code is again cleaned up.
No Hi-fi Wireframes
No matter which process you choose, one thing remains the same: Wireframes should always be low fidelity. That’s because hi-fi wireframes would be a waste of time—it’s not their role to pin down fine details.
All processes follow the same basic progression:
information structure => user flows/interaction design => visual fidelity.
In other words, the benefit of wireframes runs out by the time you tackle visuals.
Source: UXPin based on JFarny
Website Wireframes for Responsive Design
Responsive design places more emphasis on a website’s structure and layout, making wireframes especially useful, even necessary. Wireframing for each device keeps an otherwise chaotic process in order and ensures the final product turns out the way you want.
For responsive websites, we recommend the process Professor Tom Green describes in our free ebook, The Guide to Interactive Wireframing:
- Create a Content Inventory — List all the elements for each page, then organize them by priority so you know what should be seen prominently on each page.
- Start with Mobile-first — Beginning with your smallest screen helps create a consistent experience across devices—better to add things progressively than figure out what to take away.
- Place Content Blocks — Before diving into details, divide the screen into large, vague blocks for content. This helps maintain consistency across devices.
- Detail the Blocks — Once the blocks are finalized, add details like links, placeholders for images, sizes, numbers of rows, etc.
Throughout the process, keep thinking about the final prototype you’re working toward. Each of these wireframes can be tested and fine-tuned for better accuracy.
Refining Your Wireframing Process
This article is more than just a summary of the what, why, and how of wireframes—we’ve also filled it with resources if you’d like to learn more.
Our free ebook The Guide to Wireframing includes 150+ pages of advice on lo-fi static wireframing. If you’re interested in creating fast clickable prototypes, download the free ebook The Guide to Interactive Wireframing, as mentioned above. There’s also I ♥ wireframes, a tumblr blog dedicated to wireframing news.
For more on the other aspects of the design process, check out these additional free ebooks: