Building user interfaces just got faster and easier. By combining GPT-4.1‘s ability to generate React components from text prompts with UXPin Merge‘s support for design systems, you can create production-ready UIs without the usual back-and-forth between designers and developers. Here’s how it works:
- GPT-4.1 generates functional UI components based on natural language prompts, ensuring alignment with your design system.
- UXPin Merge integrates these components directly into your design workflow, using the exact React code developers will implement.
- This process eliminates redundant design handoffs, reduces inconsistencies, and speeds up development.
Key Steps:
- Set Up Tools: Get access to GPT-4.1’s API and link your design system to UXPin Merge.
- Generate Components: Use clear prompts to guide GPT-4.1 in creating components aligned with your design tokens.
- Refine & Import: Ensure outputs match your design standards, then import them into UXPin Merge.
- Test & Automate: Test components in UXPin and set up CI/CD pipelines for seamless updates.
- Scale Efficiently: Manage AI resources and establish governance for consistent results.
This workflow bridges the gap between design and development, saving time and ensuring your UI matches your design system from the start.
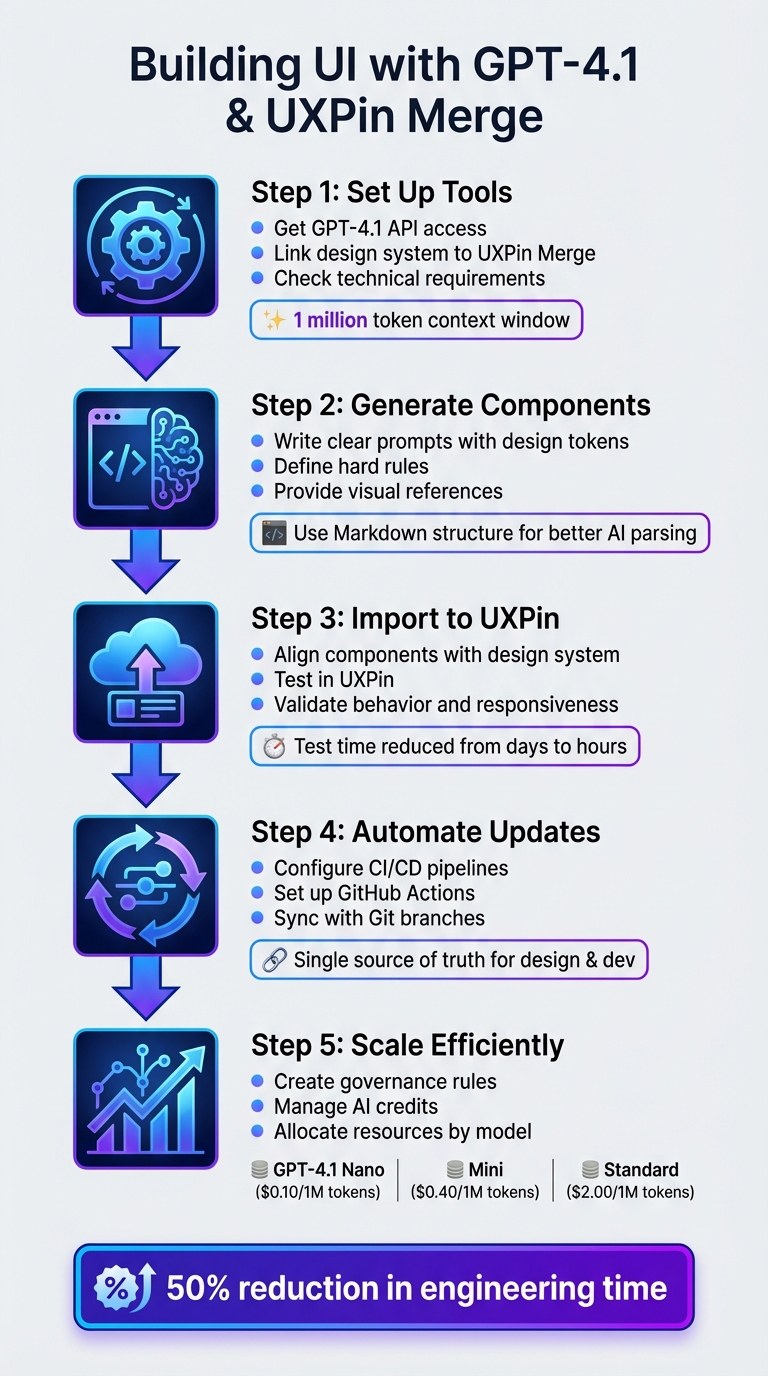
5-Step Workflow for Building UI with GPT-4.1 and UXPin Merge
UXPin Merge AI: Smarter UI Generation That Follows Your Design System
sbb-itb-f6354c6
Step 1: Set Up Your Tools and Accounts
Before diving into generating UI components, make sure both GPT-4.1 and UXPin Merge are properly configured. This involves three key steps: obtaining access to GPT-4.1’s API, linking your design system to UXPin Merge, and ensuring your technical setup is ready.
Set Up Your OpenAI GPT-4.1 API Access
Start by creating an account on the OpenAI Developer platform. From there, generate your secret API key via the API Dashboard. This key is essential for authenticating all requests to GPT-4.1, so include it in the Authorization header for every API call.
GPT-4.1, launched on April 14, 2025, is only accessible through the OpenAI API – it’s not available in the standard ChatGPT interface. When making requests, specify the model you’re using (e.g., gpt-4.1, gpt-4.1 mini, or gpt-4.1 nano) to ensure compatibility. The full GPT-4.1 model supports a 1 million token context window, which allows it to process detailed design system documentation and complex component libraries in a single go.
"GPT-4.1 is only available in the OpenAI API." – James Gallagher, Technical Writer, Roboflow
To ensure precise outputs, enable Structured Outputs from the start. This feature lets you define a specific JSON schema, ensuring GPT-4.1 generates components that align with your design system’s requirements. Use strict: true in your json_schema configuration and set additionalProperties: false to avoid unsupported CSS properties or component props.
Once you have your API key, you can move on to integrating your design system with UXPin Merge.
Configure UXPin Merge with Your Design System
After setting up GPT-4.1 API access, the next step is connecting UXPin Merge to your design system.
If you’re using libraries like MUI, Ant Design, Bootstrap, or ShadCN, you can skip this step – these libraries are already integrated with UXPin, so you can start designing directly on the UXPin canvas. For custom design systems, however, you’ll need to configure UXPin Merge.
Begin by compiling your resources, such as Storybook specs, Tailwind tokens, component libraries, and internal playbooks. Converting these into Markdown format is a smart move – it makes parsing easier for AI tools, preserves the content structure, and speeds up processing. Define key design tokens upfront, like background, surface, primary text, and muted text. These tokens are critical for maintaining consistency across all AI-generated components.
Once your documentation is ready, link your design system repository to UXPin Merge. This connection ensures that all components in your prototypes are backed by the same React code your development team will use.
Check Technical Requirements
Before proceeding, double-check that your development environment meets all necessary technical requirements.
You’ll need Node.js installed locally, access permissions for syncing your design system repository, and command-line tools for running build scripts. Keep your API key secure – don’t hardcode it into your application.
Make sure your system can handle API requests with the correct headers. The content-type should be set to application/json, and your authorization header must include the API key formatted as "authorization": "<YOUR_API_KEY>". If you’re working with a team, confirm that everyone has the proper permissions on both the OpenAI Developer platform and your UXPin workspace.
Following these steps ensures that the AI-generated components integrate seamlessly with your design system, setting the stage for efficient UI development.
Step 2: Generate UI Components with GPT-4.1
Now that your tools are set up, it’s time to create UI components that align with your design system. The key here is crafting precise prompts to guide GPT-4.1 effectively.
Write Clear Prompts for Component Generation
Start every prompt by defining your design tokens – these include elements like background, surface, primary text, muted text, and accent. This ensures consistency across the components you generate. Use Markdown structure to organize your prompts, breaking the UI into sections like ## 1. Header, ## 2. Feature Grid, and ## 3. Footer. This structure helps GPT-4.1 understand the layout and maintain a logical flow.
"Markdown naturally has a content hierarchy… offers a logical grouping of UI sections, and provides better readability for both humans and AI models." – Nick Babich, Product Designer
Set strict rules to avoid generic patterns. For example, include instructions like "No cards by default", "Brand first", or "Two typefaces maximum". These rules help the model avoid relying on overused design elements that may not fit your brand. If your design system avoids card containers and instead uses whitespace and dividers, make sure to state this explicitly.
Whenever possible, provide visual references. Upload screenshots of existing designs from your system and ask GPT-4.1 to "Describe this screen" before generating new components. This helps the model understand your visual style, including spacing, density, and typography.
Keep the reasoning level low to medium to avoid overcomplicating simple requests. Be specific about platform requirements – mention whether you’re designing for iOS, Android, or Web. Also, include details like "32px rounded icons" to ensure the model delivers platform-appropriate designs.
| Prompt Element | Purpose | Example |
|---|---|---|
| Visual Thesis | Sets the mood and energy | "Premium, dark-mode dashboard with high-density data." |
| Design Tokens | Ensures color/type consistency | "Primary: #007AFF; Typography: Inter for body, Playfair for headers." |
| Hard Rules | Prevents generic AI habits | "No cards; use whitespace and dividers for separation." |
| Content Plan | Defines the narrative flow | "1. Hero, 2. Feature Grid, 3. Social Proof, 4. Footer." |
Once you’ve crafted your prompt, review the output from GPT-4.1 and refine it as needed.
Refine AI-Generated Components
After GPT-4.1 generates a component, check if it aligns with your design system. Look for consistency in the use of design tokens, spacing, and typography. If the code includes hardcoded colors or spacing, ask the model to revise it using CSS variables for all design tokens.
Start by requesting pseudocode to verify the logic. Then, move on to generating the final code, using self-review prompts to ensure everything adheres to your design guidelines. This process helps you catch issues like poor color contrast, missing ARIA labels, or inconsistent spacing.
For complex components, break them down into modules. Ask GPT-4.1 to split the code into smaller files, each under 100 lines. This makes it easier to maintain quality, avoids hitting token limits, and simplifies integration into tools like UXPin Merge.
Once the components meet your design system’s standards, you can confidently import them into UXPin Merge for further use.
Step 3: Import Components into UXPin Merge
Bring your refined GPT-4.1 components into UXPin Merge to create UI elements that are ready for production.
Align AI Components with Your Design System
Take the components you’ve generated and refined with GPT-4.1 and ensure they align with your UI design system framework. Double-check that the code matches the structure and conventions of your design system. Input all validated design resources, such as Storybook specs, Tailwind tokens, and component libraries. Providing detailed context helps the AI better understand your naming conventions and preferred patterns.
"Mike recommends collecting your design resources in markdown format when possible – it’s easier for the assistant to parse, keeps the structure nice and clean, and maintains content hierarchy without excess HTML." – Arielle Johncox, Head of Marketing & CX, Balsamiq
If you’re working with UXPin’s built-in libraries like MUI, Ant Design, ShadCN, or Bootstrap, the AI Component Creator can automatically map your prompts to these systems. For custom libraries, you can connect your Git repository through UXPin Merge. This ensures the AI uses your actual coded components rather than generic templates.
This phase builds on your earlier refinements by ensuring the code adheres to your design system standards. Use a decoupled pattern where data-processing logic is kept separate from rendering logic. This approach ensures the UI only renders after the data is validated.
Test Components in UXPin
Once the components are aligned and imported, it’s time to test their performance. Test their behavior directly in UXPin. Modify properties and switch between themes to confirm the elements respond as expected while maintaining consistency with your design tokens and coding standards. Use variables, expressions, and conditional logic to simulate real user flows and identify any edge cases before deployment.
"What used to take days to gather feedback now takes hours. Add in the time we’ve saved from not emailing back-and-forth and manually redlining, and we’ve probably shaved months off timelines." – Mark Figueiredo, Sr. UX Team Lead, T.RowePrice
Run quick 15–20 minute tests to refine component logic and check for any misinterpretations or missing details. Test interactive states, responsiveness across different breakpoints, and accessibility features like ARIA labels. If a component doesn’t align with your visual density or tone, compare it against high-fidelity mocks from similar projects.
Step 4: Automate Component Updates with CI/CD
Streamline the connection between your repository and UXPin Merge by automating component updates. After successfully testing components in UXPin, this step ensures a smoother workflow between development and design.
Configure CI/CD Pipelines for Component Sync
Set up your Git repository to work seamlessly with UXPin Merge, creating a single source of truth for your design and development teams. By using GitHub Actions, every time you push AI-generated code, an automated build and sync process is triggered.
To keep things organized, separate AI-generated code from server logic. For instance, you could store source files in a directory like app/web/src and the bundled output in app/web/dist. Add a build script to your package.json file to bundle the component code and initiate a GitHub Actions workflow with every push.
In UXPin Merge, configure it to monitor specific Git branches. This setup ensures that any updates to themes, tokens, or components are reflected in the design editor. For global styling changes, syncing through npm ensures your UXPin Merge library stays up-to-date with the latest design tokens.
"We synced our Microsoft Fluent design system with UXPin’s design editor via Merge technology. It was so efficient that our 3 designers were able to support 60 internal products and over 1000 developers." – Erica Rider, UX Architect and Design Leader
With this CI/CD pipeline in place, your team can focus on maintaining version control and staying aligned on updates.
Maintain Consistency Across Teams
Adopt a decoupled architecture to separate data-processing tools from rendering tools. This approach minimizes unnecessary re-renders and avoids version conflicts.
Make sure your CI/CD pipelines and AI tools have access to the latest design system documentation, such as Storybook specs, Tailwind tokens, and component libraries. This ensures that the generated code consistently meets production standards.
"As your design system evolves or product decisions shift, update the assistant’s knowledge base so it keeps giving relevant, reliable feedback." – Arielle Johncox, Head of Marketing & CX, Balsamiq
To keep everyone informed, integrate your CI/CD pipelines with tools like Slack for real-time updates on component versions. Managing UI components with Git branches and tags allows your team to either update components automatically or switch library versions manually, giving you full control over the workflow. This level of automation reinforces the consistency and speed established in earlier steps.
Step 5: Scale AI-Driven UI Development
Once your CI/CD pipeline is in place, the next step is scaling the workflow across teams while ensuring quality and consistency. With updates and testing automated, this phase focuses on enabling broader collaboration without losing sight of standards.
Create Governance Rules for AI Components
After automating component updates, it’s essential to establish governance rules to maintain consistency across teams. Set up clear approval workflows to ensure AI-generated components meet organizational standards before they go live. Define roles for reviewing, approving, and deploying these components – this could involve design systems teams, senior developers, or product leads.
Develop a review checklist that includes key aspects like accessibility compliance, performance benchmarks, and adherence to design tokens. For example, make it mandatory for all AI-generated components to pass automated accessibility tests and align with your existing component library’s naming conventions. Tracking acceptance rates can help identify how often components are approved on the first review. This data is invaluable for refining your prompts and improving the output quality of GPT-4.1 over time.
To balance autonomy and consistency, assign individual Git branches to each team. This setup allows teams to experiment with AI-generated components while keeping the primary design system intact and approved.
Manage AI Credits and Team Collaboration
As the process scales, managing resources efficiently becomes crucial. Assign AI tasks to the most appropriate GPT-4.1 model based on cost and complexity:
- GPT-4.1 Nano: Ideal for high-volume tasks like autocompletion or component classification, costing $0.10 per 1 million input tokens.
- GPT-4.1 Mini: Suited for general content creation and mid-level reasoning at $0.40 per 1 million input tokens.
- GPT-4.1 Standard: Reserved for complex UI architecture tasks requiring deeper reasoning, priced at $2.00 per 1 million input tokens.
To further cut costs, implement caching for design system documentation. This strategy can reduce token usage by up to 75% when multiple team members are working with the same libraries or design tokens. Additionally, for tasks like automated bug detection or documentation generation, use the Batch API to save an extra 50% on credits.
"GPT-4.1 mini is a significant leap in small model performance… reducing cost by 83%." – OpenAI
Allocate credits across teams based on their workload and project complexity. For instance, teams working on intricate enterprise dashboards might require GPT-4.1 Standard, while those focused on marketing pages can efficiently use GPT-4.1 Mini. Keep an eye on credit usage through OpenAI’s dashboard and adjust allocations monthly based on actual usage patterns. This ensures you’re maximizing resources while maintaining the speed and consistency established earlier in the process.
Conclusion
This workflow showcases how GPT-4.1 integrates seamlessly with your custom design system through UXPin Merge. By combining AI-driven component generation with code-based design systems, you can produce production-ready components that align perfectly with your framework – whether that’s MUI, Ant Design, or a custom library connected via Git.
The impact is clear. Larry Sawyer, Lead UX Designer, shared his experience:
"When I used UXPin Merge, our engineering time was reduced by around 50%. Imagine how much money that saves across an enterprise-level organization with dozens of designers and hundreds of engineers."
With this approach, developers gain immediate access to React code and specifications, cutting down on design handoff challenges, reducing expenses, and speeding up time-to-market.
This method also ensures consistent design system governance at scale. By feeding GPT-4.1 your design tokens, Storybook specs, and component documentation, the AI produces outputs that align with brand standards from the start. It promotes uniformity across teams while fitting neatly into your existing workflow.
Rather than replacing human creativity, this shift enhances it. Designers can focus on refining AI-generated layouts that already meet production standards, freeing up time for more strategic and innovative decisions.
Adopting this streamlined approach can transform your UI development process and bring new efficiency to your design efforts.
FAQs
What do I need to connect my custom design system to UXPin Merge?
To link your custom design system with UXPin Merge, you’ll need to integrate your code components – such as React components – into the platform. Begin by forking UXPin’s Git repository and using the Merge boilerplate as your setup guide. This process connects your components to UXPin, helping to align design and development workflows for a smoother collaboration.
How do I prompt GPT-4.1 to generate React components that follow my design tokens?
If you want GPT-4.1 to create React components that match your design tokens, start by ensuring your design files are organized and use clear, consistent naming. This makes it easier to translate your design system into prompts.
When writing prompts, be specific about the tokens you want to include – such as color, typography, and spacing. For instance, you might say:
"Create a React button component using primary color #007bff, font size 16px, and border radius 4px."
By providing these details, GPT-4.1 can generate components that align with your design system, keeping everything cohesive and on-brand.
How can teams keep AI-generated components consistent and up to date at scale?
To keep AI-generated components consistent and up-to-date, teams should prioritize thorough testing to confirm they align with the design system. By standardizing elements like rules, metadata, and APIs, outputs can be fine-tuned to reflect the brand’s identity. Managing updates effectively requires a combination of gradual rollouts, proper training for team members, and reliable version control. Additionally, having a clear set of goals and maintaining a well-organized, machine-readable design system ensures scalability and long-term consistency.

