Creating user interfaces can be challenging when balancing speed and consistency. GPT-5.2 and UXPin Merge make this process easier by combining AI-powered design with production-ready React components. Here’s how they work together:
- Eliminate Design-Development Gaps: GPT-5.2 generates UI components directly from your design system, ensuring consistency between design and code.
- Save Time: Skip manual handoffs – designs are created using real components, ready for deployment.
- Scale Efficiently: Maintain design system governance standards across teams by integrating custom or open-source libraries like MUI, Ant Design, and React Bootstrap.
- Simplify Prototyping: Create interactive, testable prototypes with production-ready code in UXPin.
This approach bridges the gap between design and development, cutting down timelines and ensuring every design aligns with your brand’s standards. Whether you’re building dashboards or detailed layouts, GPT-5.2 and UXPin Merge streamline the process from start to finish.
I Built My Entire Design System in 4 Hours With AI. Full Tutorial (Claude + Cursor + Figma)
sbb-itb-f6354c6
Getting Started: Tools and Setup
To start building UIs with GPT-5.2 and UXPin Merge, you’ll need a few essential tools and a proper setup. Here’s what you’ll need to get things rolling:
Required Tools
First, you’ll need a UXPin account with Merge access. Merge is the technology that lets you sync React code components from a repository directly into the UXPin design editor. If you’re new to UXPin, they offer a free trial, giving you a chance to explore their AI-powered features before deciding on a paid plan.
With UXPin, you get built-in access to GPT-5.2 and popular design systems like MUI, Ant Design, ShadCN, and Bootstrap – no need for separate API accounts or imports. If your team uses a custom design system, you’ll need a Git repository, Storybook, or npm package hosting your React components.
GPT-5.2 comes equipped with a 400,000-token context window and supports up to 128,000 max output tokens, making it capable of handling complex component structures with ease. Once you’ve set up your tools, the next step is configuring UXPin Merge to sync your design system.
Setting Up UXPin Merge
Here’s how to connect your design system to UXPin Merge:
- For public Storybook libraries: Open the "Design System Libraries" tab in the UXPin editor, click "+ New Library", and select "Import Components from Storybook."
- For private libraries: Install the
@uxpin/storybook-deployerpackage using npm or yarn, then deploy your library with your unique token by running:npx uxpin-storybook-deployer -t TOKEN -s path/to/your/storybook - For Vite with Storybook: Add
config.base = ''in yourviteFinalconfiguration to ensure assets load correctly.
Once synced, any updates to your source Storybook will automatically reflect in UXPin.
Configuring GPT-5.2 for Design Systems
After connecting your design system, GPT-5.2 steps in to generate components. Inside the UXPin editor, you can select the specific building blocks you want the AI to use – whether they’re from an open-source library or your custom design system.
The AI Component Creator transforms text prompts or uploaded images into layouts using your system’s coded components. Meanwhile, the AI Helper lets you tweak themes, structures, or content using simple, descriptive commands, ensuring every adjustment stays aligned with your design system’s guidelines.
Additionally, Storybook "Args" enable GPT-5.2 and UXPin to dynamically update component properties, slots, and styles without altering the source code. This streamlined setup ensures that all AI-generated components perfectly match your codebase, eliminating the need for manual adjustments and keeping your designs production-ready from the start.
Generating and Implementing UI Components with GPT-5.2
Once your design system is connected to UXPin Merge, you can start creating components using GPT-5.2. This integration simplifies UI development by ensuring every element aligns perfectly with your production codebase. The AI Component Creator in the UXPin editor can transform text prompts or even uploaded images into layouts made with actual coded components.
Writing Effective GPT-5.2 Prompts
With your design system ready to go, the next step is crafting prompts that make the most of GPT-5.2’s capabilities. Writing clear and specific prompts is essential to ensure the generated components meet your requirements. Focus on prompts that set clear boundaries and avoid unnecessary embellishments. While GPT-5.2 excels at following instructions and executing them precisely, it may generate extra code unless explicitly told otherwise.
Start by uploading your design system’s JSON documentation or uxpin.config.js file into GPT-5.2’s context window. This helps the AI reference valid component names and props from your library. Use a system prompt like this:
"You are a front-end developer using the [Design System Name] library. Only use components available in this library. Do not use standard HTML tags like <div> or <button> unless the library lacks an equivalent."
To improve outcomes, include 3–5 examples of high-quality code snippets that use your custom components. This few-shot prompting helps GPT-5.2 understand the specific patterns and nesting logic in your design system. If any requirements are unclear, instruct the AI to ask 1–3 clarifying questions rather than making assumptions. Additionally, you can tweak the reasoning_effort parameter (none, low, medium, high) to balance speed and depth for more complex components – though the default is set to "none".
Refining AI-Generated Components
Once GPT-5.2 generates a component, refining it is straightforward with natural language follow-up prompts. You can use these prompts to fine-tune the output, like removing unnecessary elements or enforcing specific component usage. For instance, you might say:
"Remove the back button" or "Use the ‘Logo’ sub-component in the ‘Header’ instead of an <img> tag."
To ensure the AI sticks to your design system, use explicit constraints in your prompts. For example, include a <design_and_scope_constraints> block that instructs the model to "Implement EXACTLY and ONLY what the user requests". This prevents the AI from introducing unapproved elements like new colors, shadows, or animations outside your design tokens.
"GPT-5.2: Exceptional at adhering to design tokens. Uses CSS variables by default. Maintains perfect consistency across all generated components." – Prompt Web Design
Tests have shown that GPT-5.2 achieves 98% code accuracy in complex UI tasks, such as generating landing pages. These refinements help ensure that the components integrate seamlessly into your workflow, from building to testing your UI.
Maintaining Design System Consistency
GPT-5.2 is designed to follow your design system’s rules, avoiding rogue CSS or non-compliant UI elements. This consistency bridges the gap between design and development, ensuring every component adheres to your standards. When you select specific building blocks from your custom library in the UXPin editor, the AI generates components using only those approved elements.
To stay aligned with your design libraries, instruct GPT-5.2 to use tokens-only colors and default to CSS variables. You can also define prop mappings explicitly, such as:
"When the user requests a ‘primary’ look, apply the variant='primary' prop."
In the UXPin Merge environment, the AI-generated code is rendered instantly on the canvas, letting you see how the components behave with real production logic. This immediate feedback ensures a smooth development process and consistent UI design.
Building and Testing Interactive UIs
Once you’ve generated components using GPT-5.2, the next step is assembling them into prototypes that function like actual applications. UXPin’s canvas makes this process seamless, letting you combine these code-powered elements into interactive designs that you can test instantly. This hands-on approach bridges the gap between code generation and practical UI implementation.
Assembling Prototypes in UXPin

With your GPT-5.2 components ready, you can bring your designs to life in UXPin. Start by dragging components onto the canvas and arranging them to create complete screens. These are actual React components, meaning they behave just as they would in a live application. Buttons include ripple effects, rating stars retain their state when clicked, and form inputs respond dynamically during previews.
To fine-tune your layout, use Command+Click (macOS) to select nested elements easily. The Properties panel offers tools like alignment options and a "distribute on grid" feature, with smart grids (highlighted by pink lines) to ensure even spacing between components. For responsive designs, toggle responsive width in the Properties panel, allowing components to scale automatically to their container. This ensures your design adjusts seamlessly across devices, from iPads to iPhones.
Need to tweak dimensions? Use the "resize to fit contents" button to adjust them automatically. Plus, you can link directly to your design system’s official documentation from the Properties panel to confirm that your implementation aligns with approved standards.
Testing and Refining Your Designs
UXPin provides multiple preview modes to validate your prototypes. In Simulate mode, you can test interactive behaviors – check that toggles switch states, dropdowns expand correctly, and navigation flows work as intended. For design accuracy, switch to Specs mode to ensure all elements adhere to your design system.
Want to test on actual devices? Generate a QR code with the "Preview on a device" feature. This allows you to evaluate responsiveness and touch interactions on physical hardware, uncovering issues like small touch targets or awkward gestures that might not be apparent on a desktop. For feedback, use Comment mode, where stakeholders can leave notes directly on the prototype. This simplifies collaboration and ensures all adjustments are made before moving to development.
Exporting Code and Integrating with Development Workflows
Once you’ve validated your prototypes, the next step is moving into production. With UXPin Merge, this transition is almost effortless because your prototypes are already built with production-ready code. Developers can skip the tedious process of recreating components – they can directly use the exact JSX from the prototype.
Exporting Code from UXPin Merge
To export code, open your prototype in Spec Mode. From there, you can copy the generated JSX/React code and drop it straight into your project. Since the code references your actual components, it’s ready for production use without any additional adjustments.
"It functions as effortlessly as a translator and you don’t need to double-check anything. Your design IS code!" – UXPin
You can also use the Stackblitz integration to test and tweak the code in a live environment before committing it to your repository. This ensures everything works as intended before syncing it with your development workflow.
Syncing with Development Repositories
To sync your design assets with your development repositories, the UXPin CLI tool comes in handy. This tool allows you to connect your repository and integrate seamlessly with CI/CD workflows like CircleCI, GitHub Actions, or Travis CI. With this setup, any changes in your codebase automatically update your design library.
When configuring the uxpin.config.js file, it’s wise to start small. Add one component at a time and test it in Experimental Mode before importing your entire library. For teams with strict coding standards, the Clean Integration feature lets you connect Merge directly to production code, avoiding any unnecessary modifications.
To maintain code quality, always run git pull before pushing changes. Enforce pre-commit hooks to automatically run linting and unit tests, ensuring your code is clean and functional. Additionally, enable branch protection on critical branches like main to require peer reviews and passing status checks before merging. This helps prevent errors and keeps your workflow smooth and efficient.
Key Benefits of Using GPT-5.2 with UXPin Merge
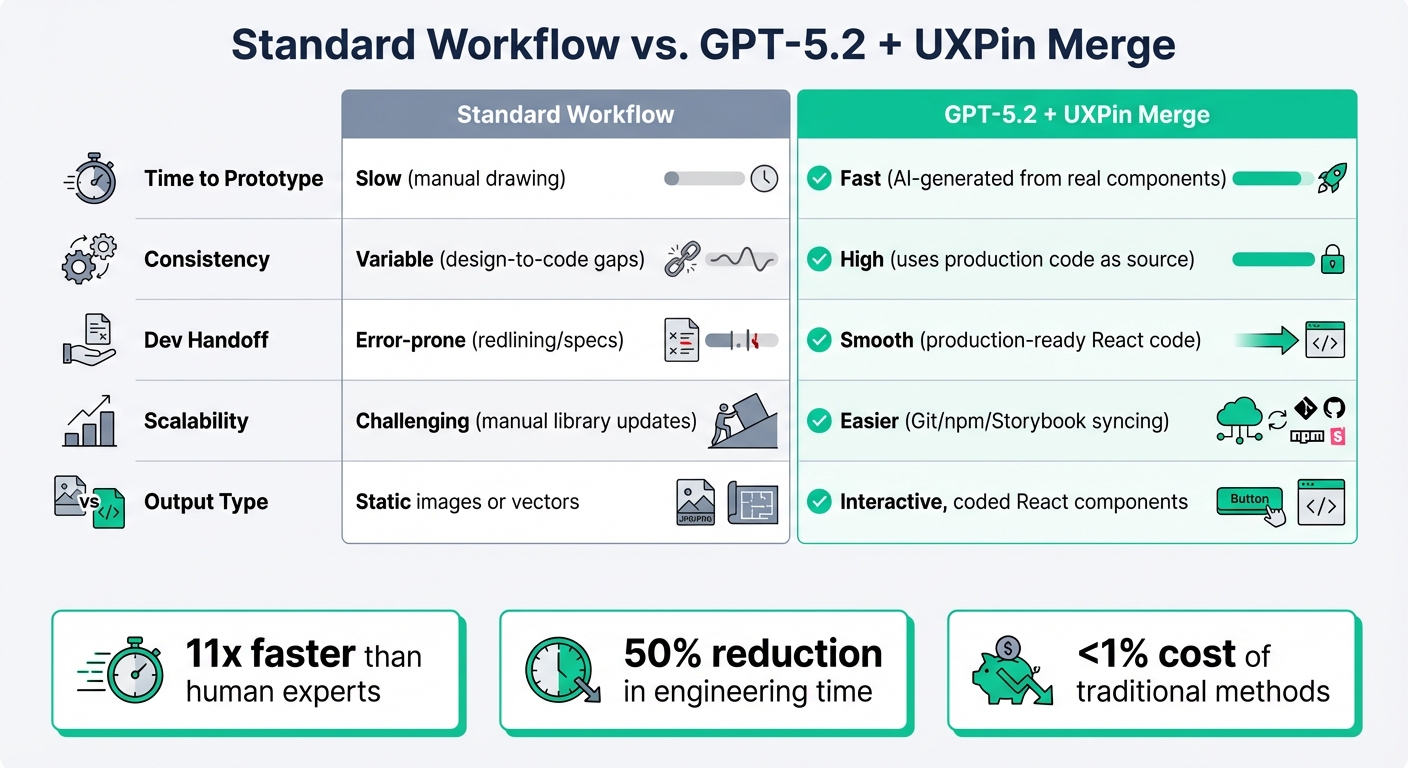
Standard Workflow vs GPT-5.2 + UXPin Merge Comparison
Pairing GPT-5.2 with UXPin Merge streamlines the workflow by delivering production-ready React components right from the start, cutting out the need for rebuilds. This eliminates the common discrepancies between initial designs and final production outputs.
The speed improvements are striking. GPT-5.2 generates professional-quality outputs 11 times faster than human experts, all while costing less than 1% of traditional methods. Combined with UXPin Merge’s code-backed workflow, this means you can design and ship projects in record time.
"When I used UXPin Merge, our engineering time was reduced by around 50%. Imagine how much money that saves across an enterprise-level organization with dozens of designers and hundreds of engineers." – Larry Sawyer, Lead UX Designer
Scalability is another standout feature. As Erica Rider shared, syncing Microsoft’s Fluent design system allowed 3 designers to support 60 products and over 1,000 developers. This level of efficiency is achievable when both designers and developers work from the same set of components from the get-go.
Comparison: Standard Workflows vs. GPT-5.2 + UXPin Merge
| Aspect | Standard Workflow | GPT-5.2 + UXPin Merge |
|---|---|---|
| Time to Prototype | Slow (manual drawing) | Fast (AI-generated from real components) |
| Consistency | Variable (design-to-code gaps) | High (uses production code as source) |
| Dev Handoff | Error-prone (redlining/specs) | Smooth (production-ready React code) |
| Scalability | Challenging (manual library updates) | Easier (Git/npm/Storybook syncing) |
| Output Type | Static images or vectors | Interactive, coded React components |
These improvements aren’t just about speed – they also enhance alignment and governance at an enterprise level.
Enterprise-Grade Alignment and Governance
For larger organizations, governance and alignment are non-negotiable. UXPin Merge ensures centralized design system management by linking directly to your Git repository. This setup ensures that the AI generates UIs exclusively using pre-approved, tested, and production-synced components.
Major companies like Amazon, AAA, and T. Rowe Price rely on custom library integration to ensure their proprietary design systems guide the AI workflow. This process guarantees compliance and auditability at scale, eliminating the risk of introducing unapproved patterns or accessibility issues.
On top of that, the workflow automatically adheres to the accessibility standards embedded in your source components. Whether you’re working with MUI, Ant Design, or a custom library, every AI-generated layout meets standards like WCAG without requiring additional manual checks. For teams managing multiple products across diverse platforms, this level of control not only prevents technical debt but also ensures seamless alignment between design and development.
Conclusion
GPT-5.2 combined with UXPin Merge is changing how UI development gets done. This process generates production-ready React components (a key skill in React for designers) from the very first prompt, cutting out the tedious step of rebuilding static mockups. The result? Faster design cycles and code that’s ready to ship.
The standout benefit here is eliminating the endless rebuild loop. When AI generates layouts using real components – whether from MUI, Ant Design, Shadcn, or your custom library – developers get deployable code instantly. That means no more wasted time on translating designs, dealing with design drift, or unnecessary rework.
"AI should create interfaces you can actually ship – not just pretty pictures." – UXPin
For enterprise teams juggling multiple products, there’s another layer of value: governance. Since the system connects directly to your Git repository, the AI works within your approved design system. This ensures consistency across platforms while speeding up the design-to-code process.
FAQs
Do I need my own GPT-5.2 API key?
To use GPT-5.2 with UXPin Merge, you’ll need an API key. This key is essential for tasks like generating UI components, creating layouts, and leveraging AI to refine or build components. Be sure to have an OpenAI API key on hand to seamlessly integrate GPT-5.2 into your design workflow.
How do I connect my custom design system to UXPin Merge?
To integrate your custom design system with UXPin Merge, you’ll need to connect your production components. This can be done by linking your design system using Git, Storybook, or npm. Once connected, your actual React components are synced directly into UXPin. This ensures they are ready for production and can be used seamlessly for prototyping and testing. The result? A smoother workflow and consistent design process.
Can I export the exact React code from my prototype?
With UXPin, you can export clean, production-ready React/JSX code directly from your prototype. This feature lets you generate code-backed components effortlessly, bridging the gap between design and development. No need for extra manual coding – your designs are ready to move straight into production.

