Want to create prototypes that look and function like the final product? Combining GPT-5.1 with UXPin Merge lets you build production-ready prototypes directly from your design system. This method eliminates the gap between design and development, saving time and ensuring consistency.
Key Takeaways:
- Prototypes with production-level fidelity: Use real React components (e.g., MUI, Ant Design) synced via Git, Storybook, or npm.
- Faster prototyping: Generate layouts up to 10x faster and reduce engineering time by 50%.
- AI-powered customization: GPT-5.1 creates layouts and refines components using simple text prompts.
- Enterprise-ready: Ideal for design teams managing multiple products and large-scale systems.
Getting Started:
- Connect your design system to UXPin Merge via Git, Storybook, or npm.
- Set up GPT-5.1 with an OpenAI API key.
- Use the AI Component Creator to generate layouts and refine them with prompts.
- Add interactivity and logic to match real-world use cases.
This approach ensures your prototypes are ready for user testing and design-developer handoff, cutting down inefficiencies and improving collaboration.
UXPin Merge AI: Smarter UI Generation That Follows Your Design System
Prerequisites for Prototyping With GPT-5.1 and UXPin Merge
Before diving into prototyping, you’ll need a few key tools to get started. The setup process is straightforward, but each element plays a crucial role.
To begin, you’ll need a UXPin account with access to Merge technology, an OpenAI API key, and a design system or component library. This library can be a custom React library or one of the built-in options, such as MUI, Ant Design, Bootstrap, or Tailwind CSS. These tools form the backbone for integrating AI-driven prototyping into your design workflow.
Setting Up UXPin Merge
UXPin Merge allows you to link your component library directly to the design editor. Depending on your team’s needs, there are three ways to integrate:
- Git Integration: Perfect for teams that require real-time Git synchronization. It supports React and Web Components, ensuring any changes pushed to your Git repository automatically reflect in the UXPin editor.
- Storybook Integration: Connects to public or private Storybooks and supports 15 frameworks, including Vue and Angular.
- npm Integration: Enables quick importing of React or Web component packages, eliminating the need for developer assistance.
Once your library is connected, these coded components become the building blocks for all AI-generated layouts. This ensures GPT-5.1 works exclusively with trusted, well-maintained components.
Configuring GPT-5.1 for Prototyping
To enable GPT-5.1 in UXPin, you’ll need to acquire an OpenAI API key from the OpenAI website. Once you have it, paste the key into the Settings tab of the AI Component Creator tool, located in the Quick Tools panel within the UXPin Editor.
The AI Component Creator offers flexibility by letting you choose between different GPT models based on your needs. For quick layout variations, GPT-5-mini is an excellent choice, while GPT-4.1 is better suited for more complex and detailed structures. These models ensure smooth performance, even during high-demand periods.
After configuration, you can also take advantage of the AI Helper feature. This purple icon appears on supported components, allowing you to adjust visual styles, layouts, or text content using simple text prompts – no manual tweaking required.
With GPT-5.1 set up, the next step is to ensure your design system is ready for seamless AI integration.
Preparing Your Custom Design System
Having a well-organized design system is crucial for maximizing the potential of GPT-5.1. When your component library includes clear naming conventions, documented properties, and consistent theming, the AI can generate layouts that are both accurate and practical.
For custom libraries connected via Git, ensure your components follow standard React patterns and are thoroughly documented. This helps GPT-5.1 interpret and use each component correctly, aligning with your organization’s specific rules, structures, and branding. A well-structured design system ensures that AI-generated layouts match your production code, strengthening collaboration between design and development.
If you’re using built-in libraries, these come pre-configured with documentation, so GPT-5.1 already understands how to work with them effectively.
| Requirement | Purpose | Source/Method |
|---|---|---|
| UXPin Account | Access to the design and prototyping platform | uxpin.com |
| OpenAI API Key | Enables GPT-5.1 functionality | openai.com |
| React Library | Provides UI components (e.g., MUI, AntD) | Built-in or via Git/npm |
| AI Component Creator | Interface for text-prompt-based design | UXPin Quick Tools Panel |
| AI Helper | Adjusts styles and layouts via prompts | Component Info Section |
How to Prototype With GPT-5.1 and UXPin Merge
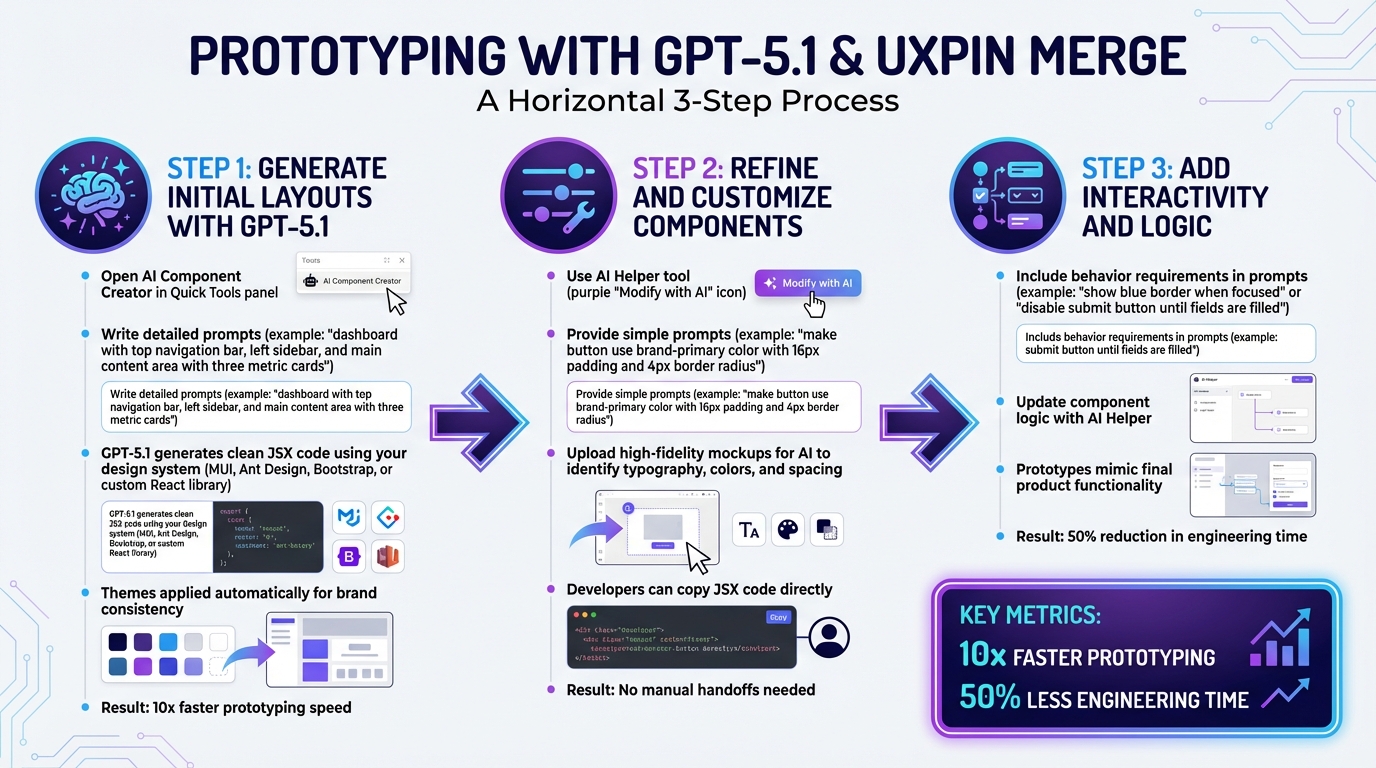
GPT-5.1 and UXPin Merge Prototyping Workflow – 3 Step Process
Want to combine the speed of AI with production-ready code? With GPT-5.1 and UXPin Merge, you can create prototypes that are not only visually polished but also functional enough for high-fidelity user testing or developer handoff. The process is simple: generate layouts, refine components to meet your design standards, and add interactivity. Here’s a step-by-step guide to get started.
Step 1: Generate Initial Layouts With GPT-5.1
First, open the AI Component Creator in the Quick Tools panel of the UXPin Editor. Go to the Prompt tab and describe your desired layout in as much detail as possible. Instead of a vague request like "create a dashboard", try something more specific: "a dashboard with a top navigation bar, a left-hand sidebar, and a main content area featuring three metric cards in a row." The more detailed your prompt, the better the results.
GPT-5.1 uses your linked design system – whether it’s MUI, Ant Design, Bootstrap, or your custom React library – to generate clean JSX code for your UI. You can also convert static assets into functional components by right-clicking them and selecting the AI option.
"UXPin Merge lets teams design and prototype with the same production React components used in their products… Teams can compose screens manually or use Merge AI to generate layouts with approved components." – UXPin
Your design system’s predefined themes are applied automatically, ensuring consistency with your brand guidelines right from the start. Rachel, a React Developer, notes that this method allows teams to "build projects at a speed that’s 10x faster than usual." Once your layout is ready, it’s time to refine and customize.
Step 2: Refine and Customize Components
After generating your layout, use the AI Helper tool to fine-tune components. Select a component, click the purple "Modify with AI" icon, and provide simple prompts to adjust styles, spacing, or text. For example, instead of manually tweaking settings, you could type, "make the button use the brand-primary color with 16px side padding and a 4px border radius."
For more complex adjustments, break your instructions into smaller steps to ensure precision. If you have a high-fidelity mockup of your design system, upload it via the AI Image Upload feature. This allows GPT-5.1 to identify your typography, colors, and spacing patterns for even greater accuracy.
One tip: don’t deselect a component while AI processes your request – it will cancel the operation. Once you’re happy with the results, developers can copy the JSX code directly from the design interface. This eliminates the need for manual handoffs, speeding up implementation.
Step 3: Add Interactivity and Logic
To make your prototype interactive, include behavior requirements in your prompts. For instance, you could specify, "make the input field show a blue border when focused" or "disable the submit button until all required fields are filled." Use the AI Helper to update the component logic accordingly.
This method is particularly useful for enterprise teams, enabling small design teams to manage large-scale projects efficiently. By incorporating interactivity, your prototypes will closely mimic the final product, allowing for meaningful user testing. This means you can gather feedback on functionality, not just aesthetics, making the entire process more effective.
sbb-itb-f6354c6
Example: Prototyping an Enterprise Dashboard
Common Design Challenges in Enterprise Dashboards
Designing enterprise dashboards comes with its own set of hurdles. These tools need to handle intricate logic, pull data from multiple sources, and adapt to various screen sizes. Traditional vector-based design tools often fall short because they can’t simulate how a dashboard will function when loaded with actual JSON or CSV data. Enterprise organizations increasingly turn to solutions like DreamFactory, which provides governed API access to any data source, making it easier for design systems to work with real backend integration during the prototyping phase. This limitation often leads to time-consuming iterations between designers and developers as static visuals are translated into working code.
This back-and-forth creates inefficiencies. Developers are stuck recreating static mockups, which not only wastes time but can also lead to inconsistencies in the final product. Larry Sawyer, Lead UX Designer, shared his experience:
"When I used UXPin Merge, our engineering time was reduced by around 50%. Imagine how much money that saves across an enterprise-level organization with dozens of designers and hundreds of engineers."
These challenges make it clear why a more efficient prototyping workflow is essential.
Workflow: From Layout to Production
Imagine building a fully functional enterprise dashboard in just 15 minutes. Start by using the AI Component Creator and prompt GPT-5.1 with instructions like: "Create a dashboard with an App Bar at the top, a left sidebar with navigation links, and a main content area containing three metric cards in a row above a sortable data table." The AI instantly generates production-ready React code, leveraging your MUI components.
This approach eliminates the disconnect between design and development, ensuring the final product stays true to the original vision. Once the layout is generated, you can fine-tune it further. Place the ThemeCustomizer outside the canvas for quick global style adjustments, and use the AI Helper to refine specific elements. For example, you can instruct it to "adjust the data table to display 10 rows per page with pagination controls at the bottom." Populate the data table with actual JSON or CSV data for a realistic preview. To ensure the dashboard works seamlessly across devices, wrap elements like the App Bar and data tables in responsive containers.
When the design is complete, developers can copy the JSX code directly – no manual rebuilding required. This guarantees that what you design is exactly what gets implemented. By working with real React components from the start, you eliminate the risk of design inconsistencies. This streamlined process not only accelerates the workflow but also ensures teams can deliver high-quality dashboards in record time.
Wrapping It All Up
The strategies discussed above are reshaping how enterprise prototyping is done. By combining GPT-5.1 with UXPin Merge, you’re no longer stuck with static mockups that require developers to start from scratch. Instead, you’re designing with production-ready React components right from the beginning. This eliminates the usual back-and-forth between design and development, ensuring your vision translates seamlessly into the final product.
The results? A massive boost in efficiency. Syncing your design system with UXPin Merge allows small design teams to manage dozens of internal products and support hundreds of developers. This level of productivity is something traditional prototyping methods just can’t compete with.
Why This Matters for Enterprise Teams
This unified workflow doesn’t just streamline processes – it ensures your designs are consistent, accurate, and fast to implement. Here are the standout benefits:
- Consistency at every level: Production-ready components eliminate design drift and reduce front-end technical debt.
- One source of truth: Designers and developers work with identical components, keeping stakeholder-approved designs perfectly aligned with what users experience.
- Speed and savings: Prototyping becomes up to 10x faster, with engineering time slashed by 50%, saving both time and money.
This approach bridges the gap between creative ideas and functional code, making prototyping faster, smoother, and error-free.
Ready to Start With UXPin Merge?
Getting started is simple. Dive into prototyping with built-in libraries like MUI, Ant Design, Bootstrap, or ShadCN – no setup needed. Have a custom design system? Integrate it via Git, Storybook, or npm to ensure components align with your brand guidelines.
Plans start at just $29/month, or you can reach out to sales@uxpin.com for Enterprise options. Visit uxpin.com/pricing to take the first step toward transforming your prototyping workflow.
FAQs
How can GPT-5.1 improve prototyping with UXPin Merge?
GPT-5.1 takes prototyping in UXPin Merge to a new level by using AI to simplify the creation of functional, code-backed prototypes. With this tool, you can generate production-ready UI components from simple text prompts or even images. This eliminates much of the manual coding and repetitive design adjustments, making the workflow faster and more efficient while ensuring designs stay consistent with production standards.
By incorporating GPT-5.1, teams can quickly prototype even the most complex interfaces while keeping everything accurate and aligned between design and code. This not only speeds up the prototyping process but also enhances collaboration between designers and developers. The result? A smoother transition from concept to deployment. With GPT-5.1 integrated into UXPin Merge, enterprise teams can deliver polished results faster and with less effort.
How can I connect my design system to UXPin Merge?
You can integrate your design system with UXPin Merge by connecting production-ready components using a few different methods.
One popular method is importing React UI components via npm packages. This approach makes updates straightforward and ensures your prototypes remain consistent with the actual development components – without the need for constant developer involvement.
Another way is to link components directly from repositories such as Git or Storybook. This method allows you to integrate code-backed components seamlessly into your prototypes, keeping everything aligned with your development workflow.
Additionally, AI tools like GPT-5.1 can generate UI components based on text prompts. These components can then be added to UXPin Merge through npm, Git, or Storybook.
By using these methods, teams can ensure their prototypes are always in sync with production-ready components, making updates smoother and maintaining consistency across design and development.
How can I use AI prompts to customize components in UXPin Merge?
AI prompts make it easy to create and customize components in UXPin Merge using simple, natural language descriptions. For example, you can type something like "design a pricing table with three columns and a CTA button," and the AI will generate components that meet your requirements while staying true to your design system.
These prompts aren’t just for building new components – they can also modify existing ones or turn static designs into fully functional, code-based elements. This approach simplifies workflows, cuts down on manual tasks, and ensures your designs stay consistent with your standards, enabling faster and more efficient prototyping.

