Front-end prototyping has always been a challenge due to disconnects between design and development. But with GPT-4.1, Bootstrap, and UXPin Merge, you can now create production-ready prototypes faster and with fewer errors. Here’s how this workflow works:
- Generate Bootstrap Components with GPT-4.1: Use text prompts to create detailed, structured components.
- Design with Code in UXPin Merge: Prototype directly with production-ready React components, ensuring consistency and reducing handoffs.
- Streamline Handoffs: Export your prototype as ready-to-use JSX code, eliminating the need for redlines or manual recreation.
This process is ideal for product teams, designers, and developers looking to save time, maintain UI consistency, and reduce back-and-forth during development. Whether you’re using standard Bootstrap components or a custom design system, this workflow ensures your prototypes are aligned with production code from start to finish.
Key Highlights:
- AI-Driven Component Creation: Generate Bootstrap components in seconds.
- Code-Backed Prototyping: Use real React components for accurate designs.
- Easy Integration: Sync with Git or npm for custom design systems.
To get started, connect UXPin Merge to your Bootstrap library and experiment with AI prompts to create and refine components. From there, you can design, test, and deliver prototypes that mirror your final product.
GPT-4.1 Bootstrap UXPin Merge Prototyping Workflow
AI Creates Bootstrap News Template | No Coding, Just Prompts! (Full Tutorial in 20 Minutes)
sbb-itb-f6354c6
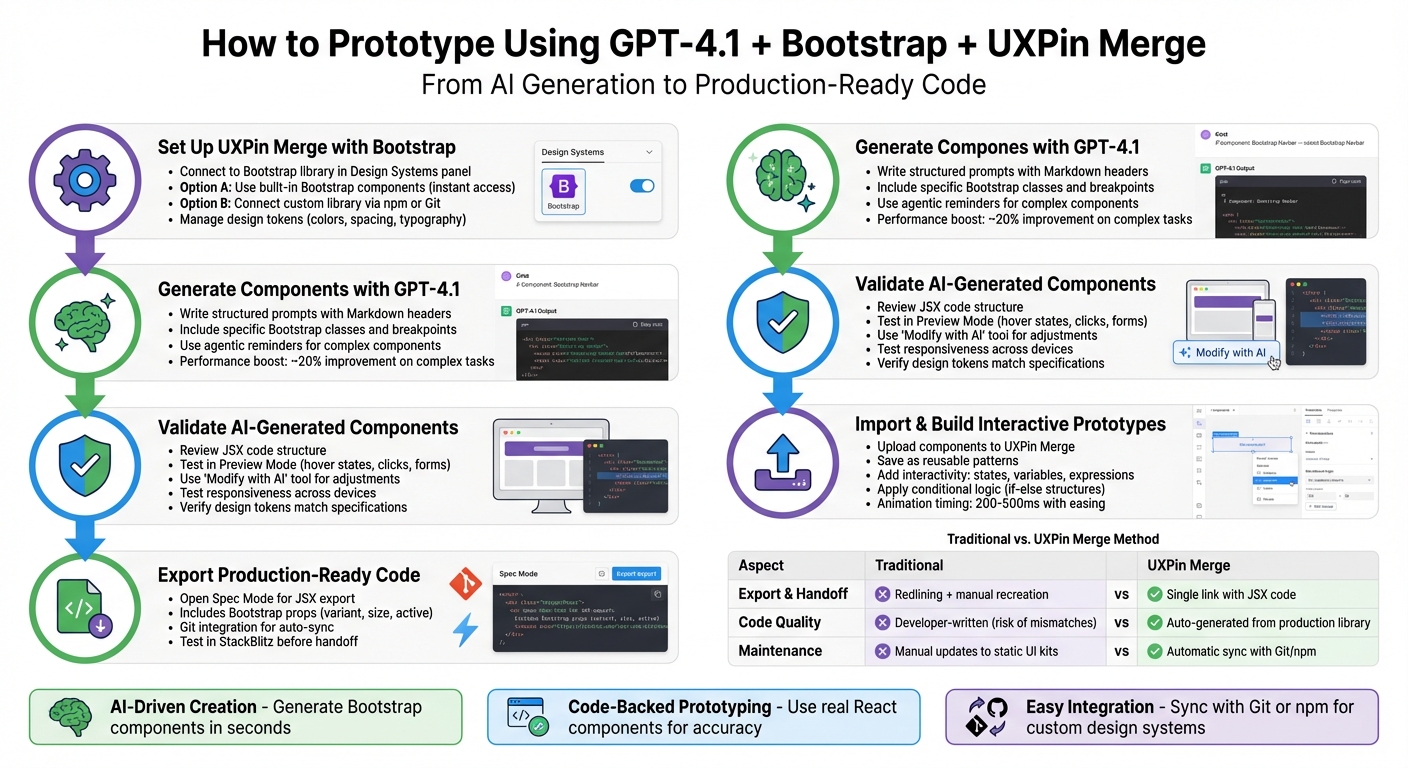
How to Set Up UXPin Merge with Bootstrap
UXPin Merge makes working with Bootstrap a breeze. It allows you to use Bootstrap components directly from the Design Systems panel – no need for configuring repositories, installing npm packages, or writing code.
You can start prototyping right away with the built-in Bootstrap library, which includes standard components. If you’re working with a custom system or need to use modified tokens, you can connect your own component library through npm or Git. This way, you’ll have access to production-ready React components that align with your specific needs.
Connecting UXPin Merge to Bootstrap
To get started, open UXPin and navigate to the Design Systems panel on the left side of your canvas. Select Bootstrap, and its components – like buttons, modals, navigation bars, and forms – will load instantly. From there, you can simply drag and drop components onto your canvas and start designing.
If you’re working with a customized Bootstrap version or need branded integration, you’ll want to use the npm or Git integration method. This involves setting up a repository with your custom Bootstrap configuration, publishing it as an npm package, or connecting it via Git. UXPin’s CLI tool ensures that any updates you push to your repository appear in the design canvas in minutes. This setup allows teams to sync their custom branding and keep prototypes updated in real time.
Once connected, it’s time to manage your design tokens and component libraries to maintain consistency across all prototypes.
How to Manage Design Tokens and Component Libraries
After connecting Bootstrap, you can adjust design tokens directly in UXPin or through custom integration for greater flexibility.
The built-in Bootstrap library in UXPin Merge already maps design tokens – like colors, spacing, typography, and breakpoints. You can tweak component properties directly in the Properties panel on the canvas. This includes standard Bootstrap variants such as button sizes, grid layouts, and color schemes, ensuring your prototypes remain aligned with Bootstrap’s structure without additional token management.
For teams using a custom design system, managing tokens involves a slightly different process. You’ll define your tokens in SCSS or CSS files within your repository, then sync them to UXPin Merge using the CLI. This ensures consistency between design and development by automatically updating tokens (like colors or spacing) across all components whenever changes are pushed. This eliminates the risk of designers accidentally working with outdated styles.
"It used to take us two to three months just to do the design. Now, with UXPin Merge, teams can design, test, and deliver products in the same timeframe." – Erica Rider, UX Architect and Design Leader
The choice between the built-in library and custom integration depends on your goals. The built-in library offers speed and simplicity, perfect for quick prototyping. On the other hand, custom integration provides full control over your design system’s tokens and components, ideal for teams requiring branded styling or advanced customization. Many teams begin with the built-in library and transition to custom integration as their needs evolve.
How to Generate Bootstrap Components with GPT-4.1
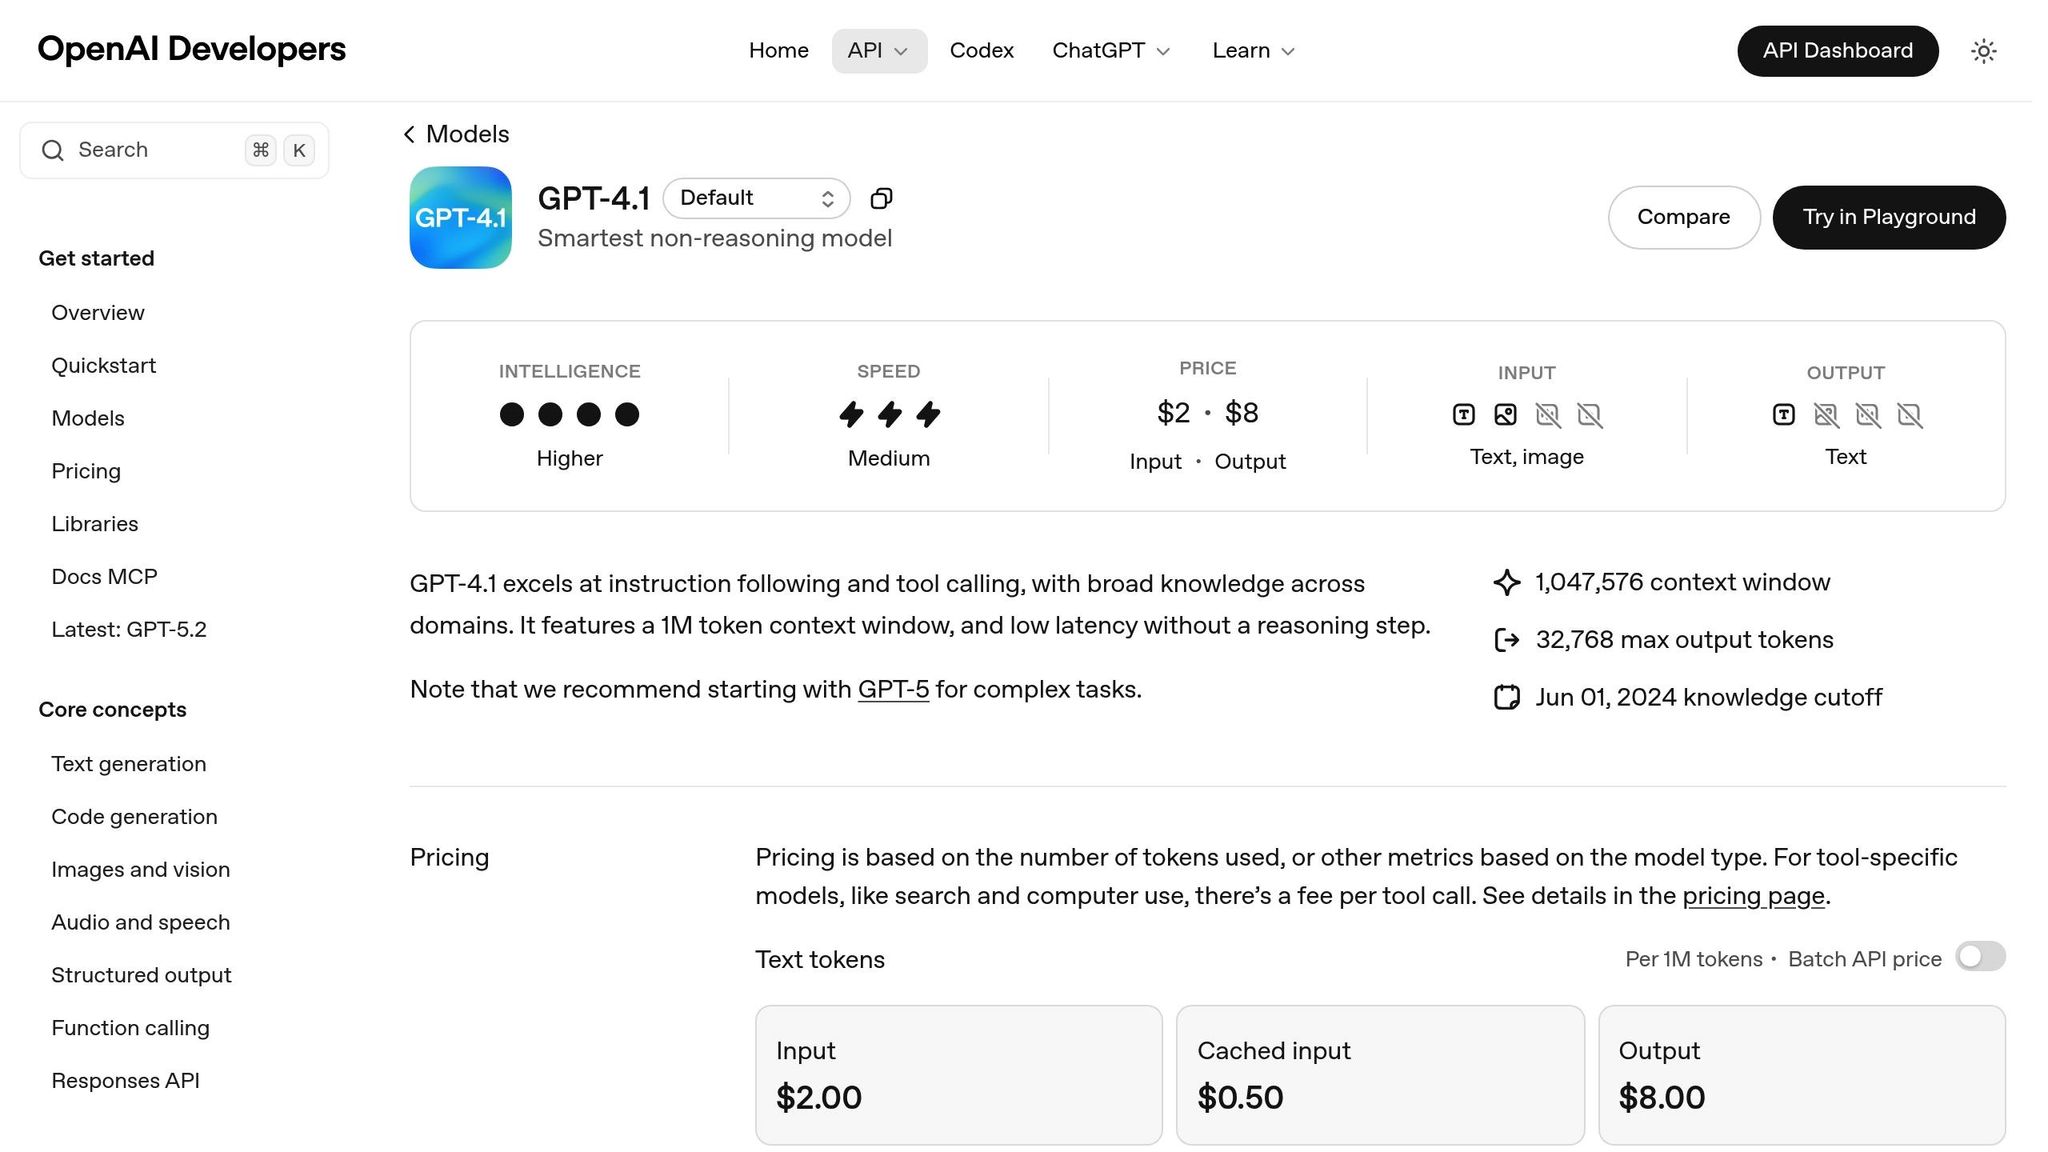
GPT-4.1 can efficiently generate Bootstrap components, but it requires clear and detailed prompts. Unlike earlier models, GPT-4.1 strictly follows instructions – it won’t infer missing details or interpret vague requests. This precision makes it an excellent tool for creating production-ready React components for UXPin Merge, ensuring they align with Bootstrap’s framework and your design system.
How to Write Effective Prompts for GPT-4.1
To get the best results, structure your prompts with clear sections using Markdown headers like # Objective, # Rules, and # Output Format. For example, if you’re creating a responsive navigation bar, include details about required Bootstrap classes, breakpoint behaviors, and any custom styling.
For more complex components, such as forms with validation or modals with dynamic content, add instructions like "think step-by-step." This helps GPT-4.1 process the logic more effectively and reduces errors.
Incorporating agentic reminders – such as persistence (continue until resolved), tool usage (refer to documentation), and planning (reflect before acting) – can improve the quality of generated components. These reminders have been shown to boost performance on complex tasks by nearly 20%.
When working on long-context requests or generating multiple components, repeat key instructions at the beginning and end of your prompt. Highlight your most critical requirements, such as accessibility standards or compatibility with a specific Bootstrap version, to ensure GPT-4.1 prioritizes them throughout the process.
After generating a component, always validate the code to ensure it’s ready for production.
How to Validate AI-Generated Components
Validation is essential to ensure that GPT-4.1’s Bootstrap components are ready for production. Start by reviewing the JSX code structure to confirm it uses correct Bootstrap classes and adheres to React best practices. Check that responsive breakpoints align with Bootstrap’s grid system and verify that interactive elements include appropriate event handlers.
Use UXPin’s Preview Mode to test the component’s functionality, including hover states, clicks, form submissions, and transitions. If the component doesn’t perform as expected, avoid manual rewrites. Instead, use the "Modify with AI" tool to make adjustments by describing the specific changes you need, such as layout tweaks or style updates. This iterative approach saves time and maintains consistency.
Test responsiveness across devices using UXPin’s Multi-Device View. While Bootstrap components are designed to adapt to various screen sizes, AI-generated code might require additional tweaks. If layouts break, refine your prompt to include specific responsive classes.
For teams using custom design systems, ensure that design tokens – such as colors, spacing, typography, and component variants – match your specifications. Compare the generated code against your SCSS or CSS variables. If you notice discrepancies, you can adjust the component properties in UXPin’s Properties Panel or regenerate the component with a more detailed prompt that specifies your token values.
Once validated, your components are ready to be imported into UXPin Merge for further refinement and integration.
How to Import AI-Generated Components into UXPin Merge
Once your AI-generated Bootstrap components are validated, importing them into UXPin Merge lets you start prototyping right away with seamless Bootstrap integration. This step connects AI-generated code to functional design, making it easier to move from concept to an interactive prototype.
How to Upload Components to UXPin Merge
First, open the AI Component Creator, select GPT-4.1, and enter your OpenAI API Key in the Settings tab. Paste the JSX code generated by the AI, or, if you’re working with a visual reference, upload a high-fidelity mockup.
When crafting prompts, include detailed design specifications. For example, mention specific hex codes like #007bff for primary buttons, precise spacing such as "16px bold label", or focus states. These details help GPT-4.1 produce JSX that adheres to Bootstrap standards. Once the component is generated, use the "Modify with AI" tool to make adjustments with natural language commands, like "make this button primary" or "add 20px padding".
Before finalizing, test the component in Preview Mode to ensure interactive elements – like dropdowns, modals, or form inputs – work as intended. After refining the component, you can save it as a reusable pattern for future use.
How to Build Reusable Patterns and Templates
After importing a component, save it as a reusable pattern to streamline your prototyping process. Select the component on the canvas, go to the Patterns tab, and click "Add" to save it. This creates a library of ready-to-use elements, such as navigation bars, card layouts, or form groups, which your team can drag and drop into new projects.
To keep things organized, group your patterns by their purpose or page type – like headers, footers, or form sections. If you’re working within a custom design system, make sure these patterns align with your design tokens (e.g., colors, spacing, typography) to maintain consistency with your brand guidelines. You can fine-tune these properties directly in UXPin’s Properties Panel or regenerate components with updated prompts that reference your token values.
How to Build and Test Interactive Prototypes
With a streamlined design-to-development workflow, your prototype now closely resembles a real application. Thanks to AI-generated Bootstrap components organized into reusable patterns, you can create prototypes that go beyond static designs. Unlike traditional tools that rely on simple "hotspots" to link screens, UXPin Merge utilizes code-based logic. This means your prototypes can handle data, respond to user actions, and showcase real component behavior.
How to Add Interactivity and Logic
UXPin Merge enables you to add functional logic to your Bootstrap components through states, variables, expressions, and interactions. For example, you can use conditional logic for form validation. An if-else structure can activate a submit button when an email input is valid, while showing an error message for invalid entries. Always include a secondary "Else" condition to manage unfulfilled cases, and prioritize the primary interaction in the chain.
Interactive elements are marked with a Thunderbolt icon in the layers panel, making them easy to identify. You can trigger interactions based on various events, such as value changes, focus, variable updates, or state changes. For smoother animations, apply easing functions like Ease In or Ease Out, with durations typically set between 200–500ms. These steps ensure your prototypes feel polished and responsive.
How to Test Prototypes for Usability
Once your prototype includes interactivity, it’s time to test for usability. Share a password-protected preview link with stakeholders or users and observe how they interact with your Bootstrap components. This process helps you confirm that all interactions, conditional logic, and state changes work as intended.
To take it further, export your code-backed prototype to a development environment with just one click using Stackblitz integration. This allows you to test your components in a real browser environment before handing them off to developers. UXPin also highlights any incomplete interactions – like links to deleted elements or variables – in red, helping you avoid broken experiences in your prototype.
How to Export Production-Ready Code from UXPin Merge
Exporting production-ready code straight from your prototypes bridges the gap between design and development. This approach eliminates the usual handoff headaches. With UXPin Merge, you’re working directly with the React Bootstrap library, so the code you export is ready to go – no need for manual recreation.
How to Export Code Aligned with Bootstrap
When it’s time to pass your prototype to developers, open Spec Mode in UXPin. Here, you’ll find production-ready JSX code that mirrors the complete component structure. It includes Bootstrap-specific props like variant, size, and active. Since UXPin Merge leverages the actual react-bootstrap library, the exported code aligns perfectly with your existing codebase.
Any tweaks you’ve made using the Properties Panel are included as a customStyles object in the JSX. This ensures developers have clear instructions for implementing your design adjustments. For enterprise teams, Git integration keeps your design library synced with your production repository. This means that when developers update Bootstrap components in the codebase, those changes automatically reflect in UXPin, creating a unified workflow.
Once you export the code, it’s a good idea to review it to make sure it meets your team’s quality standards.
How to Ensure Code Quality and Consistency
In Spec Mode, you can double-check that the JSX structure and props align with your coding guidelines. If you’ve used CSS flexbox settings in the Properties Panel, verify that these are accurately represented in the exported code, ensuring responsive layouts function as expected.
For teams using customized Bootstrap configurations, you can enable useUXPinProps: true in your configuration file. This allows advanced CSS overrides while retaining the core Bootstrap structure. After making updates to your design library, reload your prototype to ensure the exported JSX reflects the latest changes. Keep in mind that exporting mixed elements requires exporting individual components separately.
To finalize the handoff, you can test your prototype in StackBlitz. This lets you see how the Bootstrap components behave in a live browser environment, helping you catch any potential issues before development begins.
| Workflow Stage | Traditional Method | UXPin Merge Method |
|---|---|---|
| Export & Handoff | Redlining and manual developer recreation | Single link with production-ready JSX code and dependencies |
| Code Quality | Developer-written (risk of mismatches) | Auto-generated from production library |
| Maintenance | Manual updates to static UI kits | Automatic sync with Git or npm repository |
Conclusion
The workflow outlined above offers a new way to approach prototyping, combining the strengths of GPT-4.1, Bootstrap, and UXPin Merge. By moving away from manual component creation and redlined specs, you can now generate layouts with AI, build using production-ready code, and export JSX that integrates directly into your codebase. This streamlined process closes the traditional gap between design and development, where designs often had to be reinterpreted and rebuilt.
This approach balances speed and efficiency. Teams can start with actual React Bootstrap components, ensuring that each prototype mirrors what developers will implement. GPT-4.1 speeds up component creation, while UXPin Merge – with its Git auto-sync feature – ensures that prototypes remain consistent with production code.
Key Takeaways
This workflow provides clear benefits to teams:
- AI-driven component generation: Describe your needs, and receive structured Bootstrap layouts instantly.
- Code-backed prototyping: Design with the same components developers use, avoiding misalignment between design and development.
- Automated handoff: Replace redlining and manual specs with a single link containing production-ready JSX code.
The results are tangible. As Allison Barkley, Director of Operations at Baremetrics, said: "Being able to jump straight from design to having code ready is going to be a huge time-saver for our team."
Next Steps for Your Team
To get started, connect UXPin Merge to your Bootstrap library and experiment with GPT-4.1 prompts for common UI patterns in your product. Build a few prototypes and test the exported code in your development environment to see how it performs. Once your team is comfortable, explore advanced features like design tokens, custom component libraries, and Git integration to keep your design system aligned with development. For enterprise teams needing custom library AI integration or dedicated support, contact sales@uxpin.com to discuss your needs.
FAQs
What do I need to start using GPT-4.1 in UXPin Merge?
To get started with integrating GPT-4.1 into UXPin Merge, you’ll need two key things:
- A UXPin account with a Merge AI plan. This plan includes access to the Merge editor and the AI Component Creator.
- An OpenAI API key to enable AI-powered component generation.
Once you have these essentials, you’ll be ready to bring GPT-4.1 into your prototypes seamlessly.
How do I keep my custom Bootstrap tokens synced in UXPin Merge?
To integrate custom Bootstrap tokens into UXPin Merge, start by activating and managing the Bootstrap library within the Design Systems panel. You can use properties like variant, size, and disabled to adjust components or apply custom styles that align with your tokens. By managing these tokens directly through the design system, you ensure consistency between prototypes and the final code. This approach minimizes discrepancies and keeps your custom tokens current.
Will the exported JSX work directly in my React app?
Yes, the exported JSX integrates seamlessly with your React app. With UXPin Merge, you can design, test, and export React components that are ready for production. These components align perfectly with the code used during development, ensuring smooth integration and consistent performance.

