Want to create prototypes that match your production code? With GPT-4.1 and UXPin Merge, you can generate functional, code-ready prototypes in minutes by using your own React components. This approach eliminates design-development gaps, reduces handoff friction, and ensures consistency with your design system.
Here’s what you’ll need to get started:
- UXPin Merge: A platform that syncs your design system with React components via Git, Storybook, or npm.
- OpenAI API Key: To power GPT-4.1 for creating layouts and refining designs.
- Production-Ready Design Library: Use built-in options like MUI or connect your custom components.
Key Benefits:
- Speed: Generate prototypes 8.6x faster with AI and production-ready components.
- Consistency: GPT-4.1 works only with pre-approved components, ensuring alignment with your design system.
- Code-Ready: Export clean JSX code directly for developers to use.
This guide shows how to integrate GPT-4.1 with UXPin Merge, connect your design library, and create responsive, interactive prototypes that developers can implement immediately.
The trick to AI prototyping with your design system
sbb-itb-f6354c6
What You Need Before You Start
To create your first AI-powered prototype, you’ll need a few essentials: an active UXPin account with Merge technology enabled, an OpenAI API key, and a production-ready design library connected to the platform. For pricing details, visit uxpin.com/pricing. UXPin provides built-in libraries like MUI, Ant Design, Bootstrap, and ShadCN, so you can start prototyping right away. If your team uses proprietary components, you’ll need to connect a custom library.
To connect with OpenAI, use Google Chrome to obtain your API key from the OpenAI website. Setting up your environment and rendering your first component usually takes under 30 minutes.
Once you’re set up, you can move on to connecting your custom design library, configuring GPT-4.1, and ensuring you’re using production-ready components.
Connect Your Design Library to UXPin Merge
UXPin Merge offers three ways to integrate your design library: Git, Storybook, and npm.
- Git Integration
This method works well for enterprise teams that need continuous syncing with live codebases. Start by installing the@uxpin/merge-clitool using npm. Then, create auxpin.config.jsfile in your repository’s root directory and push components using the UXPin Editor’s authentication token. For automated updates, add theuxpin-merge pushcommand to your CI/CD pipeline (with tools like CircleCI or Travis CI) and include theUXPIN_AUTH_TOKENas an environment variable. - Storybook Integration
Ideal for teams with well-documented component libraries. To secure private Storybook connections, use the@uxpin/storybook-deployerand a UXPin token for authentication. If you’re using Vite with Storybook, update theviteFinalconfiguration by addingconfig.base = ' 'to handle asset paths correctly. - npm Integration
This is the fastest setup option, perfect for teams working with standard packages. Designers can import components without needing developer assistance. Ensure your components are built with React.js (version ^16.0.0) and bundled using Webpack (version ^4.6.0). Each component should be in its own directory, with the filename defining the component name and usingexport defaultfor exports (in JavaScript with PropTypes, Flow, or TypeScript).
| Integration Method | Best For | Setup Complexity |
|---|---|---|
| Git Integration | Continuous syncing and enterprise workflows | Moderate to High |
| Storybook | Documented, well-organized component libraries | Moderate |
| npm | Quick integration of standard packages | Low |
After your library is integrated, you can activate GPT-4.1 in the UXPin Editor.
Set Up GPT-4.1 in UXPin
To enable AI features, open the AI Component Creator from the Quick Tools panel in the UXPin Canvas. In the Settings tab, paste your OpenAI API key. Once validated, select GPT-4.1, which is designed for handling logic, text, and visuals in complex designs. If you encounter peak usage times, you can switch between GPT-4.1 and GPT-3.5 for steady performance. Be sure to use detailed prompts, specifying elements like hex codes, font sizes (e.g., "16px bold"), and layout preferences (e.g., "bottom border of 2px solid") to get precise results.
Use Production-Ready Components
Using components approved by your design system ensures consistency between design and development. UXPin Merge lets you integrate production-ready React components directly into your designs, keeping them synced with live code. GPT-4.1 adheres strictly to your design system, working only with pre-approved components – no new UI patterns are created.
"When I used UXPin Merge, our engineering time was reduced by around 50%."
- Larry Sawyer, Lead UX Designer
Integration times can range from 2 hours to 4 days. It’s best to start with Wrapped Integration using Higher-Order Components (HOCs) to customize components for designers – like creating controlled checkboxes. Once you’re comfortable, you can move to Clean Integration for a more streamlined workflow.
With everything set up, you’re ready to dive into AI-driven prototyping.
How to Prototype with GPT-4.1 and UXPin Merge
With your setup ready and components connected, you can dive into creating prototypes that combine the speed of AI with the precision of your design system. This process ensures your prototypes align with development from the start, following three main steps: generating layouts with AI prompts, refining them using interactive elements, and testing them with your team before final handoff.
Step 1: Generate Prototypes Using AI Prompts
Start by creating a basic layout with AI prompts. Open the AI Component Creator from the Quick Tools panel on the UXPin Canvas. Enter a detailed prompt describing the layout, components, and visual details. For instance: "Create a user profile form with a text field for email (16px font), a password input with focus state, and a primary button with a 2px solid bottom border in #0066CC."
GPT-4.1 works exclusively with your pre-approved, production-ready components. This ensures the AI-generated designs match your codebase, avoiding the risk of producing layouts that can’t be implemented.
For complex interfaces, break the task into smaller prompts. Instead of asking for an entire checkout flow in one go, request the shipping form first, then the payment section, and finally the order summary. This step-by-step approach gives you better control over the output.
Step 2: Refine Prototypes with Code Components
Once AI generates the initial layout, refine it using the Modify with AI feature. Select a supported component (like top React component libraries MUI, Ant Design, Bootstrap, or ShadCN), click the purple Modify with AI icon, and type the changes you want. For example: "Change button color to #FF5733, add 16px padding, and update label to ‘Submit Order.’" Hit Update Component to instantly apply the changes.
On the UXPin canvas, you can also add interactivity by incorporating variables, conditionals, and expressions. This allows you to simulate real application behavior, making your prototype function more like the actual product rather than a static design.
After refining, it’s time to gather feedback and validate your work.
Step 3: Test and Collaborate with Your Team
Ensure your prototype is responsive and consistent across devices. Use version history and role-based permissions to collaborate effectively and track changes. Depending on your UXPin plan, version history is available for 7 days on Core, 30 days on Growth, and unlimited on Enterprise.
You can share secure previews to collect feedback while maintaining confidentiality. Designers can continue refining the prototype, while developers access auto-generated specifications that display the real JSX code for each component. This shared reference eliminates confusion during reviews and ensures everyone stays aligned throughout the process.
Export and Hand Off to Developers
Export Code-Ready Prototypes
Once your prototype is finalized, UXPin simplifies the handoff by generating clean, functional JSX code for every component used. Developers can access this code in Spec Mode, where they can easily copy and paste React code directly into their projects. This includes all necessary props, dependencies, and interactions, streamlining the transition from design to development.
For even faster implementation, the "Open in StackBlitz" feature allows developers to launch the prototype in a live, browser-based development environment. Here, they can test and tweak the code before integrating it into production. As Allison Barkley, Director of Operations at Baremetrics, shared:
"Being able to jump straight from design to having code ready to going to be a huge time-saver for our team."
Since UXPin Merge directly uses React.js components from your Git repository or npm packages, there’s no need for a translation layer. Developers receive code that perfectly aligns with your production environment, avoiding the usual back-and-forth over implementation details. This seamless alignment speeds up collaboration and ensures a smoother workflow.
Keep Design and Development in Sync
With UXPin’s Git integration, your design system stays consistent and up-to-date. Any updates developers make to components in the code repository automatically sync with the UXPin Editor. This eliminates the risk of design drift by ensuring that designers always work with the latest approved components.
Erica Rider, a UX Architect at Microsoft, demonstrated this in action by syncing the Fluent design system with UXPin Merge. The result? A small team of just 3 designers supported 60 internal products and over 1,000 developers.
This integrated approach transforms the handoff process into a seamless experience. Developers receive prototypes built with the exact components they’ll deploy, reducing rework and accelerating the journey from design to production.
Why Use GPT-4.1 with UXPin Merge
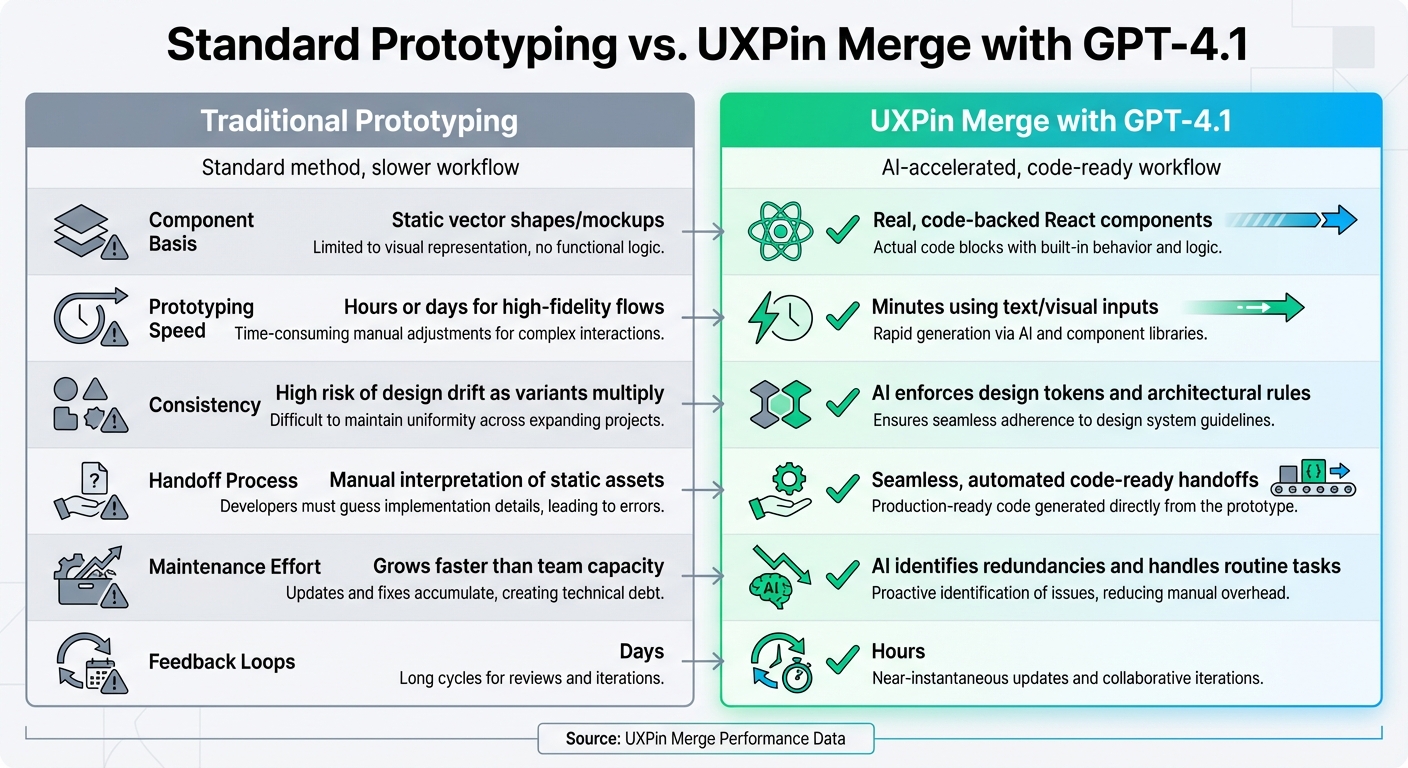
Traditional Prototyping vs UXPin Merge with GPT-4.1 Comparison
UXPin Merge combined with GPT-4.1 transforms prototyping into a fast, precise, and code-ready process. Unlike traditional tools that rely on static mockups, this approach leverages real React components directly from your production codebase – whether you’re using MUI, Ant Design, Bootstrap, shadcn/ui, or a custom library. This means your prototypes function just like the final product, eliminating the need for developers to interpret or recreate designs during handoff.
GPT-4.1 ensures that only approved, production-ready components are used, adhering strictly to your design system guidelines. This guarantees that every AI-generated layout stays consistent with your codebase while maintaining design system standards, even as your team scales.
Standard Prototyping vs. UXPin Merge with GPT-4.1
The differences between traditional prototyping and using UXPin Merge with GPT-4.1 are stark, impacting every stage of the design process. Here’s a comparison:
| Metric/Feature | Traditional Prototyping | UXPin Merge with GPT-4.1 |
|---|---|---|
| Component Basis | Static vector shapes/mockups | Real, code-backed React components |
| Prototyping Speed | Hours or days for high-fidelity flows | Minutes using text/visual inputs |
| Consistency | High risk of design drift as variants multiply | AI enforces design tokens and architectural rules |
| Handoff Process | Manual interpretation of static assets | Seamless, automated code-ready handoffs |
| Maintenance Effort | Grows faster than team capacity | AI identifies redundancies and handles routine tasks |
| Feedback Loops | Days | Hours |
Benefits for Enterprise Teams
Enterprise teams often face complex challenges, and UXPin Merge with GPT-4.1 offers direct solutions. Prototypes move from design to production in days instead of months, thanks to its streamlined workflow. The single source of truth approach eliminates version drift, as designers and developers work with identical components synced through Git or Storybook. This ensures that design system guidelines are consistently followed.
Collaboration becomes more seamless since both designers and developers work with the same synced components. Engineers receive code that aligns with their existing components and props, avoiding the need to rebuild designs from scratch.
Merge components also include high-fidelity interactivity, such as real states (hover, disabled, loading) and responsive behaviors. This enables realistic user testing without requiring manual simulation. These advantages make production-ready handoffs smoother and improve collaboration across the board.
Conclusion
Prototyping with GPT-4.1 and UXPin Merge reshapes how teams move from design to production. Instead of relying on static mockups, you work with production-ready React components. These prototypes go beyond visuals – they’re functional code that developers can use right away.
By integrating your design library, you can generate layouts using GPT-4.1 prompts and fine-tune them with precise code components. Since GPT-4.1 works exclusively with approved components from your design system, every prototype stays consistent while significantly speeding up the prototyping process.
This method brings clear, measurable advantages. Engineering time is dramatically reduced, feedback cycles shrink from days to hours, and even small design teams can effectively support over 1,000 developers without compromising quality. Prototypes include real interactive states, responsive behaviors, and consistent props, removing the typical pain points of design handoff process.
For teams struggling with design drift and slow iteration cycles, this approach offers a unified source of truth that stays synced with your Git repository or Storybook. Any updates to production code automatically reflect in your design environment, ensuring alignment without the need for manual adjustments.
FAQs
Which UXPin Merge integration should my team use (Git, Storybook, or npm)?
When deciding on a UXPin Merge integration, pick the one that best aligns with your workflow and component sources:
- Git: Perfect if you need a direct connection to repositories like GitHub or GitLab. Ideal for teams working closely with source control systems.
- npm: Use this option to import React UI libraries through package managers. A great choice if you’re managing dependencies via npm.
- Storybook: Seamlessly integrate documented components from your Storybook setup. This works well if your team relies on component libraries.
Each method caters to different workflows, so choose based on whether your priority is source control, package management, or leveraging existing component libraries.
How do I ensure GPT-4.1 only uses our approved design system components?
To make sure GPT-4.1 works seamlessly with your approved design system components, integrate your design system into UXPin Merge. By doing this, you can configure prompts to rely solely on these components, ensuring consistency and adherence to your design standards. This setup not only aligns with your guidelines but also simplifies workflows for better efficiency.
What’s the fastest way to hand off the prototype as clean JSX to developers?
The fastest way to get a prototype ready in clean JSX is by exporting production-ready React code directly using UXPin Merge. This approach keeps everything consistent, reduces unnecessary rework, and makes collaboration between designers and developers much smoother.

