Want to streamline your UI design process? With Claude Sonnet 4.5 and UXPin Merge, you can skip the back-and-forth between design and development. Here’s how:
- Claude Sonnet 4.5: Generates production-ready React components from simple text prompts.
- UXPin Merge: Syncs these components directly into your design workspace, ensuring prototypes are built with real, functional code.
This combo eliminates static mockups, aligns design with development, and speeds up deployment. Companies like Figma have already seen faster iterations and better testing with this approach.
Key Steps:
- Set up UXPin Merge: Configure libraries (MUI, Ant Design, etc.) or import your custom design system.
- Generate components with Claude Sonnet 4.5: Use detailed prompts to create React components tailored to your design tokens.
- Sync with UXPin Merge: Import components into UXPin for interactive, code-backed prototypes.
Result: A single workflow where design and development work seamlessly together, saving time and ensuring consistency.
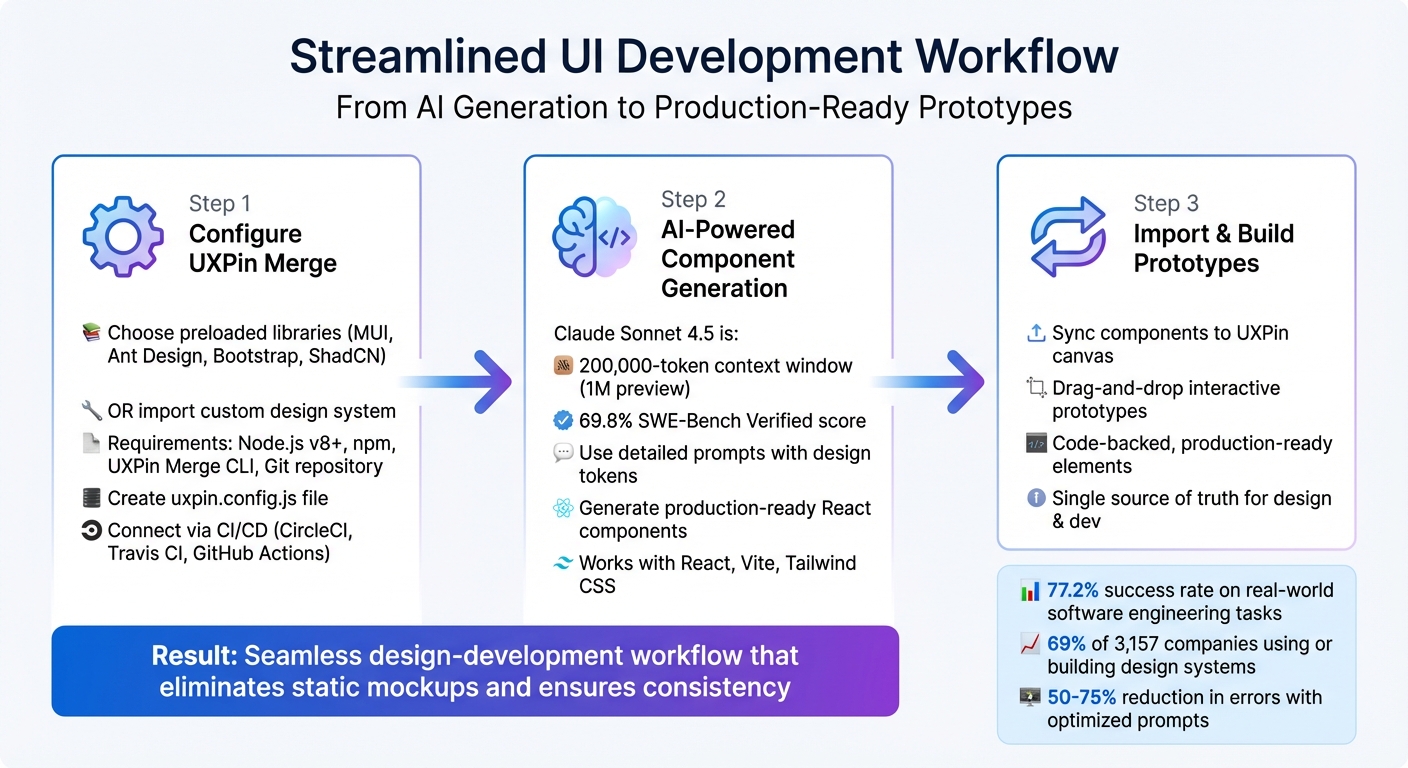
How to Build UI with Claude Sonnet 4.5 and UXPin Merge – 3-Step Workflow
Setting Up UXPin Merge and Custom Design Systems
Before syncing AI-generated components from Claude Sonnet 4.5, you’ll need to configure UXPin Merge. This tool comes with preloaded libraries like MUI, Ant Design, Bootstrap, and ShadCN, which are ready to use right out of the box. If you’re working with your own proprietary design system, you’ll need to import a custom library instead.
For custom setups, you’ll require Node.js (v8 or later), npm for managing dependencies, the UXPin Merge CLI for local testing, and a Git repository (like GitHub, GitLab, or Bitbucket). Windows users should run Linux-based CLI tools through the Windows Subsystem for Linux (WSL). Start by creating a uxpin.config.js file at the root of your repository. Then, connect the repository using CI/CD tools such as CircleCI, Travis CI, or GitHub Actions to automate syncing with the UXPin Design Editor. Don’t forget to include an access token as an environment variable to authorize code pushes. This setup ensures a smooth workflow for syncing AI-generated components with production-ready design systems.
Once you’ve set up the basics, install and configure UXPin Merge to validate your environment before moving on to design token organization.
Installing and Configuring UXPin Merge
To test your integration, start with the UXPin Merge Boilerplate repository. This lets you confirm everything works before connecting your full design system. You can choose between two integration methods:
- Clean Integration: Directly connects your Git repository to UXPin.
- Wrapped Integration: For components needing Higher-Order Components to meet Merge’s requirements.
Make sure each component resides in its own directory and exports a default to avoid compilation issues. Before pushing to production, use the npm start command to launch the local Dev Environment Editor, which previews how your components and properties will render in UXPin. As UXPin explains:
Merge components render on UXPin’s canvas exactly as they do in the repository, enabling designers to create fully functioning prototypes indistinguishable from the final product.
Organizing Custom Design Tokens
Once UXPin Merge is configured, focus on creating a structured design token system to maintain visual consistency across your projects. Organize tokens into a multi-level hierarchy: Category, Type, Item, Sub-Item, and State. Divide tokens into two groups:
- Options: These are base values, like a HEX code (e.g.,
#FF5733). - Decisions: These define how the base values are applied to components, such as
action-color-background.
Use intent-based naming for tokens (e.g., spacing-medium instead of spacing-16px) to avoid renaming tokens when their values change. Store tokens centrally in JSON or YAML files, which can then be converted into platform-specific formats like CSS variables.
For web-based systems, converting tokens into CSS variables ensures changes are applied globally. UXPin supports importing color tokens either by linking a CSS file or entering HEX codes directly. According to a survey of 3,157 companies, 69% are either using or actively building a design system. Properly organizing tokens is key to scaling your system effectively. When done right, tokens sync seamlessly with UXPin’s canvas, ensuring a tight connection between design and development efforts.
sbb-itb-f6354c6
Using Claude Sonnet 4.5 to Generate UI Components

Once your design tokens and UXPin Merge are configured, you can leverage Claude Sonnet 4.5 to produce ready-to-use UI components. This model is well-regarded for its ability to deliver React, Vite, and Tailwind code that meets production standards. The secret lies in teaching Claude about your specific design systems and constraints, ensuring the generated components integrate seamlessly into your existing codebase.
Claude Sonnet 4.5 features a 200,000-token context window (with a preview capability extending to 1 million tokens). This allows you to input entire design token JSON files, CSS variables, or component documentation directly into the prompt. By providing this detailed context upfront, the model gains a comprehensive understanding of your system before generating any code. Impressively, it scored 69.8% on the SWE-Bench Verified benchmark, reflecting its ability to tackle complex software engineering tasks. However, achieving this level of precision starts with crafting well-structured prompts.
Writing Effective Prompts for Claude Sonnet 4.5
To ensure your components align with your design system, focus on creating clear and detailed prompts. For example, you might instruct Claude: "Generate a React button component using custom tokens for action-color-background and spacing-medium, including hover and focus states".
Structure your prompts with XML tags to improve Claude’s understanding. For instance, wrap your design token JSON in <design_tokens> tags and component requirements in <requirements> tags. This organization helps the model interpret your instructions accurately. If you’re dealing with intricate UI logic or accessibility needs, enable the "extended thinking" API feature to let Claude validate token hierarchies before coding.
To avoid generic designs, include specific aesthetic constraints in your prompts. Mention details like color palettes (e.g., "use dark blue and cyan from the token file"), typography (e.g., "Inter for headings"), and layout preferences (e.g., "card-based with subtle shadows"). Additionally, request interactive features such as hover states, transitions, and refined micro-interactions to ensure the components are polished and engaging.
When making updates or working on long tasks, use the <investigate_before_answering> tag to instruct Claude to review relevant files in your codebase. This reduces inconsistencies and ensures the generated components align with your existing patterns. For extended sessions, prompt the model to save progress periodically as it nears the token limit, making it easier to pick up where you left off.
Creating Components with Custom Design Tokens
After refining your prompts, tie your components to your custom tokens by initializing each session with the latest token file. This ensures Claude uses your design tokens as the authoritative source, avoiding the use of hardcoded values. Be explicit in your instructions, specifying how UI properties – like background-color, border-radius, and padding – should map to the tokens.
For instance, when designing a card component, you could prompt: "Apply spacing-large for padding, border-radius-medium for corners, and surface-color-primary for background – all sourced from the attached token file."
Claude Sonnet 4.5 works seamlessly with React, Vite, and Tailwind CSS. If you’re using another framework, provide examples of your existing components so the model can adapt to your style. Anthropic highlights:
Claude Sonnet 4.5 excels in software development tasks, learning our codebase patterns to produce precise implementations.
For more complex components, take advantage of the "Checkpoints" feature. This allows you to save progress during the creation process and roll back if the output diverges from your design system.
Importing AI-Generated Components into UXPin Merge
After Claude Sonnet 4.5 creates your React components, the next step is importing them into UXPin Merge. Here, these components become interactive, code-backed elements that integrate directly into your design workspace. This approach simplifies the traditional design-to-development process by syncing actual code with your design tools, removing the need for static mockups.
Syncing Components into the UXPin Canvas
Once your components are ready, the next priority is importing them into your design environment. Ensure they meet production-ready React standards and align with your design system. UXPin Merge works seamlessly with libraries like MUI, Ant Design, and Bootstrap, so if your components use these frameworks, the process is straightforward. Use UXPin Merge’s sync feature to add the components to your design library. They’ll appear as fully functional, code-backed elements, retaining all their interactive features.
For custom design systems, you can connect UXPin Merge directly to your component repository. This creates a single source of truth between design and development, ensuring any updates to the components are automatically reflected in the design environment. This is especially helpful for enterprise teams managing complex systems across multiple products.
Building Interactive Prototypes in UXPin Merge
After syncing, you can immediately use the components to build high-fidelity prototypes. Simply drag and drop your React components onto the UXPin canvas to assemble prototypes that behave just like the final product. Unlike static mockups, these components fully mirror their production functionality, giving stakeholders a realistic preview of the application. Plus, when it’s time to transition to development, developers can use the exact same components, eliminating extra steps and speeding up the development process.
Best Practices for Scalable UI Development
To get the most out of Claude Sonnet 4.5 and UXPin Merge, it’s essential to establish clear workflows and consistent practices. The goal? Move quickly while keeping everything functional and scalable. This means perfecting your AI prompts and managing the components it produces with precision.
Refining Claude Sonnet 4.5 Prompts for Production Components
The quality of components generated by Claude Sonnet 4.5 hinges on how well you craft your prompts. For production-level components, use structured prompts with XML tags like <instructions>, <design_tokens>, and <component_spec>. This makes it easier for Claude to interpret and execute complex UI requirements consistently.
Another effective technique is few-shot prompting. By including 3–5 polished, production-ready examples wrapped in <example> tags, you can guide the AI to match your team’s coding standards and preferred formats. Adding a specific role to the system prompt, such as "Senior UI Engineer specializing in React and Design Systems", helps focus the AI’s responses on technical depth and relevance.
For more intricate components, leverage the effort parameter to control the AI’s reasoning depth. Setting it to "high" minimizes errors – teams have reported a 50%–75% drop in tool calling and build/lint issues. Claude’s 77.2% success rate on the SWE-bench Verified benchmark further underscores its reliability for software engineering tasks.
"Claude Sonnet 4.5’s edit capabilities are exceptional – we went from 9% error rate on Sonnet 4 to 0% on our internal code editing benchmark." – Replit
To maintain consistency, always specify the React library (e.g., MUI or Ant Design) that aligns with your UXPin Merge library. This ensures that both the visual design and functionality stay in sync. Requesting code wrapped in tags like <react_component> makes it easier to automatically extract and integrate into UXPin Merge. These strategies form the backbone of seamless integration between design and development.
Maintaining Design and Development Alignment with UXPin Merge
Once your prompts are refined, aligning design and development becomes much simpler. UXPin Merge serves as a single source of truth, syncing AI-generated React components directly into the design canvas. This allows designers to work with production-ready code, eliminating the need for translation between design and development.
Immediate syncing is critical. By importing React code from Claude into UXPin Merge without delay, designers can visually manipulate components while preserving the underlying code’s integrity. The result? Prototypes that behave just like the final product, reducing gaps between design intent and functionality. This approach is particularly effective for enterprise teams juggling complex systems across multiple products.
To ensure quality, implement DesignOps frameworks with automated checks. For instance, post-edit hooks can run linters or test suites right after component generation, verifying that everything meets your standards.
Context management is another key factor in maintaining consistency. Features like context editing can improve performance on long-running tasks by 39%, while removing outdated tool calls boosts efficiency by 29%. Claude’s Memory Tool is especially helpful here – it stores design system documentation and token values outside the immediate context window, ensuring consistency across extended development sessions.
Conclusion
Claude Sonnet 4.5 and UXPin Merge are reshaping UI development by allowing teams to work directly with production-ready React components from the very beginning. This eliminates the traditional back-and-forth between designers and developers – what designers create matches exactly what developers implement.
Here’s how it works: you can generate components using Claude, sync them into UXPin Merge with libraries like MUI or Ant Design, and build functional prototypes that feel like the final product. Since these prototypes are backed by actual code, you’re testing real functionality and interactions early on, rather than making assumptions about how things might behave later. This integration creates a smooth workflow between design and development.
Speed and consistency are key here. By combining AI-generated components with your custom design tokens, you maintain brand alignment while significantly cutting down on project timelines. This creates a single source of truth, keeping both designers and developers on the same page from start to finish.
With Claude Sonnet 4.5 achieving a 77.2% success rate on real-world software engineering tasks and UXPin Merge enabling the use of production-grade components, teams can move from an initial idea to a fully deployed UI in just days. This method not only accelerates development but also enhances reliability and scalability, making the entire UI development process more efficient and dependable.
FAQs
What do I need to set up UXPin Merge with my custom design system?
To get started with UXPin Merge and your custom design system, head over to the Design Systems tab in UXPin. From there, you can either create a new design system or access an existing one. Next, connect your code repository or import your UI components. This integration lets you design directly with your React components, maintaining consistency and enabling real-time updates between your design system and prototypes.
How do I prompt Claude Sonnet 4.5 to follow my design tokens exactly?
To get Claude Sonnet 4.5 to stick to your design tokens, clarity is key. You need to give precise, structured prompts that leave no room for interpretation. The best way to do this? Be direct and specific.
For instance, include your design tokens in the prompt and explicitly tell the model to follow them exactly. Here’s an example of how you could phrase it:
"Use these design tokens exactly: [list tokens]. Generate UI components that strictly follow them."
This approach takes full advantage of the model’s enhanced ability to follow instructions. With clear, detailed guidance, you can ensure the output aligns with your design requirements.
How do I sync AI-generated React components into UXPin for prototypes?
To sync AI-generated React components with UXPin, leverage UXPin Merge to integrate production-ready components seamlessly. Start by generating components using Claude Sonnet 4.5. Then, connect these components to UXPin Merge through a code repository, such as Git or Storybook. Once integrated, you can use these components to build interactive prototypes that closely reflect the final product. This approach removes the need for manual handoffs, making the development process more efficient.