Building UIs for enterprise applications can be faster and more efficient by combining Claude Haiku 4.5, Ant Design, and UXPin Merge. Here’s how these tools work together:
- Claude Haiku 4.5: An AI tool that generates React components from simple text prompts, making UI development easier and quicker.
- Ant Design: A robust React-based component library with pre-built, customizable elements tailored for enterprise needs.
- UXPin Merge: A design tool that integrates live code components into the design process, ensuring consistency between design and development.
This approach eliminates common design-to-development issues, speeds up workflows by 3-5x, and reduces design handoff problems by 68%. Designers and developers can work with the same production-ready components, saving time and ensuring accuracy.
Key Benefits:
- Generate UI layouts with Claude Haiku 4.5 in seconds.
- Use Ant Design’s 60+ components for enterprise-grade UIs.
- Prototype with real code in UXPin Merge for consistency.
Generate UI Designs Faster: New AI Tool for UI/UX
sbb-itb-f6354c6
Setting Up Your Environment
Get started with Claude Haiku 4.5, Ant Design, and UXPin Merge without any hassle. This setup brings everything together seamlessly – no need for separate AI subscriptions, external design libraries, or complicated installations. Here’s how you can configure your environment step by step.
How to Access Claude Haiku 4.5 in UXPin
Claude Haiku 4.5 is directly integrated into UXPin through the AI Component Creator tool. You don’t need to sign up for any external AI services. Simply open the AI Component Creator in UXPin’s canvas, choose Claude as your model, and start entering prompts. UXPin supports both OpenAI and Claude models, giving you the flexibility to generate UI components with ease.
For instance, if you type a prompt like "a responsive data table with Ant Design styling and sorting functionality," the tool will generate production-ready JSX code. These components render as real code, which you can export as React code complete with all necessary dependencies.
How to Use Ant Design Components in UXPin Merge
Once you’ve generated your UI code, you can leverage Ant Design’s pre-built components in UXPin Merge. Ant Design is included as a built-in React library in UXPin Merge. To access it, go to the Libraries section in the UXPin editor and select Ant Design. From there, you can drag and drop ready-made components – like tables, forms, or modals – directly onto your canvas. Each component is powered by React code, allowing you to adjust variants and customize properties such as padding and spacing right within the editor. Ant Design trial kits make it easy to prototype quickly without starting from scratch.
Connecting UXPin Merge to Your Code Repository
If your team uses custom components, you can keep your designs up to date by linking UXPin Merge to your code repository. UXPin Merge integrates with Git repositories via a CI/CD pipeline. Start by installing the Merge CLI tool using npm, then create a uxpin.config.js file in your repository’s root directory to define component paths, categories, and webpack settings.
Next, generate an authentication token by setting up a new library in the UXPin Design Editor. Add this token as an environment variable in your CI/CD tools. Once everything is configured, every code commit will automatically sync updates to the design editor. This ensures your design and development teams are always aligned, creating a single source of truth.
Mark Figueiredo, Sr. UX Team Lead at T. Rowe Price, shared his experience with the process:
"What used to take days to gather feedback now takes hours. Add in the time we’ve saved from not emailing back-and-forth and manually redlining, and we’ve probably shaved months off timelines."
How to Build UIs with Claude Haiku 4.5 and Ant Design
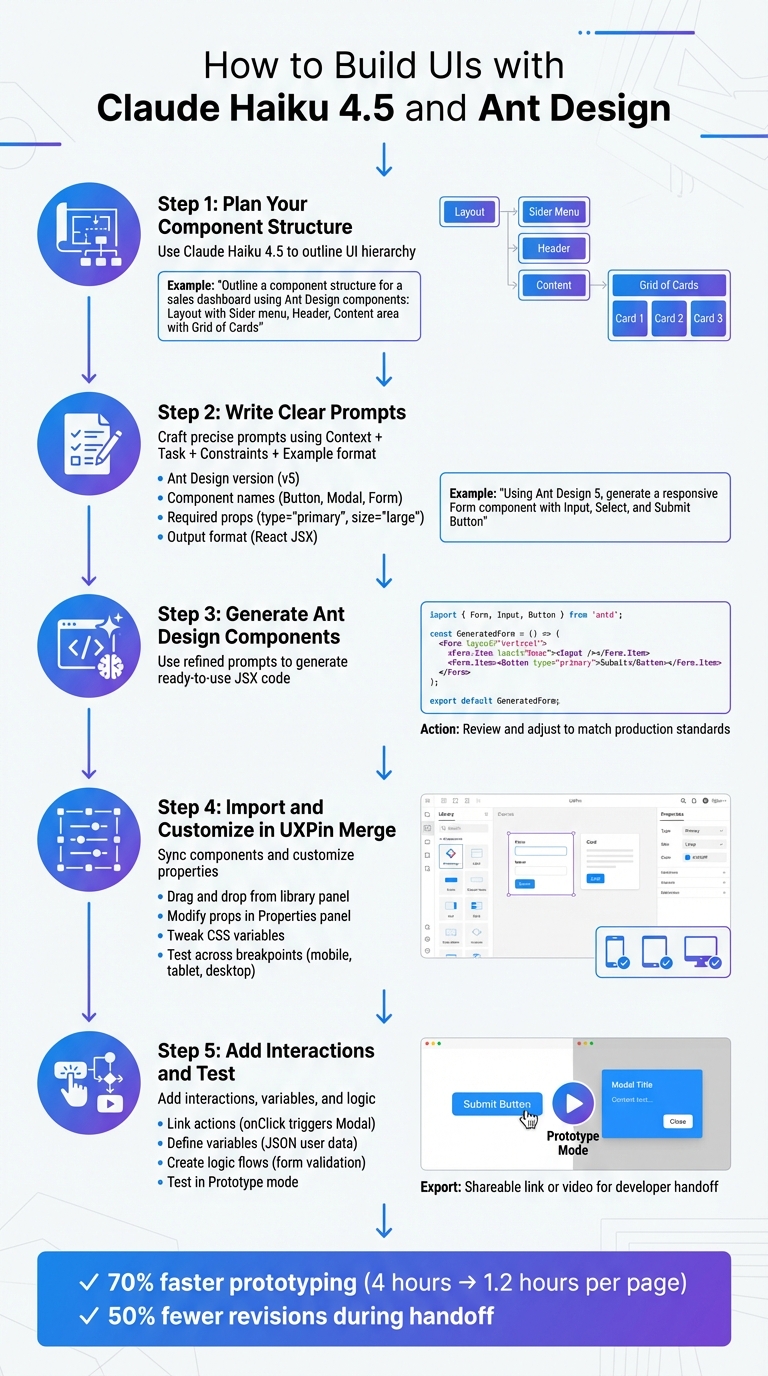
5-Step Process to Build UIs with Claude Haiku 4.5 and Ant Design in UXPin Merge
Once your environment is set up, you can follow these five steps to turn your design ideas into fully functional UI components. This process ensures your designs are consistent and ready for production, covering everything from initial planning to final testing.
Step 1: Plan Your Component Structure with Claude Haiku 4.5
Start by outlining the structure of your UI. Use a detailed prompt to map out the hierarchy of components. Open the AI Component Creator in UXPin and leverage Claude Haiku 4.5 to define the logical layout of your interface. For example, if you’re designing a sales analytics dashboard, your prompt might look like this:
"Outline a component structure for a sales dashboard using Ant Design components: top-level Layout with Sider menu, Header, Content area containing Grid of Cards with Metrics, Table for data, and LineChart; include props and nesting."
This generates a clear component tree, showing how elements like Layout, Sider, Header, and Content fit together. This step ensures your UI remains modular and scalable, which is especially important for enterprise-level applications where consistency across teams is key.
Step 2: Write Clear Prompts for Claude Haiku 4.5
The next step is to craft precise prompts using a Context + Task + Constraints + Example format. Be specific about the Ant Design version (v5), component names (e.g., Button, Modal, Form), required props (e.g., type="primary", size="large"), and the desired output format (React JSX code).
Here’s an example prompt:
"Using Ant Design 5, generate a responsive Form component with Input, Select, and Submit Button for user registration; include validation rules and Tailwind classes for UXPin Merge; output as ready-to-use JSX."
This clarity ensures the generated code works seamlessly in UXPin.
Step 3: Generate Ant Design Components
Now, use your refined prompts to generate components. Claude Haiku 4.5 provides ready-to-use JSX code, complete with imports and props. The AI utilizes its understanding of React and Ant Design to create components that can immediately function in UXPin Merge. For instance, if you need a metric card, the output might look like this:
import { Card, Typography } from 'antd'; const { Title } = Typography; const MetricCard = ({ title, value }) => ( <Card title={<Title level={4}>{title}</Title>} style={{ width: 300 }}> <p>{value}</p> </Card> ); export default MetricCard; Review the code and make adjustments if needed. This step ensures the generated components match your production standards while remaining interactive within UXPin’s canvas.
Step 4: Import and Customize Components in UXPin Merge
Once the components are generated, sync them with UXPin Merge. Drag and drop components from the library panel onto your canvas and customize their properties in the Properties panel. You can modify props (e.g., change a Button’s style from "default" to "primary"), tweak CSS variables (e.g., --ant-primary-color: #1890ff), or add states like hover effects or disabled functionality.
To ensure consistency, map your design system variables in the Merge config.json file. Test the components across various breakpoints – mobile, tablet, and desktop – using UXPin’s preview modes.
Step 5: Add Interactions and Test Your Prototype
The final step involves adding interactions, variables, and logic to simulate application behavior. Use UXPin’s interaction builder to link actions, like a button click triggering a Modal via onClick. Define variables (e.g., user data in JSON format) and create logic flows (e.g., if/else conditions for form validation). For Ant Design components, you can connect events like onFinish for Forms to mimic real-world functionality.
Test your prototype in Prototype mode, simulating user flows, checking responsiveness, and verifying performance. Once satisfied, export the prototype for developer handoff as a shareable link or video. This ensures the design and code are perfectly aligned.
UXPin case studies show teams using this workflow achieve 70% faster prototyping, cutting the time to build a single page from 4 hours to just 1.2 hours, and experience 50% fewer revisions during handoff. By working with real code components instead of static mockups, the gap between design and development is effectively eliminated.
Aligning Ant Design with Your Design System
Ant Design’s default theme is great for many applications, but enterprise teams often need to tailor it to reflect their brand identity. With UXPin Merge, you can easily customize Ant Design tokens while keeping everything consistent across your organization. This way, you work with production-ready components that match your design system perfectly.
Customizing Ant Design Tokens
Ant Design relies on design tokens to manage visual elements like colors, typography, spacing, and border radius. To align these tokens with your brand, you can modify their values in your UXPin Merge configuration. Start by opening the config.json file in your connected repository. From there, override default tokens such as --ant-primary-color to match your brand’s primary color. For instance, you might change it from #1890ff to #FF5733 for a bold and energetic appearance.
You can also adjust typography tokens like --ant-font-family to reflect your brand’s font (e.g., switching to Inter instead of the default). Similarly, tweak spacing tokens like --ant-padding-lg or --ant-margin-md to align with your design grid, such as using 8px or 4px increments. Once you sync these updates with UXPin Merge, your Ant Design components will automatically adopt your brand’s visual identity.
For more advanced adjustments, the Properties panel in UXPin Merge allows precise token edits. This ensures that every component adheres to your design guidelines, creating a seamless connection between design and development.
Maintaining Consistency Across Teams
Once you’ve customized your design tokens, it’s critical to maintain consistency across all projects. Centralized governance is the key to ensuring that everyone uses the same components and tokens. UXPin Merge integrates directly with your Git repository, so any updates to your design system tokens or components are automatically shared across all projects. This prevents teams from accidentally using outdated or mismatched components.
"Consistent design reduces cognitive load on users, as they don’t have to learn new patterns for each section of your interface." – UI Laws
To promote consistency, establish clear guidelines for how components should be used. For example, ensure functional elements like "Save" or "Cancel" buttons always appear in the same spot. Similarly, use consistent navigational patterns like breadcrumbs, menus, and headers across all internal applications.
UXPin’s Roles & Permissions feature (available with the Growth plan) can also help maintain order. By controlling who can edit design system components, you can ensure that only authorized team members make changes, keeping your design system intact and reliable.
Best Practices for Using Claude Haiku 4.5, Ant Design, and UXPin Merge
Working with AI-generated components requires a shift in approach compared to traditional design workflows. Tools like Claude Haiku 4.5 thrive on precise, detailed instructions. Instead of vague commands like "fix the bug", provide clear specifications, include file references, and describe the expected versus actual behavior to achieve better results.
Improving Designer-Developer Collaboration
UXPin Merge streamlines collaboration by letting designers and developers work with the same production-ready components. By using Ant Design components directly in the design process, you remove the need for translation layers between design and development. This shared framework reduces misunderstandings, meaning fewer meetings to explain functionality and more time spent building. To ensure your development backend is equally well-aligned, DreamFactory provides governed API access to any data source, which can be particularly valuable for enterprise applications that need secure, role-based access to multiple databases and systems.
To maximize this process, establish a single source of truth for your design system. Since UXPin Merge syncs directly with your Git repository, any updates to components or tokens automatically propagate across all projects. Designers can confidently prototype without worrying about rebuilding later, while developers can rely on specifications that match the code they’ll deploy. This alignment allows teams to focus on identifying and addressing potential issues before they arise.
Avoiding Common Mistakes
One frequent mistake when working with AI-generated code is submitting outputs without a thorough review. While Claude Haiku 4.5 may generate components that look correct, subtle issues like logic errors, security vulnerabilities, or inefficiencies can still lurk beneath the surface. As Karthikeyan R from Trellix warns:
"Claude Code is a command-line tool, not a mind reader. When you type ‘fix the bug,’ you are rolling the dice."
Treat AI-generated code as a starting point, not the final product. Review and refine edge cases, improve error handling, and adjust data types to ensure the component is truly production-ready. Avoid overwhelming the model with overly large or unfocused prompts, which can lead to errors or irrelevant outputs. Instead, break down complex tasks into smaller, focused requests.
Another common pitfall is neglecting to provide explicit instructions. Even with clear overarching directives, AI tools like Claude may miss specific constraints, such as file delimiters or procedural changes. To avoid this, use precise scoping syntax (e.g., @[path/to/file]) to limit changes to the relevant code segments. As Vincent Parrett advises:
"With ‘AI’ you absolutely have to guide it with an iron hand."
Taking these precautions ensures a smoother workflow and sets the foundation for scaling across larger teams.
Scaling Your Workflow for Large Teams
Once you’ve refined individual practices, scaling your workflow requires strong governance and automation. Building on the principle of maintaining a single source of truth, scaling involves implementing automated safeguards like static analysis and CI/CD pipelines. UXPin’s Roles & Permissions feature (available with the Growth plan) helps control who can edit design system components, ensuring consistency and preventing unauthorized changes across projects. This is particularly critical when multiple teams are involved in maintaining a unified brand experience.
For enterprise-level operations, combine AI generation with static analysis, type-checking, and CI/CD gates to catch issues before they impact your main repository. This proactive approach creates a feedback loop, allowing teams to identify and fix errors early, reducing the risk of problems in production.
While AI can speed up workflows, it doesn’t replace expertise – it complements it. As Ivan Annovazzi from Flare Emergency Response notes:
"AI does not replace experience; it requires human expertise."
The success of AI in your process depends on your team’s ability to write clear prompts, critically evaluate generated code, and maintain a strong architectural vision. With these skills, AI becomes a powerful tool to enhance your workflow rather than a source of technical debt.
Conclusion
Bringing together Claude Haiku 4.5, Ant Design, and UXPin Merge transforms how enterprise teams build user interfaces. This trio creates a seamless connection between design and development, serving as a single source of truth. With AI generating production-ready code, designers prototyping with live components, and developers receiving precise specs, the result is a workflow that dramatically boosts efficiency.
The impact is clear in the numbers. Teams using UXPin Merge have reported cutting engineering time by nearly 50%. Feedback loops that used to drag on for days now take just hours.
This efficiency stems from removing unnecessary handoffs. When designers work directly with production-ready Ant Design components, there’s no need to rebuild static mockups. Claude Haiku 4.5 speeds up the process by generating complex layouts from simple prompts, while UXPin Merge ensures every interaction, state, and token stays perfectly aligned with your design system. For enterprise teams, this tight alignment eliminates the common gap between design intent and the final product.
Start small to see the benefits in action. Use Claude Haiku 4.5 to create an Ant Design table or form, bring it into UXPin Merge, customize it to fit your brand, and track the time saved. By beginning with a single component and gradually scaling up, you can extend this streamlined approach across your entire design system while maintaining consistent governance and automation.
These tools don’t replace your team’s expertise – they enhance it. The value they bring depends on your team’s ability to craft thoughtful prompts, evaluate generated code critically, and maintain a solid architectural foundation.
FAQs
What’s the fastest way to write prompts that output usable Ant Design v5 JSX?
The quickest way to get results with Claude Sonnet 4.5 is by crafting clear and detailed prompts. When you provide precise instructions, the AI can generate React layouts with Ant Design components more effectively.
Here are some tips to refine your prompts:
- Be descriptive about UI elements: Clearly outline the design and structure you want.
- Mention specific Ant Design components: Specify the exact components or features you need.
- Include layout, styling, and interactions: Give details about how elements should look and behave.
Additionally, linking your API key and keeping prompts concise can significantly improve the AI’s ability to produce production-ready JSX code.
How do I sync my team’s custom React components into UXPin Merge from Git?
To bring your team’s custom React components into UXPin Merge, you can use UXPin’s Git integration. This handy feature allows you to pull components straight from your Git repository and ensures they stay updated automatically.
The process involves a few key steps: connecting your Git repository, setting up the integration, and importing components into UXPin Merge. Once connected, any updates made in Git will sync automatically, keeping your components aligned and ready for seamless prototyping.
How can I theme Ant Design tokens so prototypes match our brand exactly?
To make sure your prototypes reflect your brand, you can tweak Ant Design tokens by replacing the default settings with your brand’s specific colors, fonts, and design details. This means setting up a custom theme configuration where you define tokens like primary, secondary, and background colors. When you pair these custom tokens with UXPin, you’ll maintain a unified visual style across both prototypes and the final product, ensuring your designs stay aligned with your brand’s identity.

