Want to create a landing page quickly and efficiently? Combine GPT-5.2 for AI-generated copy, Ant Design for pre-built React components, and UXPin Merge for seamless design-to-code integration. This process allows you to build a responsive, production-ready landing page in hours, not days. Here’s how it works:
- GPT-5.2: Generates tailored headlines, CTAs, and feature descriptions for U.S. audiences.
- Ant Design: Provides reusable, developer-friendly UI components like buttons, grids, and forms.
- UXPin Merge: Lets designers work with real Ant Design components, eliminating handoff issues.
Key Benefits:
- Reduce back-and-forth between teams by up to 50%.
- Ensure design and code alignment with reusable components.
- Quickly iterate and refine using AI-generated content.
By using these tools together, you can create a functional, responsive landing page that minimizes manual rework and ensures consistency across design and development. Let’s dive into the steps to bring your project to life.
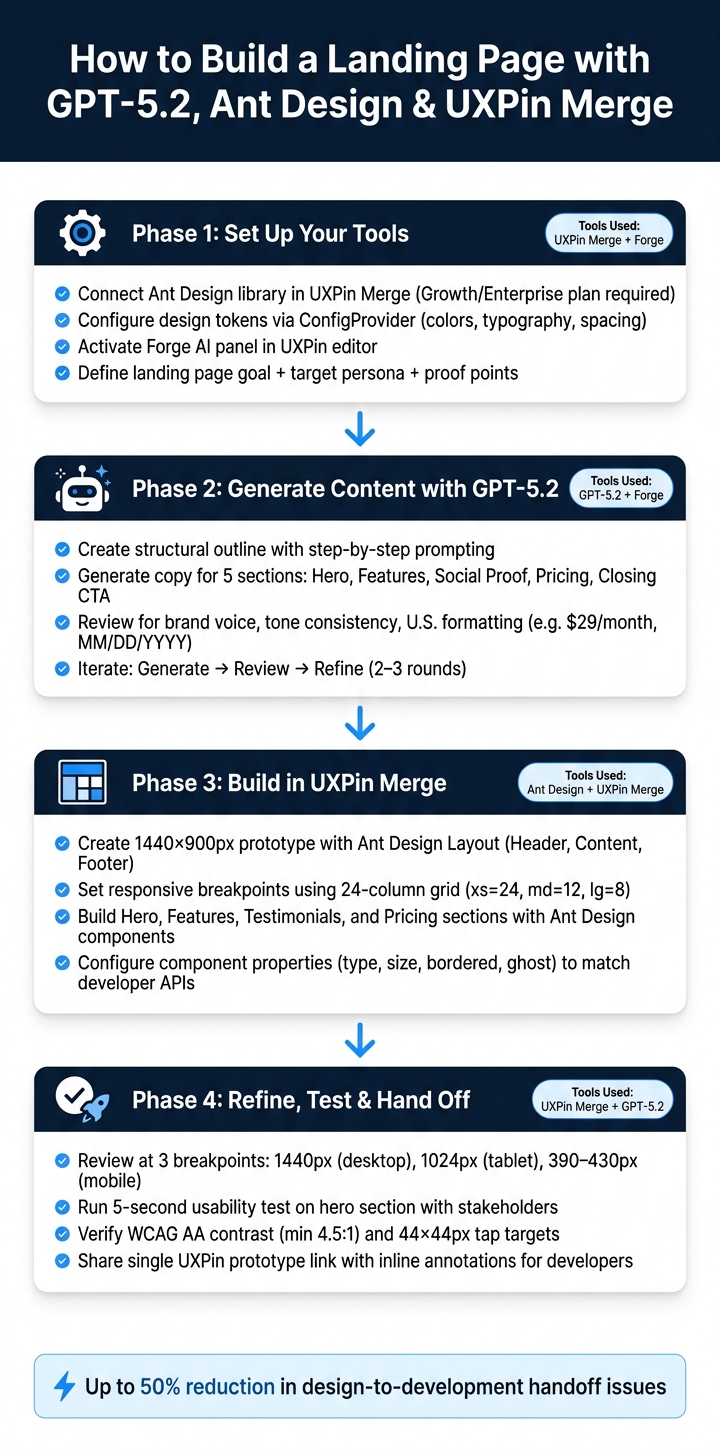
How to Build a Landing Page with GPT-5.2, Ant Design & UXPin Merge
UXPin Merge AI: Smarter UI Generation That Follows Your Design System
sbb-itb-f6354c6
Setting Up Your Tools Before You Start
Getting your tools configured correctly upfront can save you from unnecessary rework. Here, we’ll walk through three key steps: connecting Ant Design to UXPin Merge, setting up Forge for AI content creation, and defining clear goals for your landing page.
Configuring UXPin Merge with Ant Design
UXPin comes with a built-in Ant Design library powered by Merge, so there’s no need to manually import files or link GitHub repositories – unless your team uses a custom setup. Start by opening your UXPin workspace and confirming that Merge is enabled. Check that the Ant Design library is visible. If it’s not, review your workspace settings or reach out to your admin. Keep in mind, Merge is available only on UXPin’s Growth and Enterprise plans.
Once the library is active, you’ll want to set design tokens like primary colors, typography, and spacing using Ant Design’s ConfigProvider. This ensures your brand’s theme is reflected automatically. Your Merge build should pull in your custom configurations instead of Ant Design’s default theme. This way, all components in UXPin will display with your brand’s unique styles.
Test your setup by dragging an Ant Design
ButtonandTypography.Titleonto the canvas. Confirm they render with your brand’s theme before moving forward.
With your design environment ready, the next step is activating Forge for AI-driven content creation.
Setting Up Forge for AI Content Generation
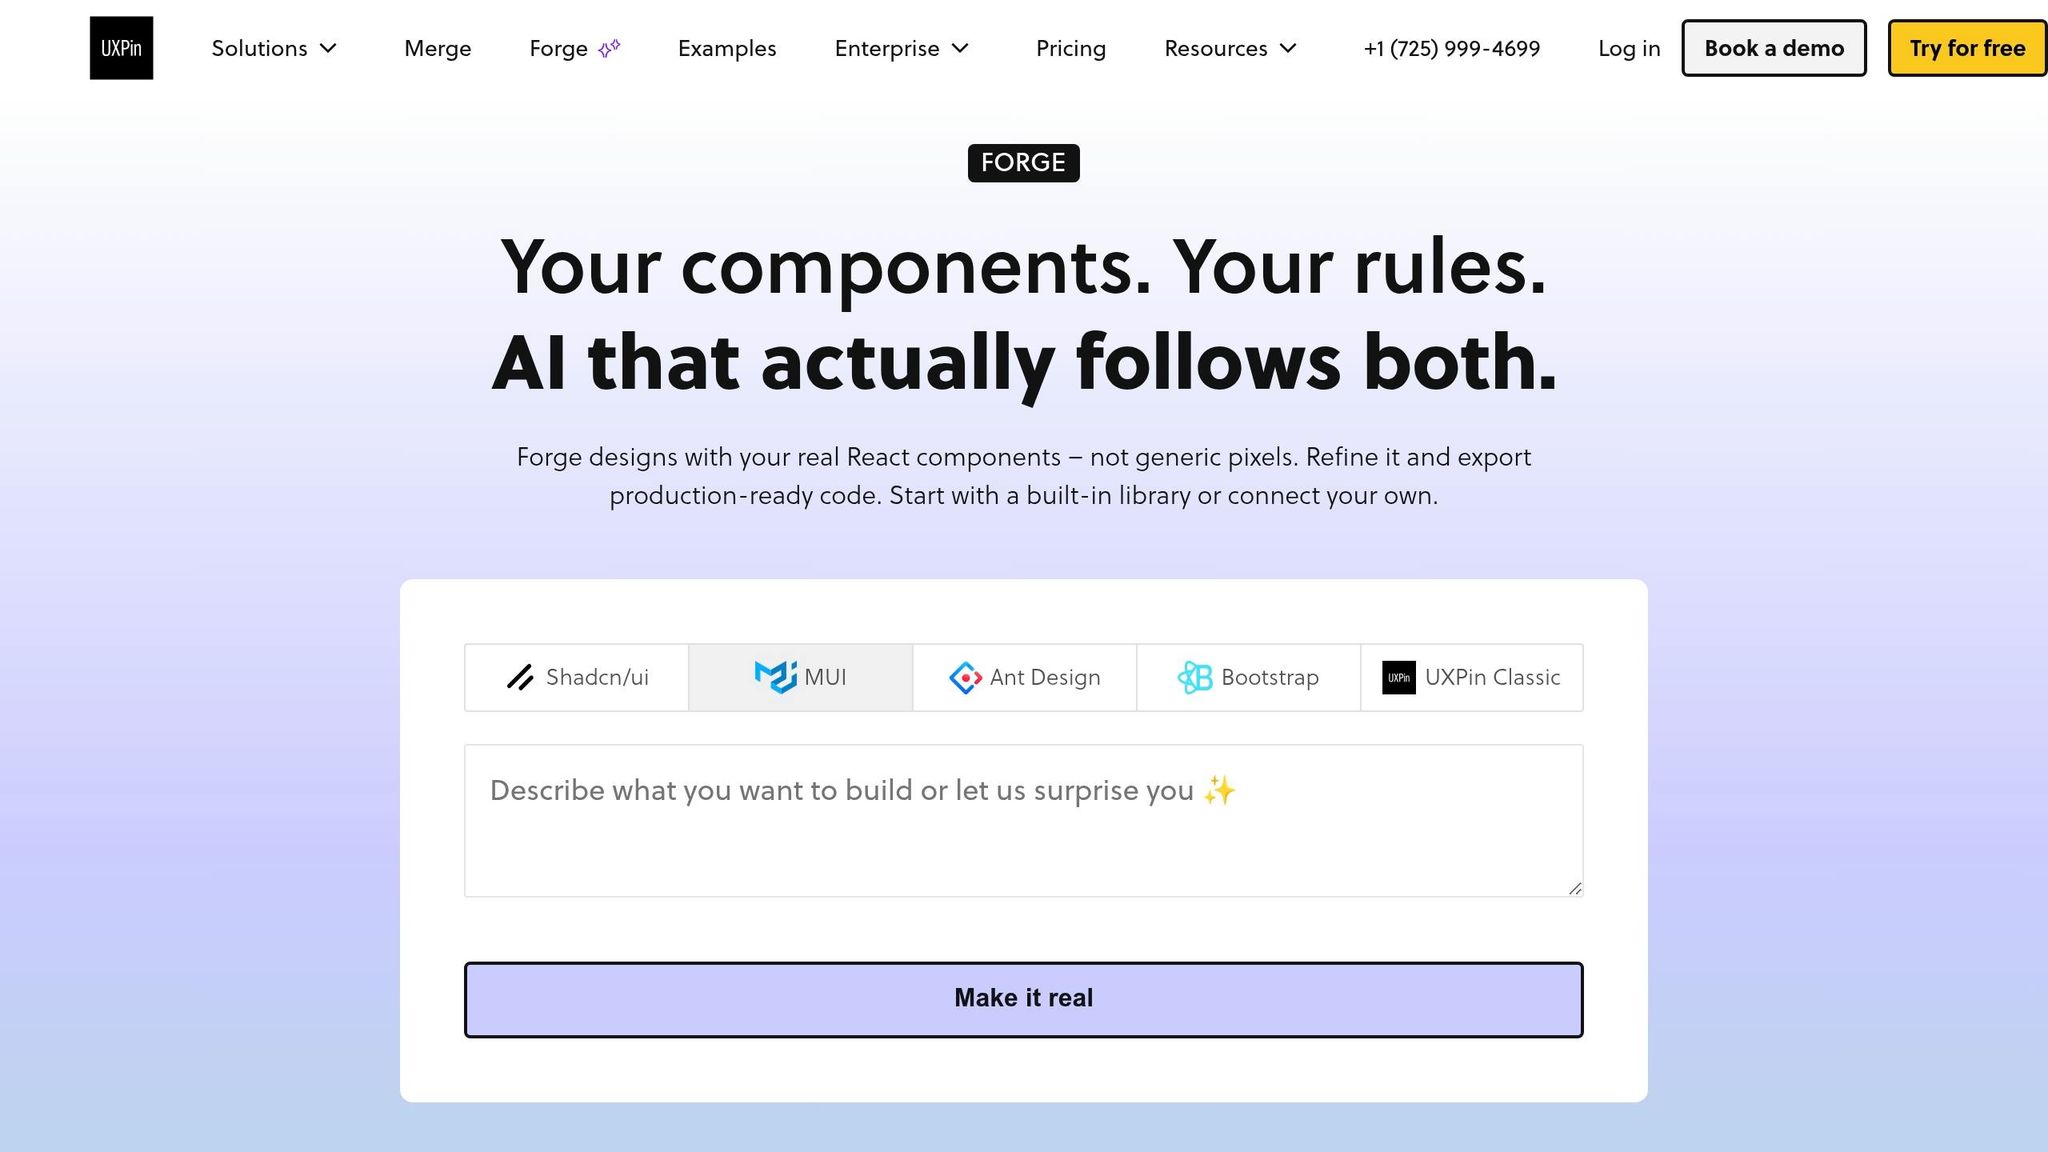
Forge is UXPin’s built-in AI assistant, designed to work seamlessly within the editor – no external API setup required. To access it, open your landing page project and find the Forge or AI panel in the editor’s toolbar.
For the best results, your prompts should include four key details: your product name, target audience, tone, and the specific section you’re generating. If you’re asking Forge for layout ideas, reference Ant Design components by name – like Layout, Row, Col, Card, or Button. This ensures Forge’s output aligns with your Merge library. Don’t forget to include localization instructions in your prompts so the content is formatted for U.S. audiences from the start.
With Forge set up, it’s time to clarify your landing page goals.
Defining Your Landing Page Goals
This step is critical – skipping it can lead to generic or unfocused content. Start by identifying a single, primary goal for your landing page. For example, is the goal to encourage users to start a 14-day free trial? Or to capture leads for a product demo? Choose one and stick to it.
Next, define your target persona by outlining their role, industry, company size, and key challenges. Then, gather proof points ahead of time, such as customer testimonials, measurable results, client logos, or trust badges. These details can be fed directly into Forge prompts to ensure the AI generates benefit statements and social proof sections with specific, accurate information instead of placeholders.
Once your goals are clear and your proof points are ready, you’ll be fully prepared to generate tailored content using GPT-5.2 in the next steps.
Generating Content and Structure with GPT-5.2
Mapping Out the Key Landing Page Sections
Before diving into content creation, it’s smart to plan out your landing page sections. Each section has a unique purpose, and understanding these roles beforehand makes your prompts more focused and your results more effective.
Here’s a typical structure for a high-converting landing page aimed at a U.S. audience:
| Section | Purpose | Ant Design components |
|---|---|---|
| Hero | Highlight the core value proposition and prompt the main CTA | Grid, Typography, Button |
| Features/Benefits | Explain how the product delivers on its promise | Card, Row, Col, Icon |
| Social Proof | Build trust with authentic quotes, names, and roles | Carousel, List, Card |
| Pricing | Simplify plans and reduce purchase hesitation | Card, Table, Tag |
| Closing CTA | Reiterate the main benefit and emphasize the primary action | Row, Typography, Button |
This layout provides a clear roadmap for generating detailed copy using GPT-5.2.
Using GPT-5.2 to Write Copy
The best way to work with GPT-5.2 is through step-by-step prompting. Start by creating a structural outline, then focus on each section individually. This ensures your content strategy aligns with the design components you’ve already selected. Open the Forge panel in UXPin and begin with a detailed, context-setting prompt that covers your product, target audience, goals, and formatting rules.
Here’s an example of a solid starting prompt:
"Act as a senior conversion copywriter for a U.S. B2B SaaS brand. Product: [your product]. Audience: [your target persona]. Goal: drive 14-day free trial sign-ups. In all responses, use U.S. conventions: dollar sign before amounts with no space (e.g., $29/month), dates in mm/dd/yyyy or Month Day, Year format, comma as the thousands separator, and U.S. spelling (e.g., ‘customize,’ ‘organization’). First, generate a complete landing page outline with section names, purposes, and content fields needed."
Once you have the outline, tackle each section individually. For example:
- Hero Section: Request 7 headline options (max 10 words each) with matching subheadlines (max 20 words).
- Features Section: Ask for 4 feature blocks with short titles and 1–2 sentence descriptions focused on benefits. Format these as a simple list that maps seamlessly to Ant Design
Cardcomponents. - Pricing Section: Define your tiers explicitly, such as "Entry: $29/month, Growth: $79/month, Scale: $199/month." Then, prompt GPT-5.2 to generate a plan name, one-line description, price label, and four benefit bullets for each tier.
This method ensures your content is concise and ready for immediate use.
Reviewing and Refining AI-Generated Content
Treat every GPT-5.2 output as a starting point. Before integrating anything into your design, review it against three key criteria: brand voice, tone consistency, and U.S. formatting accuracy. Stick to the localization guidelines you established in your initial prompt.
- Brand Voice: Ensure the copy aligns with your brand’s personality. If a headline feels generic or feature descriptions lack impact, refine them with a follow-up prompt like: "Rewrite the features section with a more direct, benefit-first tone. Avoid passive voice."
- Formatting Accuracy: Double-check for U.S. conventions. Look out for errors like "USD 29" instead of "$29" or non-standard date formats. Correct these with a targeted prompt: "Rewrite the pricing section using U.S. currency and date formats as previously specified."
The key is to create an iteration loop: generate → review against goals → refine → repeat. Usually, two or three rounds will give you polished, on-brand, and localized content that’s ready to integrate with your Merge components in UXPin.
Building the Landing Page in UXPin Merge
This step brings your GPT-5.2-generated copy and Ant Design components to life, creating a seamless workflow between design and development.
Setting Up the Page Layout
With your copy finalized, it’s time to construct the page. Begin by creating a new UXPin prototype with dimensions of 1440×900 px.
From the Merge library, drag an Ant Design Layout component onto the canvas and configure it with Header, Content, and Footer sections. This structure mirrors how developers organize an Ant Design app, ensuring no extra translation is needed during coding. Inside the Content section, add a Row and set responsive breakpoints (e.g., xs={24}, md={12}, lg={8}) to align with Ant Design’s 24-column grid. Wrap the content in a container with a maximum width of 1,200 px.
Setting up this responsive framework typically takes 10–15 minutes. Once completed, you can save it as a master template for future landing pages. With the layout ready, start populating each section using Ant Design components.
Building Each Section with Ant Design Components
Each section of the landing page follows a structured approach: a Row container, multiple Col components for responsive design, and the necessary Ant Design elements within. Here’s how to construct the key sections:
Hero Section: Use two Col components, each set to xs={24} and md={12} – one for the text and the other for a product image. Add a Typography.Title for the main headline (keep it concise, around 6–12 words) and a Typography.Paragraph for supporting text. Include a primary Button (type="primary", size="large") labeled "Start Free Trial" to encourage action. Add a secondary ghost button, such as "View Documentation", for users who may want to explore further before committing.
Features Section: Create a Row with 3–4 Col components, each set to md={8} or md={6}. Inside each column, place a Card that includes an icon, a short Typography.Title, and a brief Typography.Paragraph (1–2 sentences). For mobile responsiveness, set xs={24} so the cards stack neatly.
Testimonials Section: Use a centered single-column layout (e.g., md={16}) and add Card components featuring an Avatar, customer name, role, and a quote. Place these testimonial cards inside a Carousel to efficiently showcase multiple testimonials.
Pricing Section: Arrange a Row of pricing Cards. Each card should display the plan name, price (formatted in U.S. style, e.g., $49/month), a brief description, and a feature list using Typography.Text or List items. Highlight the recommended plan using Ant Design’s hoverable property or a token-based border style, and add a "Most Popular" label. Beneath each CTA button, include a note like "Billed monthly, cancel anytime" to build trust with users.
Keeping Design and Development in Sync
After assembling the sections, ensure the design stays aligned with development standards. UXPin Merge uses real, code-based Ant Design components instead of static visuals, allowing developers to easily recognize and implement the design. Properties like type, size, bordered, and ghost can be configured directly in UXPin’s properties panel, matching the APIs developers use.
UXPin explains Merge as a tool that allows designers to "design with the same components that developers use", significantly reducing the need for translation between design and code.
When updates are made to the shared Ant Design component library, these changes automatically flow into UXPin, eliminating manual updates and ensuring consistency. Teams using Merge report up to a 50% reduction in handoff issues, resulting in fewer revisions and faster project timelines. To maintain this harmony, avoid making visual edits in UXPin that deviate from Ant Design’s supported properties. For example, if a new primary color is needed, update it at the design token level in the codebase first, so it syncs seamlessly with UXPin. This method ensures that the prototype and production app remain perfectly aligned.
Refining, Testing, and Preparing for Handoff
Polishing, testing, and ensuring an accurate handoff are critical to maintaining the alignment between design and development you’ve established using GPT-5.2, Ant Design, and UXPin Merge.
Refining the Design and Copy
Once your sections are assembled, a final review ensures the prototype is ready for production.
Start by zooming out to 25–50% to quickly identify issues like misaligned elements, inconsistent card heights, or uneven white space. Preview the layout at three standard breakpoints commonly used in the U.S.: 1440 px for desktop, 1024 px for tablets, and 390–430 px for devices like the iPhone 13 or 14. Use Ant Design’s Space, Row, and Col components to fine-tune spacing while keeping the code consistent.
For the copy, run a final GPT-5.2 prompt to ensure it aligns with en-US conventions. This includes U.S. spelling, month-first date formats (e.g., March 15, 2026), USD currency formatting ($1,299.00), and a reading level suitable for 7th–9th grade. After the AI review, manually check for brand consistency and accuracy to ensure everything feels cohesive.
Finally, validate interactivity and accessibility to confirm the prototype is fully ready.
Running Usability Checks for U.S. Audiences
Before handing off the design, perform a quick 5-second test on the hero section with internal stakeholders. Show the section for 5 seconds, then ask what the product does and what action they’d take next. If there’s hesitation, refine the headline or primary call-to-action (CTA). According to research from Nielsen Norman Group, addressing usability issues during the design phase can save up to 100x the cost of fixing them after launch.
For mobile experiences, ensure all interactive elements meet the minimum 44×44 px tap target size. Check that pricing tables, forms, and CTAs are functional without requiring horizontal scrolling. Verify that text-to-background contrast meets WCAG AA standards (minimum 4.5:1) and that keyboard navigation follows the correct tab order. While Ant Design components often handle these requirements, confirm details in the Merge preview – especially for carousels, modals, and form validation. Document any issues directly in UXPin comments so they can be resolved before development begins.
These steps ensure the design is both user-friendly and accessible, setting the stage for a smooth development process.
Handing Off to Development with Merge
Since your prototype uses real Ant Design components from the Merge library, developers won’t need to interpret or recreate the design. They can directly use the provided code snippets, like <Button type="primary" size="large">Start Free Trial</Button>, to implement features without guesswork.
Share a single UXPin prototype link with developers, including concise inline annotations for any non-obvious details. For example, clarify focus management in modals, loading states for form submission buttons, or the specific Ant Design token controlling a border color. For complex interactions – like a Carousel for testimonials or a multi-step pricing toggle – add a brief UXPin comment describing keyboard behavior and ARIA expectations. Meeting ADA and Section 508 compliance is non-negotiable.
Conclusion: Faster Landing Page Design with AI and Code-Based Workflows
Designing landing pages used to be a time-intensive process, often requiring days of back-and-forth revisions. But with tools like GPT-5.2, Ant Design, and UXPin Merge working in harmony, those timelines shrink dramatically. GPT-5.2 can take a blank canvas and generate audience-ready copy in minutes. Ant Design offers a library of reusable, consistent components, while UXPin Merge ensures that what you design aligns perfectly with production code. This streamlined system removes unnecessary revisions, turning the design itself into the final implementation reference.
That said, while AI speeds up the process, human expertise is still essential for the final polish. AI provides a strong starting point, but details like tone, clarity, brand alignment, and U.S.-specific formats (such as $49.00 pricing or MM/DD/YYYY dates) need the careful touch of a human editor. The best results come from teams that combine AI’s efficiency with their own professional judgment to refine the output into something truly effective.
UXPin explains that Merge allows designers to "build prototypes using the same components that developers use in production", solving the age-old issue of designs not matching the final code.
This alignment between design and code is the foundation for every stage of your landing page creation.
Once the page goes live, the process doesn’t stop. With a data-driven approach, you can continually improve. Performance metrics like conversion rates, scroll depth, and form completions can be fed back into GPT-5.2. From there, you can generate new headlines or calls-to-action (CTAs) and test them within the same Ant Design framework. This workflow not only speeds up the initial launch but also ensures continuous optimization based on real-world results.
FAQs
Do I need the Growth or Enterprise plan to use UXPin Merge with Ant Design?
No, you don’t need a specific plan to use the Ant Design library or the AI Component Creator with GPT-5.2. These tools are accessible with any UXPin plan that supports Merge. While all plans come with monthly AI credits, higher-tier plans like Growth and Enterprise provide additional perks, such as more AI credits, syncing custom Git-based design systems, and the ability to set customizable credit limits.
How do I make Ant Design components in UXPin match my brand theme?
To match Ant Design components with your brand’s theme in UXPin, start by using the ConfigProvider. This allows you to define design tokens such as colorPrimary, borderRadius, fontFamily, and fontSize. For broader styling needs, you can implement a Global Wrapper Component to include custom CSS or theme files. Additionally, fine-tune individual component properties directly in the Properties Panel to ensure they align with your brand while maintaining consistency with your codebase.
What’s the best way to prompt GPT-5.2 for landing page copy that fits U.S. formatting?
To make sure GPT-5.2 produces text that follows U.S. standards, include a dedicated localization block in your prompt. Specify the following:
- Language: English (en-US)
- Date format: MM/DD/YYYY
- Time format: 12-hour clock with AM/PM
- Currency: Dollar amounts formatted as $1,234.56
- Units: Imperial system (e.g., miles, pounds, Fahrenheit)
- Spelling: U.S. English conventions
- Formatting: Use commas for thousands and periods for decimals (e.g., 1,000.50)
These details will ensure the generated content aligns with U.S. norms and expectations.