Want to design faster and avoid endless revisions? Here’s how you can create production-ready prototypes using Claude Opus 4.5, Bootstrap, and UXPin Merge. These tools streamline your workflow by letting you design with real React code from the start, eliminating the need for handoffs and rebuilds.
Key Takeaways:
- Claude Opus 4.5 generates Bootstrap component code from text prompts.
- Bootstrap provides reliable, pre-built UI components.
- UXPin Merge lets designers work directly with production code in a visual editor.
Why It Matters:
- Teams report 8.6x faster development by using code-based prototypes.
- Design and development stay aligned with consistent components.
- Prototypes are ready for testing and development without rework.
Getting Started:
- Set up UXPin: Sign up for a Growth plan ($40/month) for Bootstrap libraries and AI credits.
- Integrate Claude Opus 4.5: Use it to generate React-Bootstrap components with prompts.
- Build Prototypes: Import components into UXPin Merge, assemble them, and test interactions.
- Export Code: Deliver production-ready code with no handoff delays.
By combining AI-powered code generation with UXPin’s design tools, you can save time, reduce errors, and ship faster. Whether you’re building pricing cards or complex dashboards, this approach simplifies the entire process.
UXPin Merge Tutorial: Generating Code From the Design (5/5)
sbb-itb-f6354c6
Setting Up Your Tools and Integrations
Get started with UXPin and Claude Opus 4.5 to create efficient prototypes. UXPin comes with Bootstrap pre-installed, so you can dive into using Bootstrap components right after setting up your account – no extra steps needed.
Creating Your UXPin Account
Head over to uxpin.com to sign up and choose a plan that fits your needs. For prototyping with Claude Opus 4.5 and Bootstrap, the Growth plan (starting at $40/month) is a solid choice. It includes 500 AI credits every month and full access to Bootstrap’s built-in library. If you’re part of an enterprise team using custom component libraries, reach out to sales@uxpin.com for tailored pricing.
Once you’re signed in, open the UXPin editor. From the Quick Tools panel, access the AI Component Creator. Navigate to the Settings tab and input your OpenAI API key to activate Claude models. Then, select Claude Sonnet 4.5 (or Opus 4.5, depending on availability in your region) from the model dropdown. You’re now ready to start designing.
To take things further, integrate Claude for advanced code generation.
Connecting Claude Opus 4.5 with UXPin
If your project requires more complex prototypes, you’ll need to run Claude Opus 4.5 externally and then import the generated code into UXPin. Start by running the following command:
npm install -g @anthropic-ai/claude-code Authenticate using your Anthropic API key or a Claude Pro/Max subscription (typically $100–$200/month). After that, select the Opus model by either typing /model opus in the interface or running:
claude --model opus "[your prompt]" To streamline your workflow, create a CLAUDE.md file in your project’s root directory. This file should include coding standards, like "Use React-Bootstrap" or "Prefer functional components", ensuring the generated code aligns with UXPin Merge requirements. This external setup complements the in-editor model, helping you maintain consistency in more intricate projects.
For simpler components, stick with Claude Sonnet 4.5. Save Opus 4.5 for tasks like multi-file refactoring or system-wide adjustments, where its advanced context capabilities can justify the higher cost.
"Opus 4.5 isn’t just incrementally better. It demonstrates a fundamentally improved understanding of complex codebases, multi-file architectures, and the subtle nuances that separate working code from production-ready code." – LaunchKit Team
How to Build Prototypes: Step-by-Step Workflow
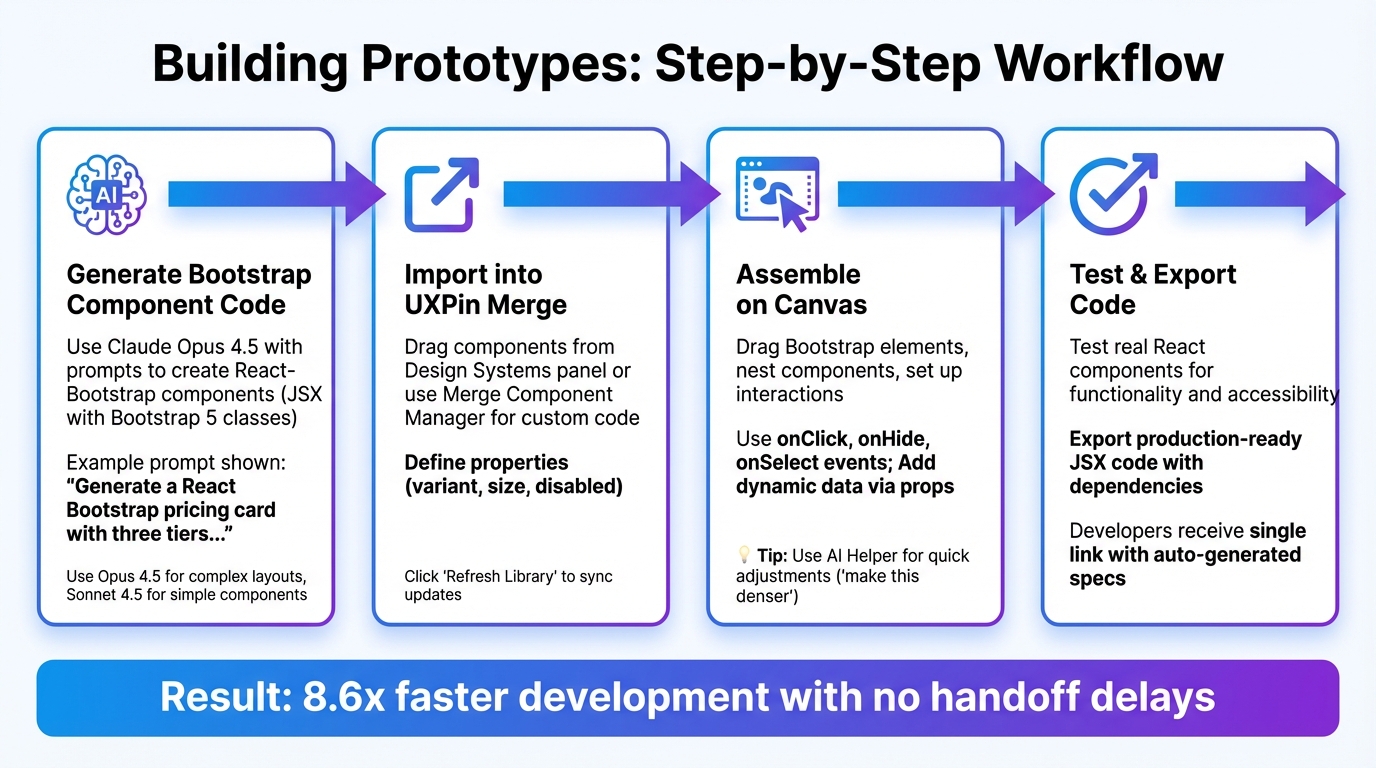
4-Step Workflow for Building Prototypes with Claude Opus 4.5, Bootstrap, and UXPin Merge
Once your integrations are ready, you can follow this workflow to turn code into interactive prototypes. The process is divided into three key stages: generating Bootstrap component code, importing it into UXPin Merge, and assembling prototypes on the canvas.
Generating Bootstrap Component Code with Claude Opus 4.5
To get started, use Claude Opus 4.5 with a prompt like this: "Generate a React Bootstrap pricing card with three tiers: Basic, Pro, and Enterprise. Include a header, a body with a feature list, and a primary button. Use Bootstrap 5 classes and ensure mobile responsiveness." This will produce JSX code with proper Bootstrap classes, such as card, card-body, and btn-primary.
For a production-ready outcome, make sure your prompt includes specific instructions, like using functional components and following React-Bootstrap conventions. For more complex layouts – like dashboards with nested navbars, modals, or data tables – Claude Opus 4.5 is particularly effective due to its advanced context handling. For simpler components, you can opt for UXPin’s built-in AI Component Creator.
Importing Bootstrap Components into UXPin Merge
You can drag components directly from the Design Systems panel without needing extra imports. For custom code generated by Claude, open the Merge Component Manager and define properties like variant, size, or disabled in the Properties Panel. These properties reflect the code structure, ensuring the design aligns with what developers will implement.
After making changes to components, click "Refresh Library" in the editor to sync updates. This ensures any style changes are applied seamlessly during iterations. UXPin Merge syncs automatically with your Git or npm repository, so updates to your custom library are instantly reflected across all prototypes.
Building Interactive Prototypes in UXPin Canvas
Once the components are imported, you can assemble your prototype by dragging Bootstrap elements from the Design Systems panel onto the canvas. To nest components, double-click on containers or use the Layers Panel. For example, you can place a Button inside a Navbar. Use Cmd (Mac) or Ctrl (Windows) to select nested elements and reorder them with Ctrl + ↑/↓.
Set up interactions in the Properties Panel using events like onClick, onHide, or onSelect. For example, you could configure a button to trigger a Bootstrap modal, changing its state from hidden to visible. To add dynamic data, pass variables through props – like replacing static pricing text with a {price} variable that updates across all tiers. To maintain responsiveness, avoid fixed widths or heights. Instead, rely on React props or the Flexbox tool. This approach ensures consistency between design and development, making your prototypes production-ready. For quick adjustments, you can use the AI Helper to type commands like "make this denser" or "swap primary to tertiary variants" directly within the component info section.
"When I used UXPin Merge, our engineering time was reduced by around 50%. Imagine how much money that saves across an enterprise-level organization with dozens of designers and hundreds of engineers." – Larry Sawyer, Lead UX Designer
Testing, Iterating, and Exporting Code
Testing Prototypes for Interaction and Usability
With UXPin Merge, you can test real React components – not just static mockups. This means you’re working with actual code to evaluate complex interactions, real data scenarios, and state transitions, rather than relying on simulations. Essentially, you’re testing how the code will function in the wild.
You can assess functionality, usability, compatibility, and accessibility. Since Bootstrap components from Claude Opus 4.5 are built with accessibility in mind, you can validate these aspects directly in the browser using tools like Chrome DevTools or Axe. Once testing confirms the prototype’s performance, you can quickly refine it based on collected feedback.
Iterating Based on Feedback
When feedback rolls in, you can make updates directly in UXPin. Simply click "Refresh Library" to sync those changes across all prototypes instantly. Whether it’s tweaking props or swapping out variants, you can incorporate feedback seamlessly.
For even faster adjustments, use AI commands to streamline the process. This is especially helpful when juggling input from multiple stakeholders, cutting down iteration cycles significantly.
Exporting Production-Ready Code from UXPin
Once your prototype is polished and validated, you can export production-ready code. Developers receive a single link where they can access auto-generated specifications and copy the JSX code directly. The exported code aligns perfectly with your Bootstrap library, complete with dependencies and interactions, ensuring a smooth transition from design to development.
For additional refinement, developers can open projects in StackBlitz to test and adjust the code in a live environment before implementation. This approach eliminates the traditional handoff gap, saving time and reducing errors. For example, at PayPal, a team of just three designers supported 60 internal products and over 1,000 developers by syncing their design system with UXPin Merge. This streamlined approach made their product development process up to 8.6x faster than traditional methods.
"Being able to jump straight from design to having code ready to going to be a huge time-saver for our team." – Allison Barkley, Director of Operations, Baremetrics
Best Practices for Enterprise Teams
Maintaining Design-Development Alignment
To keep design and development on the same page, it’s crucial to establish a single source of truth. Tools like UXPin Merge make this possible by allowing designers to work with the exact same production React components – such as React-Bootstrap – that developers use. By integrating your team’s Git repository or standard libraries directly into UXPin Merge, any updates to components are automatically reflected across all prototypes. This eliminates the need for the traditional – and often redundant – redesign-to-development rebuild process.
This method not only cuts down on engineering workload but also ensures a consistent experience throughout the entire design-to-development workflow.
Scaling Prototyping Across Teams
Once alignment is in place, scaling your prototyping efforts becomes much more manageable, even within large enterprises. Centralized component management is key to maintaining efficiency. For instance, Erica Rider, a UX Architect at Microsoft, successfully synced the Fluent design system with UXPin Merge. This allowed a small team of just three designers to support 60 internal products and over 1,000 developers. Using UXPin’s Component Manager, teams can simplify workflows by converting technical code properties into user-friendly labels and categorizing components for faster access.
This centralized approach ensures that as your team expands, everyone – from designers to developers – works with the same set of production-ready components.
Using AI to Speed Up Time-to-Market
As teams grow, leveraging AI can dramatically speed up prototyping and help you get to market faster. For example, Claude Opus 4.5 can generate Bootstrap components that adhere to your design system rules, ensuring that even initial drafts are production-ready. By prompting AI for a core layout structure, you can skip the daunting blank canvas stage and jump straight into the design process. Additionally, natural language commands make it easy to apply bulk updates to visuals or content across components, saving time on repetitive styling tasks.
"It used to take us two to three months just to do the design. Now, with UXPin Merge, teams can design, test, and deliver products in the same timeframe. Faster time to market is one of the most significant changes we’ve experienced using Merge." – Erica Rider, UX Architect and Design Leader
Conclusion
Claude Opus 4.5, Bootstrap, and UXPin Merge allow you to prototype using production-ready React components right from the start. This approach eliminates the need for handoffs, redlining, guesswork, and rebuilds, streamlining the entire workflow.
Claude Opus 4.5 is designed to optimize efficiency, reducing token usage by up to 65% and cutting tool-calling and build errors by 50%–75%. These improvements translate into real cost savings and quicker project delivery timelines.
For enterprise teams, this unified system creates a single source of truth. Designers and developers work from the same Bootstrap library, effectively eliminating design drift. AI-powered natural language commands enable quick, bulk updates, while UXPin Merge ensures components are organized for easy scalability. Together, these tools support a smooth transition from design to development, tailored for enterprise needs.
The advantages are clear:
"Claude Opus 4.5 handles complex coding tasks more efficiently than any model we’ve tested… giving developers real cost control without sacrificing quality." – Anthropic
This combination of AI-driven component generation and code-based design offers a faster, more accurate prototyping process. Whether you’re building a single feature or scaling across multiple products, it provides the speed and consistency needed to stay ahead in a competitive market.
FAQs
When should I use Claude Sonnet 4.5 vs Opus 4.5 for prototyping?
The details provided don’t elaborate on specific scenarios for selecting between Claude Sonnet 4.5 and Opus 4.5 when it comes to prototyping. That said, Opus 4.5 stands out as the go-to model for tasks involving coding, agents, and other computer-related activities. This makes it a solid choice for developing prototypes with natural language prompts.
What do I need to import custom Claude-generated React-Bootstrap components into UXPin Merge?
To bring custom Claude-generated React-Bootstrap components into UXPin Merge, make sure they adhere to React.js standards (version ^16.0.0). Each component should have a proper export default statement and be structured with one component per directory, with filenames matching their respective components. Use a supported JavaScript dialect – JavaScript, Flow, or TypeScript – and include a webpack configuration to bundle both styles and components. For a basic setup, the integration process usually takes around 30 minutes.
How do I keep prototypes responsive and accessible with Bootstrap in UXPin?
To make prototypes in UXPin both responsive and accessible using Bootstrap, start with Bootstrap’s grid system and pre-made components, which are designed to adapt seamlessly to various screen sizes. You can tweak the styles using SCSS variables and utility classes, ensuring you retain accessibility features like proper contrast ratios and keyboard-friendly navigation. Enable Bootstrap integration through UXPin’s Design Systems panel to access and work with real components. Finally, test your prototypes across multiple screen sizes to confirm they meet both responsiveness and accessibility standards.

