Want to streamline design and development? Claude Opus 4.5 and UXPin Merge let you create prototypes that match production code perfectly. No more design-to-development gaps, manual redlining, or endless back-and-forth. Instead, you’ll use real, production-ready components from your design system to build interactive prototypes that developers can implement directly.
Here’s what you need to know:
- Claude Opus 4.5: An AI tool that generates precise, production-aligned UI components using your design system.
- UXPin Merge: A platform that integrates your design system’s code, allowing designers and developers to work with the same components.
- Key Benefits: Faster timelines, consistent designs, and prototypes that behave like the final product.
With a UXPin Merge plan and an Anthropic API key for Claude Opus 4.5, you can integrate your design system, generate AI-driven components, and build fully functional prototypes. This workflow eliminates handoffs, saves time, and ensures your designs stay aligned with production standards.
Steps to get started:
- Connect your design system to UXPin Merge via Git or Storybook.
- Use Claude Opus 4.5 to generate components with detailed prompts.
- Refine components directly in UXPin using AI or manual edits.
- Assemble interactive prototypes with real code-backed components.
This approach ensures that what you design is exactly what developers build, saving time and reducing errors.
UXPin Merge AI: Smarter UI Generation That Follows Your Design System

sbb-itb-f6354c6
What You Need Before You Start
UXPin Pricing Plans Comparison: Core vs Growth vs Enterprise
To get started with prototyping using Claude Opus 4.5 and UXPin Merge, you’ll need a few essentials: a UXPin account with Merge access, an Anthropic API key for Claude Opus 4.5, and a compatible design system. These basics will help you create efficient, code-aligned prototypes without unnecessary hurdles.
First, secure an Anthropic API key for Claude Opus 4.5 (model ID claude-opus-4-5-20251101). Pricing is straightforward: $5 per million input tokens and $25 per million output tokens. While UXPin’s interface currently labels the API key field as "OpenAI API Key", it supports multiple models, including Claude Sonnet 4.5 and GPT-5-mini.
If you’re working with a custom design system, make sure it’s React-based for seamless Git or npm integrations. Storybook, which supports over 15 frameworks like Vue and Angular, is another option. Components in your design system should include detailed documentation, with clear property definitions and usage examples.
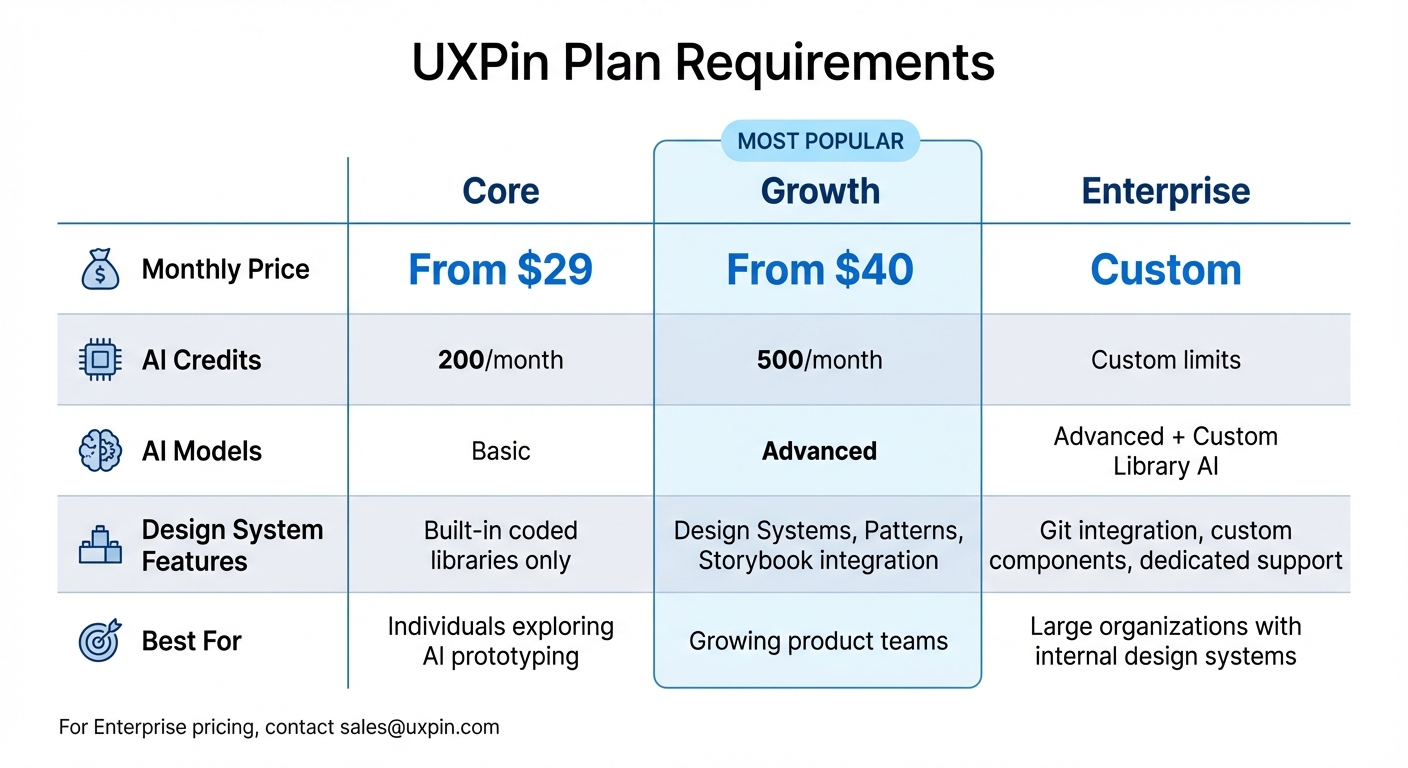
UXPin Plan Requirements
UXPin offers three pricing tiers, all of which now include Merge technology. The plans differ mainly in AI features, design system capabilities, and support levels.
| Plan | Monthly Price | AI Credits | AI Models | Design System Features | Best For |
|---|---|---|---|---|---|
| Core | From $29 | 200/month | Basic | Built-in coded libraries only | Individuals exploring AI prototyping |
| Growth | From $40 | 500/month | Advanced | Design Systems, Patterns, Storybook integration | Growing product teams |
| Enterprise | Custom | Custom limits | Advanced + Custom Library AI | Git integration, custom components, dedicated support | Large organizations with internal design systems |
The Growth plan is the most popular choice for teams that need Storybook integration with their design systems. If you’re using a custom component library stored in Git, the Enterprise plan is required. This plan includes Git integration and custom AI credit limits. For Enterprise pricing, reach out to sales@uxpin.com.
To enable AI features, open the AI Component Creator in the UXPin Editor’s Quick Tools panel and enter your API key.
Setting Up Your Custom Design System for Merge
Once you’ve selected the right plan, you can integrate your design system as follows.
UXPin supports popular libraries like MUI, Ant Design, Bootstrap, and shadcn/ui directly on the canvas – no need for imports or external accounts. If you’re using these built-in libraries, you can skip additional setup.
For custom design systems, UXPin Merge offers two integration options: Git Repository and Storybook.
Storybook Integration
This is the easier option and works with all Storybook-supported frameworks. Any updates you make in Storybook will automatically reflect in UXPin. Use Storybook version 6 or later and switch to "Args" instead of "Knobs". For private Storybook libraries, you’ll need to install @uxpin/storybook-deployer and deploy via CLI using a UXPin token:
npx uxpin-storybook-deployer -t TOKEN -s path/to/your/storybook.
Git Integration
This method requires more setup but offers tighter integration. You’ll need a boilerplate repository, proper configuration (including Webpack and a Wrapper component), and CI/CD updates. This option is best suited for React.js components and involves developers to manage updates through CI/CD pipelines.
If you’re using Vite with Storybook, make sure to add config.base = '' to your viteFinal in the main.* file to ensure assets load correctly. Once your design system is connected, Claude Opus 4.5 can generate layouts using these production-ready components.
Step 1: Connect Your Custom Design System to UXPin Merge
Linking your custom design system to UXPin Merge transforms production code into design-ready assets. This step, which typically takes 10–15 minutes for standard libraries, ensures that your prototypes match the actual code.
To get started, log into UXPin and head to the Merge tab. Click "Connect Repository" and input the URL for your GitHub or Bitbucket repository containing your React components. Make sure your repository complies with UXPin’s version and structure guidelines. Next, configure component mapping by selecting entry points, such as your Storybook stories.js files. UXPin Merge supports JavaScript with PropTypes, Flow with types, and TypeScript with interfaces. Once you’ve set this up, click "Sync" to import your components. After syncing, these components will serve as the foundation for AI-generated layouts in the following steps.
Using production-ready components guarantees perfect alignment between design and development. For example, in 2022, Microsoft’s UX Architect Erica Rider integrated the Microsoft Fluent design system with UXPin Merge. Her small team of three designers successfully supported 60 internal products and over 1,000 developers. The process eliminated the need to recreate UI elements from scratch, as designers could pull directly from the existing component library.
"We synced our Microsoft Fluent design system with UXPin’s design editor via Merge technology. It was so efficient that our 3 designers were able to support 60 internal products and over 1,000 developers." – Erica Rider, UX Architect and Design Leader
With this setup, every interaction, data state, and visual detail remains intact. The next step is layout generation using Claude Opus 4.5, where the AI will work exclusively with these verified components to ensure your design adheres to production standards.
Step 2: Generate Components with Claude Opus 4.5
Once your design system is synced, Claude Opus 4.5 steps in as your AI assistant, helping you create production-ready components with up to 50–75% fewer errors and achieving an 80.9% industry-standard test score.
To get started, open the AI Component Creator in UXPin, select Claude Opus 4.5, and provide a detailed prompt. For instance, you might say: "Create a card with a 16px bold title, 14px #333333 body text, and a 2px solid #E0E0E0 bottom border." The more precise you are with details like hex codes, typography, and spacing, the closer the output will align with your design tokens. If needed, you can also upload a high-fidelity mockup along with your prompt. Claude excels at recognizing typography, colors, and spacing from detailed images, making it more effective than when working with low-fidelity wireframes.
Claude Opus 4.5 uses a 200,000-token window, allowing it to reference your entire design documentation while consuming up to 65% fewer tokens. This makes the generation process faster and more cost-efficient.
For complex components, choose the high-effort mode, while simpler iterations can work well with lower settings. After generating components, use the "Modify with AI" feature to fine-tune elements like styles, spacing, or content through text commands. The refined components can then be directly integrated into your interactive prototype, ensuring they remain consistent with your custom design system.
Step 3: Import and Refine AI-Generated Components in UXPin Merge
Good news: there’s no need for a manual import! Components generated by Claude Opus 4.5 automatically appear on your UXPin canvas as production-ready React code. These components are fully functional and align seamlessly with your design system.
Once a component is generated, you’ll notice a purple "Modify with AI" icon next to it. Clicking this icon opens the AI Helper, which allows you to tweak styles, spacing, and text with simple commands. For instance, instead of manually adjusting properties, you can type commands like "change padding to 20px" or "make the button primary blue." The AI Helper integrates smoothly with popular React libraries like MUI, Ant Design, Bootstrap, and Tailwind CSS.
If the initial output doesn’t meet your expectations, you can refine it further with more specific prompts. Include precise details, such as "font size of 16px" or "bottom border of 2px solid #E0E0E0", to get the exact result you need. For more complex UI sections, break them into smaller components and refine each one individually. Just make sure the component stays selected during AI processing to avoid interrupting the task.
Beyond AI adjustments, you can also manually fine-tune components using the properties panel. This lets you modify interactions, states, and variables to suit your design needs. Best of all, every change you make – whether through AI or manual edits – maintains complete code parity with your UI library, ensuring the exported React code mirrors your final design perfectly.
"When I used UXPin Merge, our engineering time was reduced by around 50%. Imagine how much money that saves across an enterprise-level organization with dozens of designers and hundreds of engineers." – Larry Sawyer, Lead UX Designer
Next up: Step 4, where you’ll use these refined components to build interactive prototypes. Stay tuned!
Step 4: Build Interactive Prototypes with Merge Components
Now it’s time to bring your refined components together to create a fully functional prototype. Unlike traditional design tools that display static visuals, UXPin Merge allows you to work with actual HTML, CSS, and JavaScript code directly on your canvas. This means every component you use retains its full functionality, including interactions, data handling, and animations – making your prototype feel like the real deal.
Start by dragging and dropping your components onto the canvas. Position each element as needed, and watch as they come to life. Since these are real code components, their built-in behaviors are already functional. For example, sortable tables will sort when clicked, form fields will validate input, and video players will actually play. There’s no need to manually simulate states or wire up behaviors – everything works just as it will in the final product.
If your prototype requires more advanced logic, you can incorporate variables, expressions, and conditional interactions. This is particularly useful for modeling complex workflows, such as multi-step processes or edge cases in enterprise SaaS platforms. The beauty of using code-backed components is that your prototype doesn’t just look like the finished product – it acts like it too. This makes stakeholder testing far more insightful and accurate.
Once your prototype is ready, sharing it is simple. Generate a single link and send it to stakeholders for review. They’ll experience a fully interactive prototype that behaves exactly like production software. For developers, the process is seamless – they can copy the JSX code directly into their projects or open it in environments like StackBlitz. This eliminates the need for the traditional design handoff, where designers create static mockups and engineers rebuild everything from scratch.
"As a full stack design team, UXPin Merge is our primary tool when designing user experiences. We have fully integrated our custom-built React Design System and can design with our coded components. It has increased our productivity, quality, and consistency." – Brian Demchak, Sr. UX Designer, AAA Digital & Creative Services
Best Practices for Prototyping with Claude Opus 4.5 and UXPin Merge
To create polished, production-ready prototypes, consider these practical steps when working with Claude Opus 4.5 and UXPin Merge.
Begin with a complete design system specification. Before crafting any prompts, supply Claude Opus 4.5 with your full set of design tokens – covering colors, typography, spacing, and component states. Thanks to its 200,000-token context window, Claude can retain your entire design system and apply it consistently across all components it generates. Studies from Anthropic indicate this approach reduces design inconsistencies by 50–75% compared to earlier versions.
Divide large prototypes into manageable modules. Rather than asking Claude to create an entire dashboard in one go, split the project into smaller sections like navigation bars, forms, or data tables. Claude Opus 4.5 supports multi-agent coordination, enabling it to generate these sections simultaneously, improving efficiency by 15% for complex designs. Afterward, you can import the components in batches and assemble them directly on your canvas. This modular method also simplifies updates – when your design system changes, you only need to regenerate the affected components.
Write clear, structured prompts tailored to UXPin Merge. Use detailed instructions such as: "Generate a React component that matches [design system variables], with states: default, hover, focus, error; include UXPin Merge props for interactions." Claude Opus 4.5 scores 80.9% on industry-standard software engineering tests and produces code with 50–75% fewer errors than earlier models. Precise prompts ensure you get the best results.
Involve designers and developers early in the process. Start by having designers define prompts with UXPin Merge specifications. Developers can then review the generated code for production readiness before importing it. Take advantage of Claude’s Plan Mode to create editable plan.md files that outline component logic before coding begins – this serves as a natural checkpoint for team alignment. Once components are integrated into UXPin Merge, share prototype links for real-time collaboration. Developers can easily copy JSX directly into their projects, ensuring smooth handoffs and consistent results.
Use iterations as a way to refine and improve. Upload your prototype to Claude and request targeted adjustments like, "Optimize for web accessibility and performance, and explain changes." Claude reaches peak efficiency in just four iterations, compared to the ten or more required by other AI models. In UXPin Merge, you can refine components visually and then provide screenshots or exported code back to Claude for further updates. This back-and-forth process steadily enhances production quality while maintaining full context throughout the project.
Conclusion
This guide highlights how Claude Opus 4.5 and UXPin Merge simplify enterprise prototyping, transforming it into a production-ready workflow. By bridging the gap between design and development, UXPin Merge removes handoffs and speeds up delivery timelines.
Claude Opus 4.5 stands out with its ability to produce code with 50–75% fewer errors, achieve an impressive 80.9% score on software engineering benchmarks, and reach optimal performance in just four iterations. Its 200,000-token context window ensures your entire design system stays consistent across all generated components. Additionally, its multi-agent coordination boosts efficiency by 15% for complex tasks. When combined with a React design system, the result is that what designers create is exactly what developers implement.
"What used to take days to gather feedback now takes hours. Add in the time we’ve saved from not emailing back-and-forth and manually redlining, and we’ve probably shaved months off timelines."
From the start, prototypes behave just like the final product. Designers use production-ready components, developers get exportable React code, and stakeholders interact with high-fidelity prototypes that replicate real user flows. By removing guesswork and manual revisions, Claude Opus 4.5 and UXPin Merge provide a unified source of truth, aligning teams and driving faster development.
FAQs
How do I know whether to use Storybook or Git for Merge?
When deciding between Storybook and Git for UXPin Merge, the right choice hinges on your team’s workflow and preferences. If your team already uses Storybook for development, it’s a great option to integrate interactive UI components from existing libraries seamlessly. On the other hand, Git enables you to sync components directly from version control, keeping everything aligned with the most up-to-date code changes. Both methods support production-ready React components, so the decision ultimately comes down to how your team prefers to manage and integrate components.
What should I include in prompts so Claude uses my design tokens correctly?
To make sure Claude applies your design tokens correctly, provide clear and detailed instructions in your prompts. Mention that the tokens are formatted for AI-friendly readability, such as JSON, Figma, or MCP. Use specific directives like "Apply the design tokens for color, spacing, and typography" or "Style components using the provided tokens." This approach helps Claude understand and implement your tokens accurately, ensuring consistent design outcomes.
How can my team keep generated components production-ready and accessible?
With UXPin Merge, you can work with production-ready React components to ensure your designs match the final product in both appearance and functionality. This means you’re not just designing static visuals – you’re interacting with components that behave just like they would in the real application. Plus, you can export ready-to-use JSX code for development, saving time and effort.
By integrating your UI libraries or custom React components into UXPin Merge, you maintain consistency across your design and development teams. This approach also helps ensure accessibility standards are upheld, minimizes rework during the handoff phase, and simplifies the prototyping workflow.

