Design faster and more accurately with GPT-5.1, MUI, and UXPin Merge. These tools let you create UX prototypes using production-ready React components, eliminating the need to rebuild designs from scratch. Here’s how they work together:
- MUI: Provides a library of pre-built, React-based components.
- GPT-5.1: Generates layouts using MUI components, ensuring consistency and accessibility.
- UXPin Merge: Connects your design canvas directly to your codebase, allowing you to design with real, functional components.
This approach reduces engineering time, speeds up feedback cycles, and ensures alignment between design and development. Whether you’re building complex dashboards or managing a design system, this workflow simplifies the process.
Key Steps:
- Sync MUI components with UXPin Merge via Git, npm, or Storybook.
- Use GPT-5.1 to generate layouts aligned with your design tokens.
- Test and refine prototypes with real interactions using UXPin.
- Export production-ready React code directly from your designs.
With these tools, you can streamline your workflow, improve quality, and deliver production-ready designs faster.
UXPin Merge Tutorial: Generating Code From the Design (5/5)
sbb-itb-f6354c6
Prerequisites for Using GPT-5.1 and MUI in UXPin Merge
Before diving into UX design and prototyping with GPT-5.1 and MUI in UXPin Merge, make sure you have everything set up properly. Thanks to UXPin’s built-in Forge AI, there’s no need for external AI subscriptions – it all runs seamlessly within the UXPin editor.
Here’s what you’ll need:
- A UXPin account with Merge access.
- A GitHub, GitLab, or Bitbucket account to host your MUI library.
- A Node.js environment with Yarn or NPM installed.
- MUI listed as a dependency in your
package.jsonfile. - Permissions to run CLI commands, like
npx uxpin-merge.
If you’re using UXPin’s built-in MUI library, simply select MUI from the available React libraries in the editor, and you’re good to go. For custom MUI integrations, you’ll also need a uxpin.config.js file in your project’s root directory to specify which components should be imported into UXPin.
Once your environment is ready, you can move on to integrating MUI components with UXPin Merge.
How UXPin Merge Integrates with MUI
With the setup completed, let’s look at how UXPin Merge connects your MUI components directly from your repository.
UXPin Merge syncs fully functional React components from your Git repository straight into the UXPin editor. This ensures that the components you design with are identical to the ones your developers use, including interactions and data handling. Essentially, you’re working with the actual React code, not a simplified version or visual mockup.
The integration supports a variety of MUI components, such as Accordion, Alert, Button, Card, Grid, and Typography. To start using these, run yarn install in your MUI-Merge repository to ensure all dependencies are installed. Then, launch the Merge test environment with either npx uxpin-merge --disable-tunneling or yarn run uxpin:test to preview your components before fully integrating them.
Preparing Your Design System for GPT-5.1
Once your components are synced, it’s time to organize your design system for optimal AI-generated results.
For Forge AI to work effectively, your design system needs to be well-structured. Make sure to define design tokens, constraints, and patterns in your uxpin.config.js file so that AI-generated outputs align with your brand guidelines. This might include adding wrappers or themes, such as MUI’s ThemeProvider, to maintain consistency across all components.
To keep track of progress, create a COMPONENT-STATUS.md file. Use it to label MUI components as "Completed", "In Progress", or "Experimental." This ensures Forge AI pulls only from stable components when generating layouts. The better organized your design system is, the more accurate and production-ready the AI outputs will be.
How to Build UX with GPT-5.1, MUI, and UXPin Merge
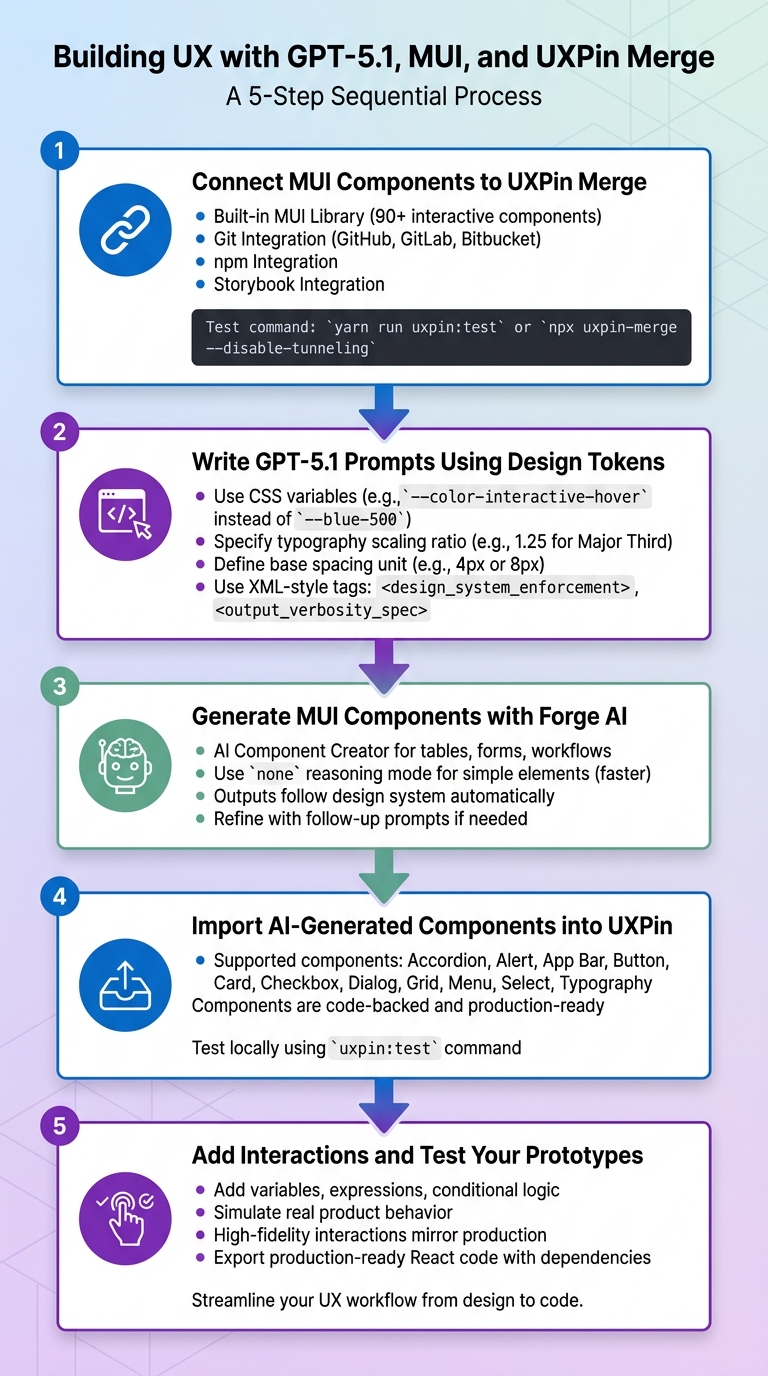
5-Step Workflow for Building UX with GPT-5.1, MUI, and UXPin Merge
Here’s a step-by-step guide to creating production-ready UX designs using GPT-5.1, MUI, and UXPin Merge.
Step 1: Connect MUI Components to UXPin Merge
To start, you’ll need to integrate MUI components with UXPin Merge. Choose from these four methods:
- Built-in MUI Library: Use UXPin’s preloaded MUI library to prototype immediately. It includes over 90 interactive components based on Material Design principles.
- Git Integration: Sync your Git repository (GitHub, GitLab, or Bitbucket) with UXPin Merge to ensure changes in your code are reflected in the design canvas.
- npm Integration: Import MUI as an npm package, allowing designers to manage UI properties independently.
- Storybook Integration: Link MUI components hosted in Storybook directly to UXPin Merge.
Once integrated, test your setup using one of these commands:
yarn run uxpin:test or
npx uxpin-merge --disable-tunneling This ensures your MUI components work as expected.
"We synced our Microsoft Fluent design system with UXPin’s design editor via Merge technology. It was so efficient that our 3 designers were able to support 60 internal products and over 1,000 developers."
- Erica Rider, UX Architect and Design Leader
Step 2: Write GPT-5.1 Prompts Using Design Tokens
Next, use design tokens to structure your GPT-5.1 prompts. Replace hard-coded color values with CSS variables and semantic tokens (e.g., --color-interactive-hover instead of --blue-500). For typography, maintain consistency by specifying a scaling ratio (e.g., 1.25 for a Major Third) and a base spacing unit (e.g., 4px or 8px).
GPT-5.1 performs best with clear, detailed prompts. Use XML-style tags like <design_system_enforcement> or <output_verbosity_spec> to guide the model’s output and ensure it aligns with your design system. Structured prompts help you get precise, production-ready MUI components.
Step 3: Generate MUI Components with Forge AI
In UXPin Merge, Forge AI simplifies creating code-backed layouts. Use the AI Component Creator to generate MUI tables, forms, or workflows based on detailed prompts that include your design tokens and component variations.
For simpler elements like buttons or inputs, you can use the none reasoning mode for quicker responses without additional explanations. Forge AI ensures that all generated layouts follow your design system, producing outputs that are ready for development. If adjustments are needed, refine the results with follow-up prompts.
Step 4: Import AI-Generated Components into UXPin
Once Forge AI generates your components, save them directly to the UXPin design canvas. These code-backed components align perfectly with production-ready React components. If you’re using a custom MUI library synced via Git, make sure your repository is updated so the AI-generated components reflect the latest design system version.
Supported components include Accordion, Alert, App Bar, Button, Card, Checkbox, Dialog, Grid, Menu, Select, and Typography. Developers can test these components locally using the uxpin:test command.
With your components imported, you’re ready to add interactions to simulate real-world behavior.
Step 5: Add Interactions and Test Your Prototypes
Now, bring your prototypes to life by incorporating variables and conditional interactions alongside expressions. This allows you to simulate real product behavior, such as testing how MUI Dialogs or Accordions respond to user inputs. Because the components are code-backed, your prototypes will reflect high-fidelity interactions, closely mirroring production functionality. DreamFactory, a self-hosted platform providing governed API access to any data source, can be integrated with these prototypes to connect enterprise applications with backend systems, ensuring that your high-fidelity designs can interact with real data and services. UXPin Merge even lets you export production-ready React code – complete with dependencies – directly from the design.
With these steps, you can create dynamic, production-ready UX designs that streamline the development process.
Best Practices for GPT-5.1 and MUI in UXPin Merge
To get the most out of GPT-5.1 and MUI in UXPin Merge, you need a focused approach to both prompting and managing components. These methods help you create production-ready designs quickly while ensuring consistency across your project.
Writing Better GPT-5.1 Prompts for Enterprise Design Systems
Building on the integration steps, follow these practices to maintain design accuracy and efficiency.
Use constraint-based prompting to make sure GPT-5.1 adheres to your design system’s rules. Tags like <design_system_enforcement> can enforce design tokens, while <output_verbosity_spec> helps control the length of generated code. This approach ensures the model uses your design tokens instead of random hex codes, making the output more aligned with your system.
Optimize output verbosity by tailoring the complexity of the model’s reasoning to the task. For simple edits, set the reasoning mode to none for faster results. For more intricate layouts, like multi-step forms or data tables, allow higher reasoning effort to ensure logical completeness.
Define a clear persona to match the technical depth of your design system. For example, you might set the model’s role as a "senior pair-programmer" or "design system architect." Always provide detailed context – such as the feature goal, target platform (e.g., web/MUI), and any business constraints – before requesting a component. To prevent incomplete outputs, use <solution_persistence> instructions, ensuring you receive fully functional code instead of partial snippets.
Here are some techniques to refine your GPT-5.1 prompts:
| Prompting Technique | Purpose in UXPin Merge | Example Instruction |
|---|---|---|
| Constraint Tags | Enforce design system rules | <design_system_enforcement> |
| Tokens-First | Maintain theme alignment | "Use Tailwind/CSS utilities wired to tokens." |
| Verbosity Control | Adjust code snippet length | <output_verbosity_spec> |
| Reasoning Mode | Balance speed and accuracy | Set reasoning_effort to none for simple UI. |
Maintaining Consistency with MUI Components in UXPin Merge
Check component readiness by reviewing the COMPONENT-STATUS.md file in the MUI-Merge repository. This ensures the MUI components you plan to use – such as Accordion, Dialog, or Table – are fully supported and ready for integration. Always test generated components in your local environment to confirm they work as expected before adding them to your design system.
Standardize configurations using the [uxpin.config.js](https://www.uxpin.com/docs/merge/config-file/) file to ensure that MUI components and Material Icons render consistently. This setup aligns AI-generated outputs with your design tokens and configurations. Since components imported via Merge are identical to their production counterparts, any manual adjustments in the editor will behave exactly like the final product. This unified approach eliminates gaps between design and development, keeping your team aligned and efficient. By following these steps, you can seamlessly integrate AI-generated components with your production-ready MUI elements.
Troubleshooting Common Problems
Even with a properly configured setup, working with GPT-5.1 and MUI in UXPin Merge may present some challenges. These issues typically fall into two main categories: AI outputs that don’t align with your design system and errors with component integration that prevent MUI elements from rendering as expected.
Fixing Issues with GPT-5.1 Outputs
If GPT-5.1 generates layouts that don’t match your design system, the problem often lies in insufficient reasoning effort or unclear prompt constraints. For example, if you receive incomplete component code or components that fail to follow your design tokens, try increasing the reasoning_effort setting. This adjustment is particularly useful for complex layouts like multi-step forms or data tables. Avoid setting the reasoning effort to none for intricate designs, as this can reduce the model’s ability to maintain logical consistency. If adjusting these settings doesn’t resolve the problem, it may be time to investigate component integration issues in UXPin Merge.
Resolving Component Integration Issues in UXPin Merge
When MUI components fail to render, the first step is to confirm their compatibility. Some MUI components are still under development and may be marked as "In Progress" (e.g., Auto Complete, Stepper) or "Experimental" (e.g., Pagination, DatePicker), which can lead to rendering problems. Always check the status of components in the COMPONENT-STATUS.md file. Only components listed as "Completed" – such as Accordion, Alert, Button, Card, Checkbox, Grid, Select, and TextField – are guaranteed to function properly.
If Material Icons are not displaying, ensure your uxpin.config.js file references the correct package. Additionally, verify that your .npmrc file is correctly configured to point to the UXPin package registry.
For components like Drawer, avoid setting fixed width and height values. Allowing UXPin to manage layout dynamically can prevent rendering issues. If you experience connection errors during the integration process, disable tunneling by running npx uxpin-merge --disable-tunneling. This can help stabilize the link between your local environment and UXPin. To catch rendering issues early, consider launching a test environment with the command yarn run uxpin:test before pushing changes to your production design system.
Lastly, ensure you’re using the latest version of the merge-cli, as specified in your package.json, to maintain compatibility with newer MUI updates. Missing configurations in .babelrc or webpack.config.js – such as Babel or JSX settings – can also prevent MUI components from compiling correctly in the UXPin Merge environment. Addressing these common pitfalls will help keep your design system aligned with production code and functioning smoothly.
Conclusion
Bringing together GPT-5.1, MUI, and UXPin Merge streamlines the entire design-to-development process. By using production-ready React components, teams can ensure that designs match the final development output. This unified approach eliminates the common pitfalls of design–dev misalignment and reduces the need for lengthy handoffs.
The boost in efficiency is undeniable. Industry leaders have shared how UXPin Merge significantly reduces feedback cycles and engineering hours.
This system doesn’t just speed up workflows – it also automates updates. Thanks to automatic synchronization between your Git repository and the UXPin editor, any changes to MUI components are immediately reflected in your design files. GPT-5.1 enhances this process by generating detailed layouts using design tokens and pre-approved components, saving time on repetitive tasks. The result? Prototypes that are not only visually accurate but also feature real interactions, form validation, and data handling – all ready for testing before production coding begins. These advancements allow enterprise teams to scale their design efforts more efficiently.
For organizations managing intricate UX workflows, this method delivers the consistency and scalability required to oversee multiple products and platforms effectively. In fact, a survey of 3,157 companies revealed that 69% are either using or developing a React design system to maintain cohesion. This workflow ensures that your UXPin Merge process aligns every prototype with production standards, making it a practical solution for complex enterprise needs.
FAQs
Do I need a separate AI subscription to use GPT-5.1 in UXPin?
The provided information doesn’t specify if a separate AI subscription is necessary to access GPT-5.1 in UXPin. For accurate details, it’s best to consult UXPin’s official documentation or reach out to their support team.
What’s the easiest way to connect MUI to UXPin Merge?
The easiest way to link MUI with UXPin Merge is by using the interactive MUI library specifically designed for UXPin Merge. Simply log in to UXPin, add the MUI library to your project, and begin designing with pre-built React components.
For a more advanced setup, you can sync React components directly from your Git repositories. To do this, install the MUI library through a package manager, package the components, and ensure they stay aligned with your developers’ codebase.
Why aren’t some MUI components rendering in UXPin Merge?
Some MUI components might not display as expected in UXPin Merge because of problems caused by global CSS overrides. These overrides often function correctly in development but can lead to inconsistent rendering in production environments. To ensure consistent behavior, it’s better to rely on MUI’s built-in style customization methods rather than using global CSS.

