High-Fidelity Prototyping vs Low-Fidelity Prototypes: Which to Choose When?
Prototyping is an essential part of the UX design process. Prototypes allow designers to test design ideas and user flows before committing to the final product.
Prototypes help validate what works but also expose missing elements and features. Without the prototyping phase, companies would waste precious resources iterating over the final product.
Low-fidelity prototypes allow teams to test information architecture and user flows, while high-fidelity prototypes introduce UI elements and how the user might interact with the final design.
In this article, we will explore low-fidelity and high-fidelity prototypes—which to use and when?
UXPin is a collaborative design tool allowing teams to create low-fidelity and high-fidelity prototypes to test at every stage of the design process. Sign up for a 14-day free trial today and start designing better products with UXPin.

What is a Prototype?
Before we begin, it’s important to define a prototype. Many people confuse prototypes with static wireframes and mockups.
Prototypes use wireframes and mockups with clickable elements to simulate interactions and user flows.
UX teams might even create low-fidelity paper prototypes in the early design stages to demonstrate how a user might navigate through a product.
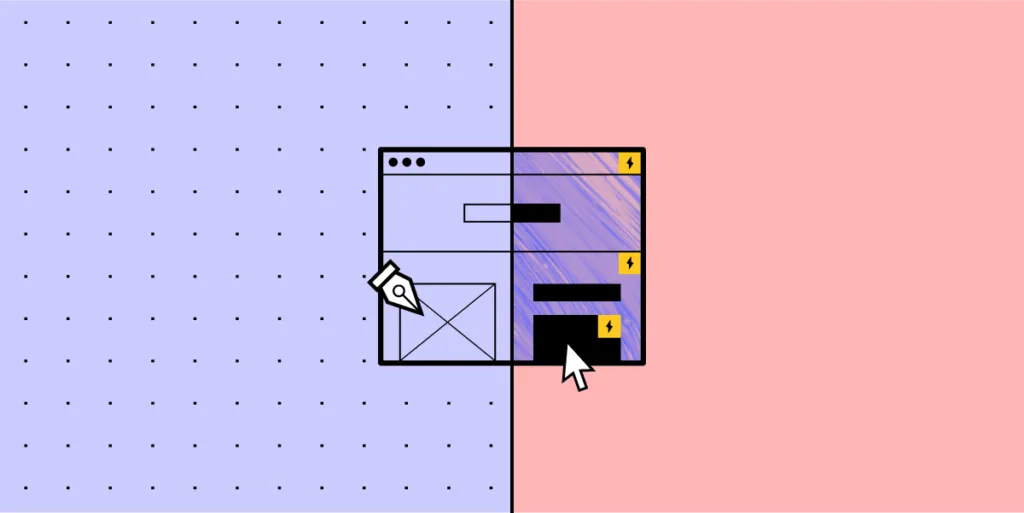
Low-Fidelity Prototyping
Whether UX designers use paper or digital wireframes, low-fidelity prototyping is the first step in testing design ideas and user flows.
Low-fidelity prototypes are either hand-drawn or basic digital wireframes without color or content. These low-tech designs allow UX teams to visualize each screen’s layout, test navigation, and experience user flows.
A great example of a digital low-fidelity prototype is a typical eCommerce checkout flow. After creating a wireframe or low-fidelity mockup, UX designers will use buttons or links to connect each screen and create a checkout flow.
The checkout flow might look something like this:
home page > product page > cart > payment/checkout > confirmation > thank you.
Using a low-fidelity prototype, UX designers can experience the checkout flow—ensuring each screen has the correct elements and the user can navigate forwards and backward throughout the flow.
Types of Low-Fidelity Prototypes
- Paper prototypes are the fastest way for teams to create user flows and imagine interactions. Paper prototyping is particularly beneficial during design sprints when teams have limited time to develop flows and iterations. With paper “screens” laid out on the desk or whiteboard, teams can visualize flows together, allowing effective collaboration and idea-sharing. None of the elements are clickable, but paper prototypes enable teams to design screen layouts and flows, reducing the time needed to create initial digital wireframes.
- Clickable wireframes are a low-fidelity digital representation of how screens and flows. Each frame will usually have simple lines and shapes with a prominent CTA for navigation. Modern UX tools like UXPin enable teams to collaborate effectively with comments, replicating the energy and excitement of a paper prototyping session.
Pros of Low-Fidelity Prototyping
- Designers can make low-fidelity prototypes fast! This speed allows designers to make quick changes during testing or meetings to visualize fresh ideas.
- Low-fidelity prototypes are time efficient – inexpensive, which means teams can test multiple variations and iterations at a low cost.
- Anyone can create low-fidelity prototypes because they only use simple lines and shapes—even non-design team members can provide valuable input.
Cons of Low-Fidelity Prototypes
- Due to the basic layout and functionality, low-fidelity prototypes don’t provide accurate results during testing. Stakeholders might also battle to visualize the final product resulting in poor feedback or confusion.
- Without color, interactions, transitions, or animations, low-fidelity prototypes can feel dull and underwhelming.
High-Fidelity Prototyping

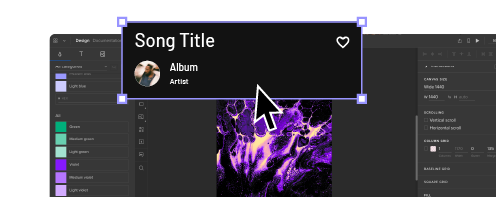
High-fidelity prototyping is where a product begins to take shape. Using mockups with color and content, designers can create hi-fi prototypes that look and function as close to the final product as possible.
Now designers can add interactions, transitions, and animations to create an immersive user experience—making high-fidelity prototypes perfect for usability studies and presenting to stakeholders.
If we go back to our eCommerce example, designers can include product images and colored CTAs to entice users down a particular flow—like completing a checkout.
UX designers can also add interactions, like an overlay showing the user’s cart when adding a new item. They might also add screen transitions to indicate a user’s movement through the checkout flow.
Types of High-Fidelity Prototypes
- A high-fidelity prototype using mockups gives users an accurate sense of how a product will look and function. The designs will include color and content, while every link and button should work as it would in the final product.
- A high-fidelity prototype using code takes prototyping one step further. For example, with UXPin Merge, designers can use React or Storybook components to create prototypes that function exactly like the final product. Research teams using prototypes from UXPin Merge get better results from usability studies and testing and cut down time to market.
Pros of High-Fidelity Prototyping
- High-fidelity prototypes provide meaningful feedback during usability studies because participants can interact with the prototype like they would the final product.
- UX designers can test interactions, animations, and transitions.
- Hi-fi prototypes provide stakeholders with an accurate representation of the final product. These prototypes could help startups get early-stage funding or pitch product concepts to clients.
Cons of High-Fidelity Prototypes
- UX designers must spend more time making changes with greater detail, so high-fidelity prototypes cost more to produce.
- Without clear objectives, UX designers can get distracted trying to find the “perfect” interactions, animations, or transitions while creating high-fidelity prototypes. This fixation could lead to unnecessary delays.
Which Prototype to Use and When?
Now that you have a solid foundation of high-fidelity vs. low-fidelity prototyping, we can begin to explore which you would use and when.
When to Use Low-Fidelity Prototypes
Low-fidelity prototypes are best for the early stages of the design process. UX teams can use paper prototypes before they even sit down at the PC. These low-tech paper designs are also great for collaboration and exploring lots of ideas at speed—perfect for design sprints!
Digital low-fidelity prototypes help UX teams organize information architecture and user flows before committing to mockups.
When NOT to Use Low-Fidelity Prototypes
Unless you’re testing basic user flows, low-fidelity prototypes do not provide meaningful feedback during usability studies. Users might get distracted by the unfamiliarity of the product and thus focus on the wrong elements.
When to Use High-Fidelity Prototypes
UX teams should only move from lo-fi to hi-fi prototyping once designers have completed mockups to complete at least one user flow for testing.
These mockups must include clickable links and elements, color, and content—but might not require interactions, animations, and transitions for the first round of usability studies.
High-fidelity prototypes are helpful for testing layouts and how page transitions or scrolling might affect content and elements. UX designers can also test how interactions, animations, and transitions affect the user experience.
High-fidelity prototypes should be the last stage of the design process before handing over to engineering.
When NOT to Use High-Fidelity Prototypes
UX designers must not build high-fidelity prototypes before researchers have thoroughly tested lo-fi prototypes and created mockups with content, and color.
If teams want to test design concepts fast, creating and editing high-fidelity prototypes will severely hamper progress.
UXPin – The Best Prototyping Tool
UXPin provides design teams with powerful tools for prototyping at every stage of the design process.
Teams can preview prototypes in the browser or scan a QR code to preview prototypes on any mobile device using UXPin Mirror—great for getting feedback from usability participants and stakeholders using multiple devices.
Lo-Fi Prototyping in UXPin
UX designers can design beautiful wireframes quickly with UXPin’s pre-built form fields and icons—create buttons, input fields, dropdowns, radios, checkboxes, icons, and more with just a few clicks.
With your wireframes complete, you can create basic lo-fi navigation between pages with tap/click interactions. Achieve vertical or horizontal scrolling with a single click.
With your lo-fi prototypes complete, you can preview your design in the browser or test on any device using UXPin Mirror.
Provide feedback and assign changes to designers using UXPin’s comments feature. Designers can create private notes for themselves and click resolve once complete.
Hi-Fi Prototyping in UXPin
With lo-fi prototyping complete, UX teams can begin high-fidelity prototyping in UXPin.
If you have ever worked with Figma, Adobe XD, and other popular design tools, then you’ll LOVE the added functionality UXPin provides—enabling you to take your high-fidelity prototyping to the next level and beyond!
Create reusable components to maintain consistency and build page layouts fast! If you need to make changes, simply edit the master, and the changes copy to all child components.
UXPin’s variables feature allows you to store data from user inputs and take actions based on the data provided. For example, on a signup page, the user enters their name. On the next page, you can use the name (let’s say John) to personalize the experience—Welcome to UXPin, John!
You might also want to store dummy credit card details so users can get a clearer sense of how the product will capture and display credit card information at checkout.
Start Prototyping with UXPin Today
Sign up for a 14-day free trial and experience the endless possibilities of prototyping with UXPin.