Paper Prototyping: The Complete Guide to Low-Fidelity UX Design in 2026
Even in 2026 — with AI assistants, code-backed components, and cloud-based design tools — pen and paper remain one of the fastest ways to explore ideas in the early stages of UX design. Paper prototyping lets teams sketch, test, and iterate on concepts before investing time in digital tools or code.
This guide covers everything you need to know about paper prototyping: what it is, when it makes sense, step-by-step techniques for creating effective paper prototypes, tips for testing them, and how to transition your best concepts into high-fidelity, interactive prototypes.
Ready to skip straight to digital? With UXPin Forge, you can describe a UI concept in plain language — or upload a photo of your paper sketch — and get a working prototype built with real components. Start a free trial.

What Is Paper Prototyping?
Paper prototyping is the process of sketching user interface screens by hand to visualize and test ideas before committing to digital design. Each sketch represents a screen or state in the application, and teams arrange them in sequence to simulate user flows.
Paper prototypes are low-fidelity by nature — they don’t have interactivity or pixel-perfect styling. Their purpose is to map out information architecture, validate navigation concepts, and gather early feedback before investing time in detailed design work.
Designs are typically sketched in black and white, using basic shapes for UI elements. Content is kept minimal — headlines and CTA labels may be legible, but body text is usually represented as wavy lines or lorem ipsum placeholders.
Advantages and Disadvantages of Paper Prototyping
Advantages
- Speed — Sketching a screen takes minutes, not hours. It’s far easier to discard a 5-minute sketch than a polished digital mockup.
- Low cost — Paper, pens, and sticky notes are all you need. Even stencil kits are inexpensive.
- Increased creativity — The freeform nature of pencil and paper encourages experimentation and divergent thinking, which can be stifled by the precision of digital tools in early stages.
- Team collaboration — Paper prototyping sessions bring cross-functional teams together in a creative, low-stakes environment. Everyone can sketch, regardless of design skill.
- No learning curve — Anyone can participate, making it ideal for involving stakeholders, marketers, and developers in ideation sessions.
- Documentation value — Paper prototypes become useful UX artifacts. Designers annotate decisions and rationale directly on the sketches for future reference.
Disadvantages
- No real interactivity — Without functioning inputs, transitions, or states, user feedback is limited to high-level flow validation rather than detailed interaction testing.
- Difficult to interpret outside the team — Stakeholders and test participants outside the UX team may struggle to understand rough sketches, limiting feedback quality.
- May be unnecessary with modern AI tools — Rapid prototyping tools like UXPin and AI assistants like Forge can produce testable, high-fidelity layouts in minutes — making paper prototyping an optional extra step for some workflows.
- Difficult to version and share remotely — Paper prototypes require photography or scanning to share with distributed teams, and tracking iterations is manual.
When to Use Paper Prototyping
Paper prototyping is most valuable in the earliest stages of the design process. It works best for:
- Brainstorming sessions — When you need to generate many ideas quickly and explore different directions without tool constraints.
- New product concepts — When you’re still defining the product’s core flows, information architecture, and key interactions.
- Cross-functional workshops — When you want non-designers (product managers, developers, executives) to contribute ideas in a low-pressure format.
- Early-stage user testing — When you want to validate broad navigation concepts and screen flows before investing in digital prototypes.
- Remote or low-resource environments — When digital tools aren’t readily available or when you need a fast, no-setup ideation method.
Once you’ve validated the core concept on paper, transition to a digital tool to test interactivity, visual design, and responsive behavior. Research referenced by Nielsen Norman Group found that roughly 75% of usability issues can be identified with simple, low-fidelity prototypes — so paper prototyping delivers high value before you ever open a design tool.
How to Create a Paper Prototype: Step by Step
Step 1: Prepare Your Materials
Gather blank printer paper (avoid ruled paper — lines restrict creativity), fine-tipped black markers, colored markers for highlights, sticky notes, scissors, tape, and index cards. If you have a whiteboard, use it to map out overall flows before sketching individual screens.
Pro tip: Assign preparation to the team’s “arts & crafts enthusiast” — every team has one, and they’ll make sure you have more than enough supplies.
Step 2: Warm Up with Crazy Eights
Start with a warm-up exercise. Crazy Eights is a popular design sprint technique: fold a sheet into 8 panels and sketch a different version of the same screen in each panel (one minute per panel). After a couple of rounds, you’ll have dozens of ideas to expand on — and the time pressure prevents overthinking.
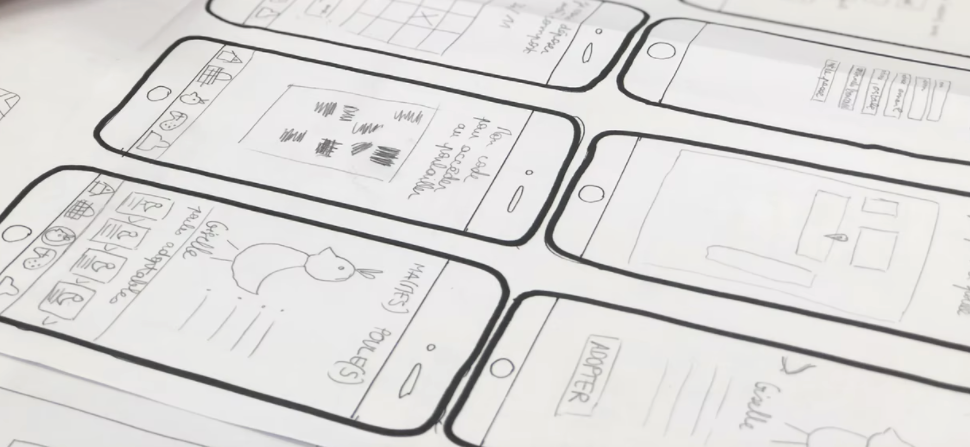
Step 3: Sketch One Screen Per Sheet
Draw one screen per piece of paper. This lets you rearrange, swap, and add screens flexibly when mapping user flows. Use basic shapes for buttons, inputs, and images — label key elements clearly so others can interpret your intent.
Step 4: Arrange Screens Into User Flows
Lay out your screens on a desk or floor in the order a user would encounter them. Walk through the flow as if you were a real user navigating the product. Identify gaps, dead ends, unnecessary steps, and opportunities to streamline.
Step 5: Simulate Interactions
Designate a team member as the “human computer” who swaps screens when the test participant taps a button or makes a selection. Some teams build cardboard device frames to simulate mobile or tablet screens for added realism.
Step 6: Annotate and Document
Add sticky notes with questions, assumptions, and design rationale to each screen. Photograph or scan your paper prototypes to create a digital archive before moving on to the next phase.
6 Tips for Better Paper Prototypes
- Design mobile-first. Start with the smallest screen and scale up. This forces you to prioritize content and avoid desktop-heavy layouts that don’t translate to mobile.
- Focus on quantity, not quality. The goal is generating many ideas. You’ll combine the best elements from multiple sketches into a refined concept.
- Use color sparingly. Black-and-white sketches keep the focus on layout and flow. Use color only to highlight CTAs, status indicators, or important states.
- Keep a “parking lot.” Capture off-topic or tangential ideas on a separate sheet rather than derailing the current session.
- Time-box sessions. Paper prototyping works best in focused 30–60 minute blocks. Longer sessions often produce diminishing returns as energy fades.
- Photograph everything. Paper gets lost, crumpled, or recycled. Take photos of each screen and the overall flow arrangement before cleaning up.
Testing and Presenting Paper Prototypes
Presenting paper prototypes outside the design team requires extra preparation. Participants need to “imagine” interactions, which can confuse or distract from the feedback you’re trying to gather.
Tips for effective paper prototype testing:
- Assign clear roles — Have one person present and guide the session, and another play the “human computer” who simulates the product by swapping screens.
- Rehearse before testing — The presenter and simulator need to be in sync so the demonstration flows naturally and doesn’t distract participants.
- Follow usability test best practices — Test with at least 5 participants and record sessions. For detailed guidance, see UXPin’s Guide to Usability Testing.
- Provide annotations — If participants inspect prototypes independently, include labels and instructions so they know where to focus and what actions are available.
- Ask participants to think aloud — Verbal narration of their thought process reveals mental models and expectations that you can’t observe from actions alone.
From Paper to Digital: Transitioning to UXPin
Paper prototyping validates the concept. The next step is building something interactive that you can test at higher fidelity and share with distributed stakeholders.
UXPin offers two fast paths from paper sketches to interactive digital prototypes:
Option 1: Build Manually with Merge Components
Open UXPin and drag pre-built, code-backed components from libraries like MUI, shadcn/ui, or Bootstrap onto the canvas. Because these are real React components, your prototype functions like the final product — with working inputs, states, and interactions.
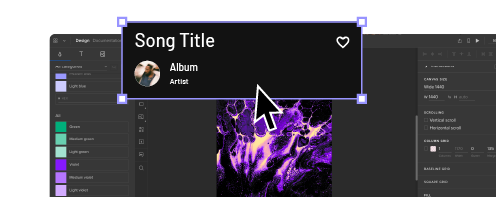
Option 2: Use Forge to Convert Sketches Automatically
Forge accepts image uploads as input. Photograph your paper prototype, upload it to Forge, and the AI generates a component-based layout that matches your sketch — using your production design system’s actual React components. From there, refine it conversationally (“move the navigation to the left,” “add a search bar in the header”) and export production-ready JSX.
Either path eliminates the tedious manual translation work that traditionally slows the transition from paper to digital. Teams using Merge and Forge report 8.6x faster design-to-prototype cycles compared to vector-based tools. Sign up for a free trial and try both approaches.
Frequently Asked Questions
What is paper prototyping in UX design?
Paper prototyping is a low-fidelity design technique where UX teams sketch user interface screens by hand and arrange them to simulate user flows. It’s used in early-stage ideation to explore concepts quickly before moving to digital design tools.
When should you use paper prototyping?
Use paper prototyping during brainstorming sessions, new product conceptualization, cross-functional workshops, and early-stage user testing. It’s most valuable when you need to generate and compare many ideas quickly at minimal cost.
Is paper prototyping still relevant in 2026?
Yes. While AI tools like UXPin Forge can generate layouts from text prompts, paper prototyping remains valuable for collaborative ideation, early-stage exploration, and workshops where you want non-designers to contribute. Many teams use paper prototyping for the initial concept and then transition to digital tools for testing and refinement.
How do you test a paper prototype?
Assign a “human computer” to simulate interactions by swapping paper screens as the participant navigates. Follow standard usability testing practices: use at least 5 participants, record sessions, and ask participants to think aloud as they work through tasks.
What materials do you need for paper prototyping?
At minimum: blank printer paper, fine-tipped black markers, and sticky notes. For more polished sessions, add colored markers, scissors, tape, index cards, UI stencils, and a whiteboard for mapping overall flows.
How do you convert a paper prototype into a digital design?
You can manually recreate the layout in a design tool using pre-built components, or use AI tools like UXPin Forge to upload a photo of your sketch and generate a component-based digital layout automatically. Forge uses your real production components, so the output is immediately usable and on-brand.