Want to design faster without losing precision? Combining Claude Opus 4.5, MUI, and UXPin Merge lets teams prototype directly with production-ready code. This approach eliminates design-to-development gaps, reducing rework and cutting engineering time by up to 50%.
Here’s how it works:
- UXPin Merge: Syncs your design tool with React component libraries like MUI, ensuring prototypes are built with real code.
- Claude Opus 4.5: AI that generates and refines layouts, handles debugging, and optimizes workflows.
- MUI: Pre-built React components based on Material Design principles, ensuring accessibility and consistency.
This process helps teams create interactive prototypes that look and behave like the final product, speeding up collaboration and delivery.
Key Steps:
- Link UXPin Merge to your MUI or custom component library.
- Use Claude Opus 4.5 for AI-assisted layout creation and debugging.
- Build, test, and refine prototypes with real interactivity and developer-ready code.
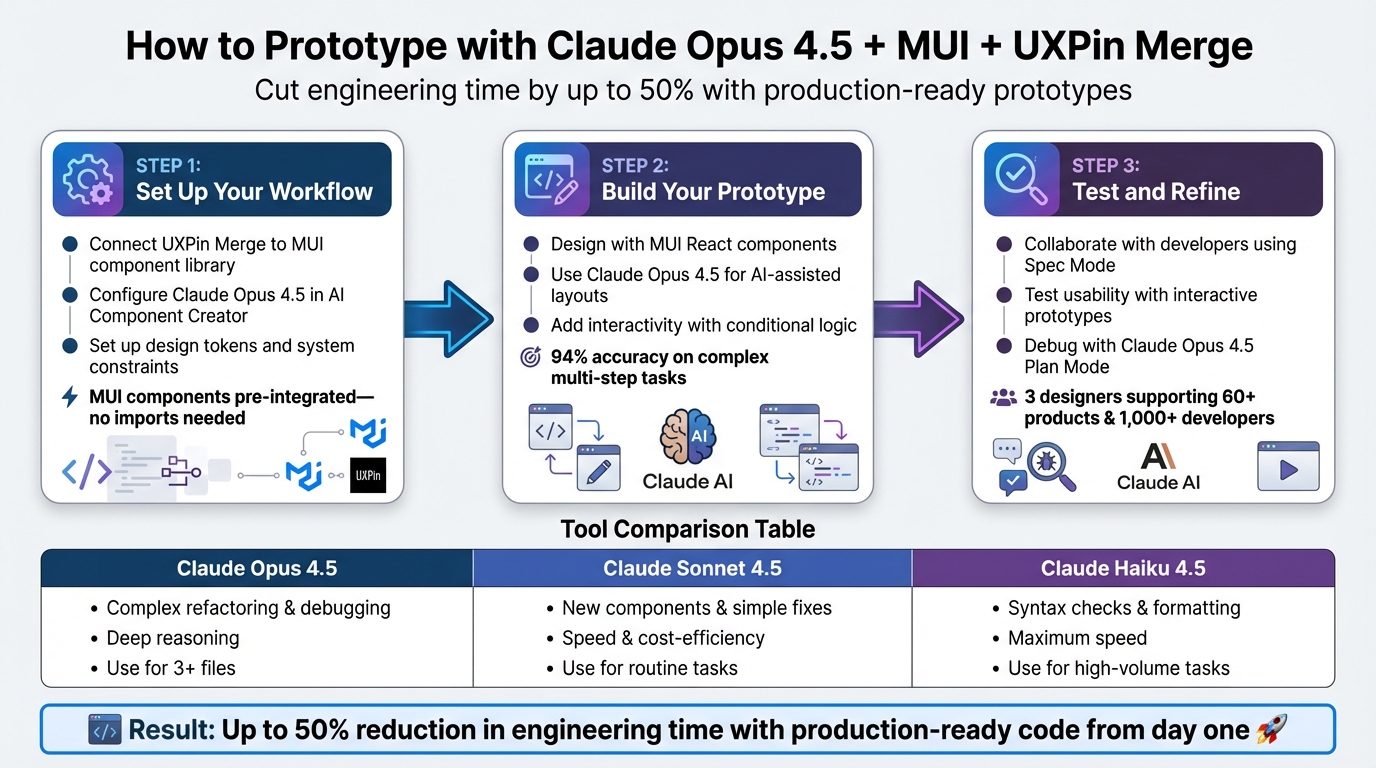
3-Step Workflow for Prototyping with Claude Opus 4.5, MUI, and UXPin Merge
UXPin Merge Tutorial: Prototyping an App with MUI – (4/5)

sbb-itb-f6354c6
Step 1: Set Up Your Workflow
To keep your prototypes aligned with production code while allowing for quick iterations, start by completing these three key steps.
Connect UXPin Merge to Your Component Library
UXPin Merge comes preloaded with MUI, so there’s no need for additional imports or external configuration. Simply open the UXPin Editor, and you’ll find the integrated MUI library ready to use. Every component you place on the canvas is actual React code.
If you’re working with custom component libraries, they can be synced seamlessly from Git, Storybook, or npm.
Use Claude Opus 4.5 for AI-Assisted Prototyping
In the Quick Tools panel, access the AI Component Creator, enter your Anthropic API key under Settings, and choose Claude Opus 4.5 as your model.
Once set up, the Prompt tab allows you to generate functional layouts with ease. For instance, typing, "Create a MUI login form with validation," will instantly generate a code-backed component that’s fully interactive and structured for a smooth design-to-development handoff.
"Claude Opus 4.5 is the only model that nails some of our hardest 3D visualizations. Polished design, tasteful UX, and excellent planning & orchestration." – Anthropic
For existing MUI components, click the Modify with AI purple icon in the component info section. This feature lets you tweak styles, layouts, or text using natural language prompts, cutting down on manual adjustments and speeding up the iteration process.
Configure System Constraints and Design Tokens
UXPin Merge maps React props directly to the Properties Panel, giving you full control over component behavior. For MUI components, you’ll interact with property types like boolean, enum, string, and number.
| Property Type | Example Usage | UXPin UI Control |
|---|---|---|
| Boolean | disabled, loading, required |
Toggle/Switch |
| Enum | color (primary, secondary), variant |
Dropdown |
| Node/String | children (Button label), helperText |
Textfield |
| Number | elevation, tabIndex |
Number Input |
You can also use the AI Helper to define borders, typography, and spacing with natural language prompts. This ensures consistency across your designs and minimizes the risk of misalignment between design and development.
With these steps completed, you’re ready to start building interactive prototypes using MUI components.
Step 2: Build Your Prototype
Now that your production-ready workflow is set, the next step is creating a live, interactive prototype. This involves leveraging MUI’s component library alongside Claude Opus 4.5’s AI capabilities to streamline your design process while ensuring the prototype behaves like the final product.
Design with MUI Components in UXPin Merge
Start by dragging MUI components from the library panel straight onto your canvas. These components are fully coded in React, meaning they’re ready for customization. Adjust their props – like variant, color, disabled, or elevation – directly in the Properties Panel. For more complex interfaces, take it step by step. For example, begin with a navigation bar and then layer in elements like a data table. This method minimizes errors and gives you greater control over the final design.
Use Claude Opus 4.5 to Simplify Layout Creation
Claude Opus 4.5 is a powerful tool for handling intricate, multi-file layouts efficiently. When building layouts, use the AI Component Creator’s "Plan Mode." This feature lets the model analyze tasks and flag potential file impacts before making changes, helping to reduce errors.
Add Interactivity with Conditional Logic and Variables
Once your layout is complete, it’s time to make it interactive to reflect actual user flows. UXPin Merge provides advanced features like conditional logic and variables to help you achieve this. For more complex behaviors, Claude Opus 4.5 can generate React code. Impressively, the model improved evaluation scores on challenging, multi-step tasks from 78% to 94%, making it ideal for creating intricate interaction patterns. Use the "Modify with AI" tool to update component properties or text content using natural language prompts, eliminating the need for manual changes. This ensures your prototype remains dynamic and closely aligned with how users will interact with the final product.
Step 3: Test and Refine Your Prototype
Once your prototype is ready, it’s time to ensure it meets both usability and system standards. This phase connects your interactive design to the production-ready version.
Collaborate with Developers for Feedback
Share your prototype as early as possible. Using real React components in Spec Mode allows developers to directly inspect the JSX and CSS. This eliminates the need for redlining and enables developers to verify component details right within Spec Mode before production begins. It’s a seamless way to maintain alignment between design and development.
If a developer identifies a limitation – like an unsupported prop or a layout issue conflicting with the existing architecture – you can address it immediately on the canvas. This quick feedback loop reduces unnecessary back-and-forth and keeps the team on the same page.
"UXPin prototypes gave our developers enough confidence to build our designs straight in code." – Edward Nguyen, UX Architect
Test for Usability and System Compliance
Once developer feedback has been incorporated, shift your focus to prototype testing for usability. With production-level code in place, test the prototype’s interactivity and ensure it complies with system requirements. Instead of relying on static mockups, use interactive prototypes – complete with features like ripple effects, calendar pickers, and sortable tables. This method provides more actionable insights into how users interact with the interface.
For more complex debugging, leverage tools like Claude Opus 4.5. This tool, released in November 2025, excels at detecting nuanced issues such as race conditions or edge cases that could disrupt the user experience. It’s particularly effective for analyzing multi-file architectures, acting as an "architecture consultant" to pinpoint problems with data flow or state management. Use Plan Mode via /plan to outline solutions and prevent new issues from arising.
When dealing with large-scale updates – like modifying all navigation components based on user feedback – Claude Opus 4.5 can run parallel processes to update multiple components simultaneously. For simpler tasks, such as minor UI adjustments, faster models like Sonnet are more cost-efficient and time-saving.
| Model Tier | Best Use Case for Testing/Refining | Key Strength |
|---|---|---|
| Claude Opus 4.5 | Complex refactoring, debugging race conditions, architecture review | Deep reasoning and multi-file context |
| Claude Sonnet 4.5 | Writing new components, simple bug fixes, documentation | Speed and cost-efficiency |
| Claude Haiku 4.5 | Syntax checks, formatting, and quick cleanup | Maximum speed for high-volume tasks |
Conclusion
Key Benefits Summary
Bringing together Claude Opus 4.5, MUI, and UXPin Merge creates a streamlined workflow that bridges the gap between design and development. By designing with React components that mirror production code, teams operate from a single source of truth – avoiding the need for translation or rebuilding.
The impact of this approach is measurable. Enterprise setups can see engineering time reduced by nearly 50%. UX Architect Erica Rider highlighted that after integrating Microsoft Fluent with UXPin Merge, just 3 designers managed to support 60 internal products and over 1,000 developers.
Claude Opus 4.5 plays a critical role as a "seasoned senior engineer" in this setup, handling complex tasks like refactoring, architectural decisions, and debugging intricate issues that simpler models might overlook. For routine tasks – such as creating components or making minor UI tweaks – faster models like Sonnet can help reduce costs and increase efficiency. This tiered approach ensures Opus 4.5 is reserved for tasks involving 3+ files or system-wide complexities.
Follow these straightforward steps to unlock the full potential of this workflow.
Next Steps for Your Team
Getting started with this workflow is simple. First, connect your design system to UXPin Merge. If you’re using libraries like MUI, Ant Design, Bootstrap, or ShadCN, they’re already integrated – no additional imports needed. For custom component libraries, sync directly via your Git repository, Storybook, or npm package.
To set up Claude Opus 4.5, choose between a Claude Max subscription ($100–$200/month) or API access ($15 per 1M input tokens / $75 per 1M output tokens). Add a CLAUDE.md file to your project root to define architecture guidelines, coding standards, and when to use Opus over faster models. Use the /plan command before major refactors to identify affected files and flag potential issues early.
For enterprise-level scalability, consider UXPin’s Enterprise plan. This includes custom AI library integration, unlimited version history, and dedicated support. Learn more at uxpin.com/pricing or reach out to sales@uxpin.com to tailor a solution for your team.
These steps will ensure your design system stays in sync with production, boosting efficiency and collaboration across your projects.
FAQs
Do I need to code to prototype with MUI in UXPin Merge?
No, you don’t need to code. With UXPin Merge, designers can work with fully interactive React components from the MUI library without touching a single line of code. This allows you to build functional, code-powered prototypes effortlessly, so you can concentrate entirely on the design process.
How do I connect Claude Opus 4.5 to UXPin Merge?
UXPin Merge lets you import React components directly from code libraries like npm or Git repositories. With Claude Opus 4.5, you can generate or refine components, export the code, and then bring it into UXPin Merge. This can be done through direct upload or by integrating with version control systems. The result? You can prototype using real, code-based components crafted with Claude Opus 4.5.
When should I use Opus 4.5 vs faster Claude models?
For tasks involving advanced coding, intricate workflows, or multi-agent systems, Claude Opus 4.5 is the go-to choice. It’s designed for enterprise-level applications, offering improved token efficiency, higher-quality code output, and smoother workflow management.
On the other hand, faster Claude models are ideal for simpler tasks where quick responses and minimal resource use are priorities.
If you’re working on prototyping with tools like Material UI, Opus 4.5 stands out. It delivers production-ready code and simplifies the transition from design to development, making it a powerful asset for streamlining your workflow.

