Prototyping with Claude Sonnet 4.5 and UXPin Merge bridges the gap between design and development by enabling teams to create production-ready prototypes directly from their design systems. Here’s what you need to know:
- Claude Sonnet 4.5: An AI tool with a 200,000-token context window, optimized for coding and handling complex design systems.
- UXPin Merge: A platform that lets you sync live React components from Git, Storybook, or npm to create functional prototypes.
- Key Benefits:
- Prototypes are built using actual production components, reducing rework.
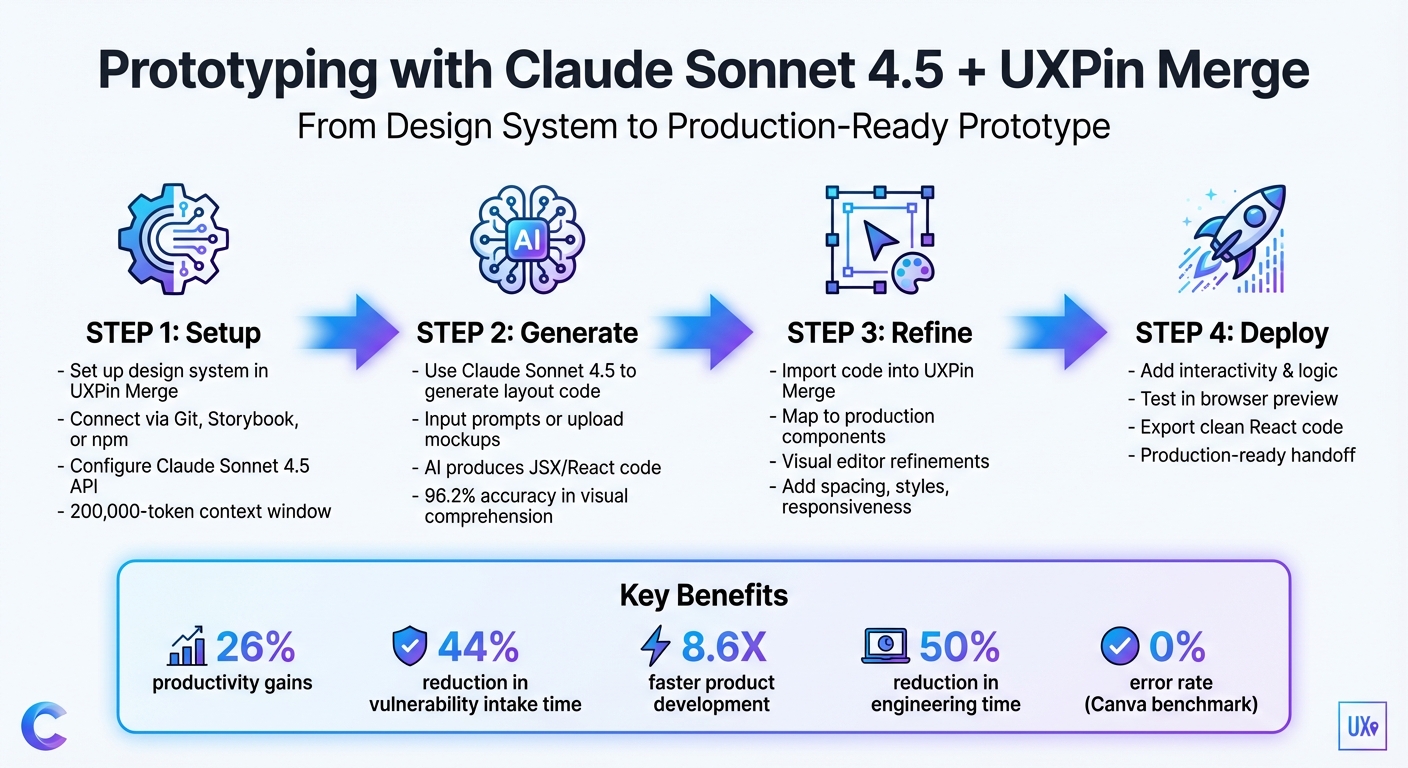
- Teams report up to 26% productivity gains and a 44% reduction in vulnerability intake time.
- AI-generated layouts can be refined with UXPin’s visual editor and interactivity tools.
Steps to Get Started:
- Set up your design system in UXPin Merge using Git, Storybook, or npm.
- Use Claude Sonnet 4.5 to generate layout code from prompts or mockups.
- Import the code into UXPin Merge, refine it visually, and add interactivity.
- Test, iterate, and export clean React code ready for development.
This streamlined approach significantly cuts down prototyping time while maintaining alignment between design and development. Keep reading for detailed setup instructions and practical examples.
How to Prototype with Claude Sonnet 4.5 and UXPin Merge: 4-Step Workflow
UXPin Merge AI: Smarter UI Generation That Follows Your Design System

sbb-itb-f6354c6
Prerequisites for Using Claude Sonnet 4.5 with UXPin Merge
Before you dive into prototyping, make sure you have everything you need: a UXPin account with Merge access, an Anthropic account for Claude Sonnet 4.5, Node.js 18 or higher (with npm or yarn), a modern browser like Chrome (version 100 or later), Git access, and a stable internet connection with latency under 200ms. You can access Claude Sonnet 4.5 through Anthropic‘s platform at claude.ai or via their API at platform.anthropic.com. Paid plans start at $3 per million input tokens, while the free tier offers limited access with a 200,000-token context window. For enterprise teams needing more scalability, platforms like Azure AI Foundry or OpenRouter provide extended API options.
Setting Up a Custom Design System in UXPin Merge
UXPin Merge works with both pre-integrated libraries and custom design systems. If you’re using pre-built libraries like MUI, Ant Design, Bootstrap, or shadcn/ui, you can connect them directly from UXPin’s library marketplace. This eliminates the need for additional imports or AI accounts, allowing you to get started quickly with production-ready components.
For custom design systems, the process is straightforward:
- Log into UXPin and create a new Merge project.
- Connect your component library via one of these methods:
For instance, to integrate MUI, install the @mui/material package through the Merge console. Then, run the command uxpin-merge sync in your local repository or use UXPin’s GitHub integration to automate the syncing of components.
Once your components are synced, map their props in UXPin’s editor. Start by testing a single component to minimize errors – this approach can reduce setup mistakes by 30% in enterprise workflows, helping you identify version conflicts or prop mismatches early. If you encounter sync issues, restart the Merge daemon or double-check your uxpin.config.js.
"We synced our Microsoft Fluent design system with UXPin’s design editor via Merge technology. It was so efficient that our 3 designers were able to support 60 internal products and over 1,000 developers." – Erica Rider, UX Architect and Design Leader
Configuring Claude Sonnet 4.5 for Prototyping
In the UXPin Editor, go to the Quick Tools panel, open the AI Component Creator’s Settings tab, and paste your API key. If you’re using Anthropic’s API directly, generate your key from their console at platform.anthropic.com.
Next, in the Prompt tab, select Claude Sonnet 4.5 from the model dropdown. This version is optimized for coding and agentic tasks, offering a 200,000-token context window (expandable to 1 million tokens in beta). It can handle entire design system documentation and extensive component libraries. Adjust the temperature parameter to around 0.7 for a balance between creativity and precision. If you’re refining layouts from screenshots or mockups, enable vision capabilities.
When writing prompts, be as specific as possible about your UXPin Merge components. For example, instead of saying, "create a dashboard", try something like:
"Generate React code for a responsive dashboard using MUI Grid and Cards with a 16px font size and 2px solid bottom borders."
This level of detail ensures Claude generates layouts that align perfectly with your design system. Developers have reported a 44% improvement in detecting vulnerabilities during prototyping when using Sonnet 4.5, making it an excellent tool for enterprise teams prioritizing security and compliance.
Once you’ve completed these steps, you’re ready to start generating prototypes with Claude Sonnet 4.5 and UXPin Merge.
How to Prototype with Claude Sonnet 4.5 and UXPin Merge
With your setup ready, you’re all set to create prototypes that blend AI-generated layouts with production-ready components. The workflow involves generating initial layouts using Claude Sonnet 4.5, refining them in UXPin Merge’s visual editor, and adding interactivity to build fully functional prototypes. This approach can speed up product development by up to 8.6 times while cutting engineering time by nearly 50%. Here’s a step-by-step guide to get started.
Step 1: Generate Prototype Layouts with Claude Sonnet 4.5
Start by opening the AI Component Creator in UXPin’s Quick Tools panel and navigating to the Prompt tab. Here, you’ll enter a detailed prompt outlining the design system components, layout structure, and constraints. For example: "Create a login page layout using our custom AuthButton, FormInput, and Header components; ensure mobile responsiveness and export as clean JSX for UXPin Merge import."
The more detailed your prompt – such as including hex codes, spacing (e.g., 16px padding), and typography – the better the AI will perform.
You can also upload wireframes or mockups directly into the AI Component Creator. Simply paste a screenshot of your design and include a text prompt to clarify missing details, like interactivity or specific spacing. Claude Sonnet 4.5’s ability to analyze visuals allows it to transform low-fidelity wireframes into functional, code-backed components. For complex designs, providing clear and detailed prompts minimizes the need for manual adjustments later.
Step 2: Refine Layouts with UXPin Merge
Once you have your AI-generated layout, import the JSX or HTML output into UXPin Merge using its code import feature. Map these components to your design system library in Merge’s component panel and fine-tune the styles, spacing, and responsiveness using the visual editor. This process ensures that the design stays aligned with your system while maintaining its original intent.
If you notice any issues – like incorrect button variants or missing properties – you can fix them directly in the properties panel or use the "Modify with AI" tool. For example, you can type instructions like "add 20px padding" or "switch button to primary theme" to make quick adjustments.
Preview your layout in Merge’s browser to check for pixel-perfect alignment. This step ensures that your design integrates seamlessly with production components, reducing manual rework by up to 44% in similar workflows. While Claude Sonnet 4.5 handles much of the heavy lifting, you may still need to manually refine complex elements like conditional logic or variable-specific details.
Step 3: Add Interactivity and Logic
With your refined layout ready, it’s time to incorporate interactivity. UXPin Merge allows you to add variables and conditional interactions to handle complex logic. For instance, you can define variables like userLoggedIn: boolean or cartQuantity: number in the Variables panel. Then, set up visibility rules such as "if userLoggedIn, show Dashboard else Login." Use the Logic Canvas to visually connect components to events like button clicks or form submissions.
For a dashboard prototype, you might include logic like {if (data.loading) show Spinner else MetricsGrid} to simulate real-world conditions. You can also integrate APIs to bring in dynamic content, ensuring your prototype behaves like the final product. This step ties everything together, turning your prototype into a deployable product. By adding these interactive elements, you streamline the design-to-code handoff, saving developers from having to recreate functionality from scratch.
Example: Building a Dashboard Prototype
This example walks through creating an analytics dashboard for a SaaS platform. Using Claude Sonnet 4.5 and UXPin Merge, the goal is to produce a prototype that aligns with your custom design system and is ready for production.
Define Requirements and Generate the Initial Design
Start by defining the requirements for your dashboard. Open the AI Component Creator in UXPin and choose Claude Sonnet 4.5 from the dropdown menu. Then, create a detailed prompt outlining the structure:
"Design an analytics dashboard with a left sidebar for navigation, a top metrics header showing four KPI cards, a data grid for user activity, and a line chart for monthly trends. Use Material Design components, 16px spacing, #1976D2 for primary actions, and ensure the layout fits within a 1440px-wide container."
"Claude Sonnet 4.5 is our most intelligent model for creating work deliverables. With code execution and file creation, Claude can build presentations, spreadsheets, and documents faster and with higher quality than before." – Anthropic
For more complex dashboards, enable Extended Thinking to guide the model through multi-step layout tasks. With a 96.2% accuracy rate in chart and figure comprehension (VLAT score of 50.17), Claude Sonnet 4.5 can analyze visual mockups and generate React code structures. To improve accuracy, break the project into smaller tasks, such as "sidebar navigation", "data grid", and "analytics header", instead of tackling everything at once.
Customize and Connect Components
Once Claude generates the JSX output, import it into UXPin Merge and sync it with your custom React design system using Git, Storybook, or npm. Use the Properties Panel to check that the components meet your development standards.
If changes are needed, click the "Modify with AI" icon and provide specific instructions like "Change the KPI card border to 2px solid #E0E0E0" or "Add 20px padding to the metrics header". This AI-driven tool allows you to tweak visual styles, layouts, and typography without manual coding.
"Claude Sonnet 4.5 produces smoother, more consistent designs that match your style." – UXPin
With a 77.04% Pass@1 rate on 4,442 functional coding tasks, the components typically require minimal manual adjustments. Focus your efforts on fine-tuning enterprise-specific needs like accessibility, responsive design, and brand-specific tokens. After refining, validate interactivity and ensure the prototype is ready for production.
Test and Iterate for Production Readiness
Preview the dashboard in UXPin’s browser to test interactivity and responsiveness. Add conditional logic to simulate real-world scenarios by defining variables such as dataLoading: boolean. For example, configure the dashboard to show a spinner while data is loading and display the metrics grid once loading is complete. Test user flows like filtering data or switching chart views to confirm production-ready behavior.
Export the React code and validate it in your development environment to ensure proper calculations and layout consistency. While Claude Sonnet 4.5 includes self-testing capabilities to catch bugs during generation, always have your development team review the code. Early testing has shown that Claude Sonnet 4.5 reduces vulnerability intake time by 44% and increases accuracy by 25%.
"We went from 9% error rate on Sonnet 4 to 0% on our internal code editing benchmark. Higher tool success at lower cost is a major leap for agentic coding." – Canva
Use UXPin’s version history to save milestones throughout the process. This feature ensures you can revert to earlier versions if needed. By following these steps, your dashboard will not only look polished but also meet functional standards, eliminating the usual challenges of translating designs into production-ready code.
Conclusion
Pairing Claude Sonnet 4.5 with UXPin Merge redefines enterprise prototyping by enabling teams to work directly with production-ready components. This eliminates the need to recreate designs from scratch, bridging the gap between design and development. The result? Product development speeds up by 8.6X compared to traditional workflows.
The process generates clean React code that integrates seamlessly into your development environment. With Claude Sonnet 4.5, your designs are smoother and more consistent, aligning perfectly with your unique style. This allows teams to concentrate on improving user experiences instead of spending time on tedious manual adjustments.
"Being able to jump straight from design to having code ready to going to be a huge time-saver for our team." – Allison Barkley, Director of Operations, Baremetrics
This method also supports scalable design systems with full auditability. By syncing custom design systems from Git or Storybook, teams can ensure consistency and align prototypes with development standards. Additionally, the AI captures component dependencies during design handoff, cutting down on the need for extensive manual documentation.
FAQs
What should I include in prompts so Claude uses my design system components?
To make sure Claude incorporates your design system components, provide detailed and precise instructions in your prompts. Clearly reference your design system or component library by name (like MUI, Ant Design, or custom components) and specify that the output should adhere to its guidelines. For instance, you could say: "Generate a layout using my custom design system components." Be sure to emphasize that the components need to be production-ready and fully aligned with your design system standards.
How do I fix prop mismatches or sync errors in UXPin Merge?
To address prop mismatches or sync issues in UXPin Merge, it’s crucial to carefully validate and parse user inputs. This means ensuring that inputs are managed correctly, even when they don’t match the expected format – like hex color codes entered without the "#" symbol. You can make adjustments to component properties directly in the Properties Panel or regenerate components using precise prompts to correct discrepancies. By focusing on proper validation and error handling during prop parsing, you can maintain smooth synchronization between design and code, reducing the likelihood of errors.
Can I export the prototype as clean React code for my dev team?
With UXPin Merge, you can export prototypes as clean, production-ready React code, making it easier for your development team to implement designs. By using real code components, prototypes function just like the final product, ensuring a smooth transition from design to development.
On top of that, AI tools such as Claude Sonnet 4.5 can help generate React-based layouts and components. This added capability simplifies the workflow, speeding up the development process significantly.

