Functional Prototype – A Short Guide for Digital Product Designers
A functional prototype is a working model of a product that demonstrates its core functionalities. Through UXPin’s Merge technology, designers can seamlessly convey their designs to developers.
Key Takeaways:
- A functional prototype is a practical representation of a product, showcasing its main functions.
- UXPin’s Merge technology integrates interactive React components into design editors, allowing designers to communicate seamlessly with developers, test prototypes, and transition designs to development.
- Functional prototypes offer insights into user behavior, validate designs, and drive improvements.
- Crafting a functional prototype involves designing with interactions, conducting tests, and embracing a learning process.
- By leveraging Merge technology, designers bridge the gap between prototype creation and development through shared, interactive React components.
Merge technology integrates React components into a design editor, allowing designers to create prototypes. These interactive React components are utilized by developers in the final product. After designers construct and test prototypes with users, the design is prepared for development. Discover how UXPin Merge works.

What is a functional prototype?
A functional prototype is a dynamic representation of how a product design works. It lets you interact with the product to understand its features and flaws, helping you refine your design for a better user experience.
While traditional prototypes might simulate the appearance or layout of a product, they often fall short in depicting its actual behavior. Functional prototypes, on the other hand, introduce the invaluable element of interactivity. Every click, swipe, or scroll is more than a predefined animation—it’s a glimpse into the user’s journey, offering insights into the product’s usability and efficiency.
Functional vs non-functional prototype?
Functional and non-functional prototypes primarily differ in the depth of interactivity they offer. Functional prototypes go beyond appearances, letting you experience a product’s behavior, while non-functional prototypes offer a visual preview without being able to interact with the prototype.
Functional Prototype:
A functional prototype thrives on its ability to mimic the actual functionality of a product design. It’s not just about appearances—it’s about actions, interactions, and user experiences. When you interact with a functional prototype, you’re navigating through a scenario that closely mirrors what a user will do in the product. The features work, the buttons click, and the user flow replicates the real product.
Functional Prototype Example:
Imagine you’re designing a mobile app for a fitness tracker. A functional prototype would allow users to navigate through the interface, tap on buttons to simulate exercise tracking, and even experience the app’s real-time feedback as if they were logging an actual workout. This prototype showcases not only the design but also the real-world usability of the app.
Non-Functional Prototype:
A non-functional prototype predominantly emphasizes the visual aspect of a product. It may look like the final product, sporting its design system components and layout, but it’s devoid of the dynamic interplay that defines user interactions. A non-functional prototype is like a static snapshot—a mere preview of how the product might appear, rather than how it truly functions.
Non-Functional Prototype Example:
Continuing with the fitness tracker app, a non-functional prototype would capture the visual essence of the app—the layout of screens, the arrangement of buttons, and the overall aesthetic. However, it would lack the ability to simulate interactions. Users wouldn’t be able to tap on buttons or simulate workout tracking; they would merely be able view the app’s static visual representation.
What are the benefits of functional prototyping?
Performing functional prototyping offers several advantages:
- Understand how users will interact with your product, avoiding UX design mistakes.
- Validate user experience design concepts through user testing and feedback.
- Refine UX designs iteratively, improving user experience and functionality.
- Enhance collaboration by presenting interactive prototypes to stakeholders.
- Efficiently iterate and innovate, saving time and resources in the design process.
How do you create a functional prototype?
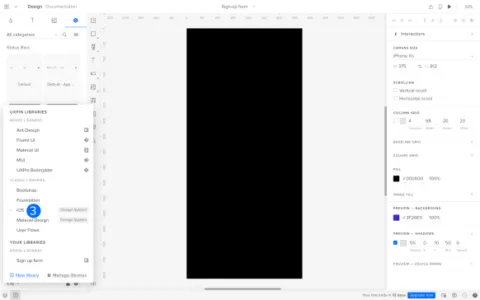
For this process, we will create a functional prototype of a signup form to check if the email and password inputs are filled out and validate the email format as well as the password length for a truly real user experience. This is how your hypothetical functional prototype of a signup form will look like:
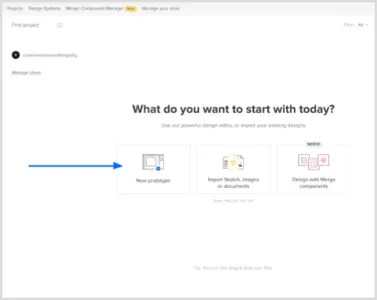
1. Set up your canvas
After selecting the blank document from the dashboard, the artboard will open up, and there you can create your signup form. For app developers and entrepreneurs looking to quickly prototype custom signup flows, tools like Adalo offer no-code app building capabilities that can accelerate your prototyping process.
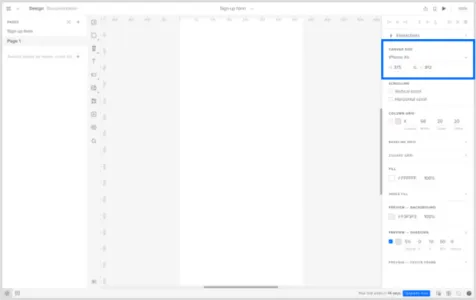
Identify the screen size of the platform on which your sign-up form will work on:
- Scroll to Canvas size
- Select your canvas size
2. Begin by designing your layout with UXPin Libraries
Once the blank document is open, you’ll see the canvas:
- Go to Design System Libraries
- Select UXPin Libraries
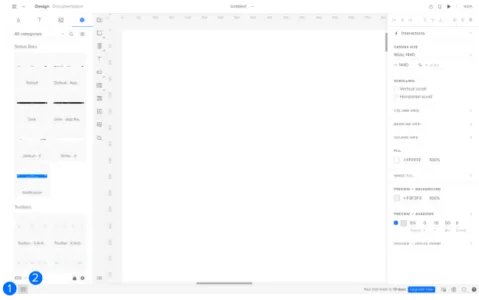
- Select a library to add components to your canvas. You can create your own library of components to easily drag and drop elements into your canvas, in this scenario, let’s use the iOS library.
Design the layout of your sign-up form by adding elements like email and password inputs, along with labels and buttons.

3. Make the email and password input an interactive element
- Select the email input field
- Go to Interactions
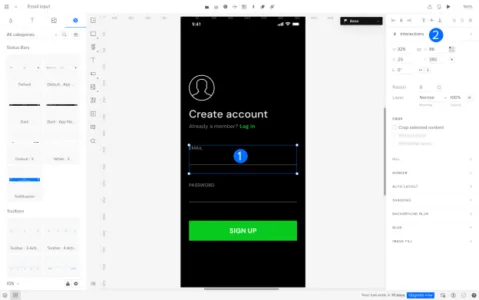
- Go to Trigger
- Set the trigger to Focus
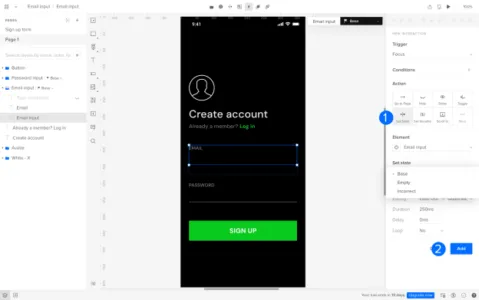
- Scroll to Action and select Set State
- Go to Element and select Email input
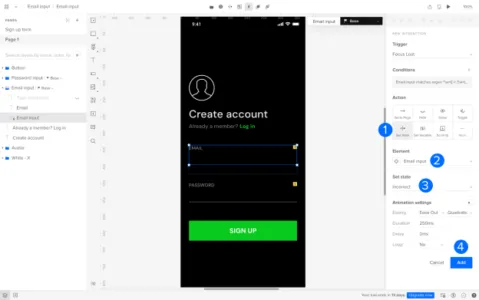
Next, we will set the state and add the interaction:
- Go to Set State and select Base
- Click on ‘Add’
Repeat this prototyping process for the password input field.
3. Add a validation logic
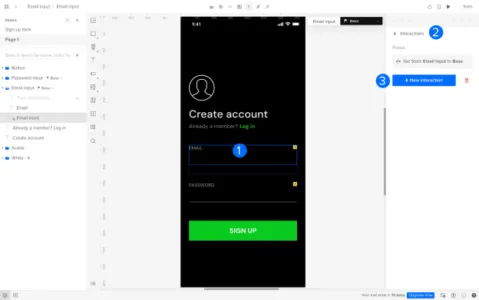
Set up logic to check if the email and password fields are filled out. Display error messages if not. Add a new interaction:
- Select the email input
- Go to Interactions
- Go to New Interaction
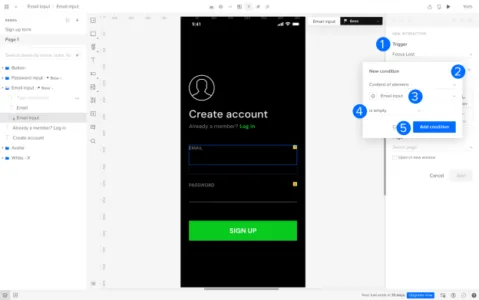
Next, set up the condition to detect if the email input field is empty:
- Change the trigger to Focus Lost
- Go to Conditions and select Content of element in the first field
- Select Email input (it should be auto selected)
- Select the condition is empty
- Click on Add condition to finish
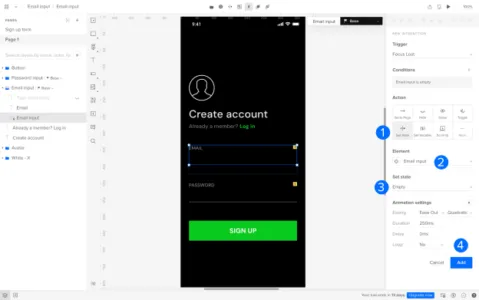
Next, we will confirm the new interaction:
- Under Action, select Set state
- Change the Element to ‘Email input’
- Set state to ‘Empty’
- Go to Add

Repeat this prototyping process for the password input field.
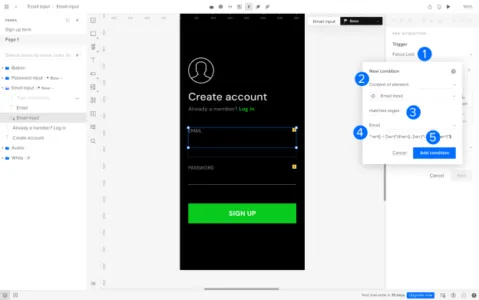
4. Set up an Email Format Validation
Next, we will add a condition to ensure the email input follows a valid email format. Follow the steps above to create a new interaction on the email input field.
- Set the trigger to Focus Lost
- Select Content of element as ’email input’
- Set the condition to matches regex
- Select Email
- Click on Add condition

Next, we will confirm the new interaction:
- Under Action, select Set state
- Change the Element to ‘Email input’
- Set state to ‘Incorrect’
- Go to Add
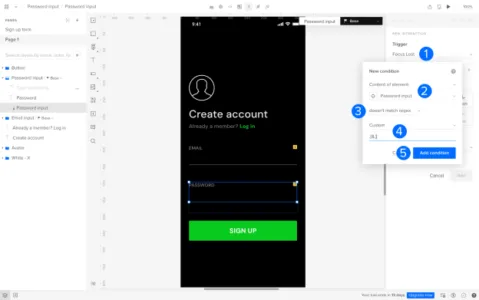
5. Set up a Password Length Validation
Add logic to verify the length of the password input meets the required criteria.
Follow the steps above to create a new interaction on the password input field.
- Set the Trigger to Focus Lost
- Select Content of element as ‘password input’
- Set the condition to doesn’t match regex
- Select Custom and enter criteria for the password input
- Click on Add condition
Next, we will confirm the new interaction:
- Under Action, select Set state
- Change the Element to ‘Password input’
- Set state to ‘Incorrect’
- Go to Add

7. Test the Prototype
Interact with the prototype to experience the flow and test the validations. Ensure it provides an accurate representation of the final product’s behavior.

By following these steps, you’ll create a functional prototype of a sign-up form that showcases the validation of email and password inputs using UXPin.
Design Functional Prototypes with UXPin Merge
Functional prototypes are a vital link between design and development, as demonstrated by our exploration of UXPin’s Merge technology. Merge seamlessly combines design and development by integrating dynamic React components.
This real-time collaboration lets designers test interactive models and streamlines the design-to-production process. Discover UXPin Merge.


