Using Claude Sonnet 4.5, shadcn/ui, and UXPin Merge streamlines the process of turning designs into functional prototypes. Here’s how it works:
- Claude Sonnet 4.5: AI generates React-based UI layouts from text prompts, adhering to your design system.
- shadcn/ui: A pre-integrated React component library with Tailwind CSS support, ensuring production-ready elements.
- UXPin Merge: Enables visual editing of coded components, adding interactivity and exporting clean React code.
This workflow eliminates design-to-code translation, reducing engineering time by 50% and speeding up development by 8.6x. Prototypes behave like the final product, allowing for realistic testing and seamless handoff to developers.
Key Steps:
- Set up UXPin Merge with shadcn/ui and Claude Sonnet 4.5.
- Use AI prompts to generate layouts and refine them visually.
- Add interactivity and test functionality directly in UXPin.
- Export production-ready React code for deployment.
This approach bridges the gap between design and development, saving time and improving accuracy.
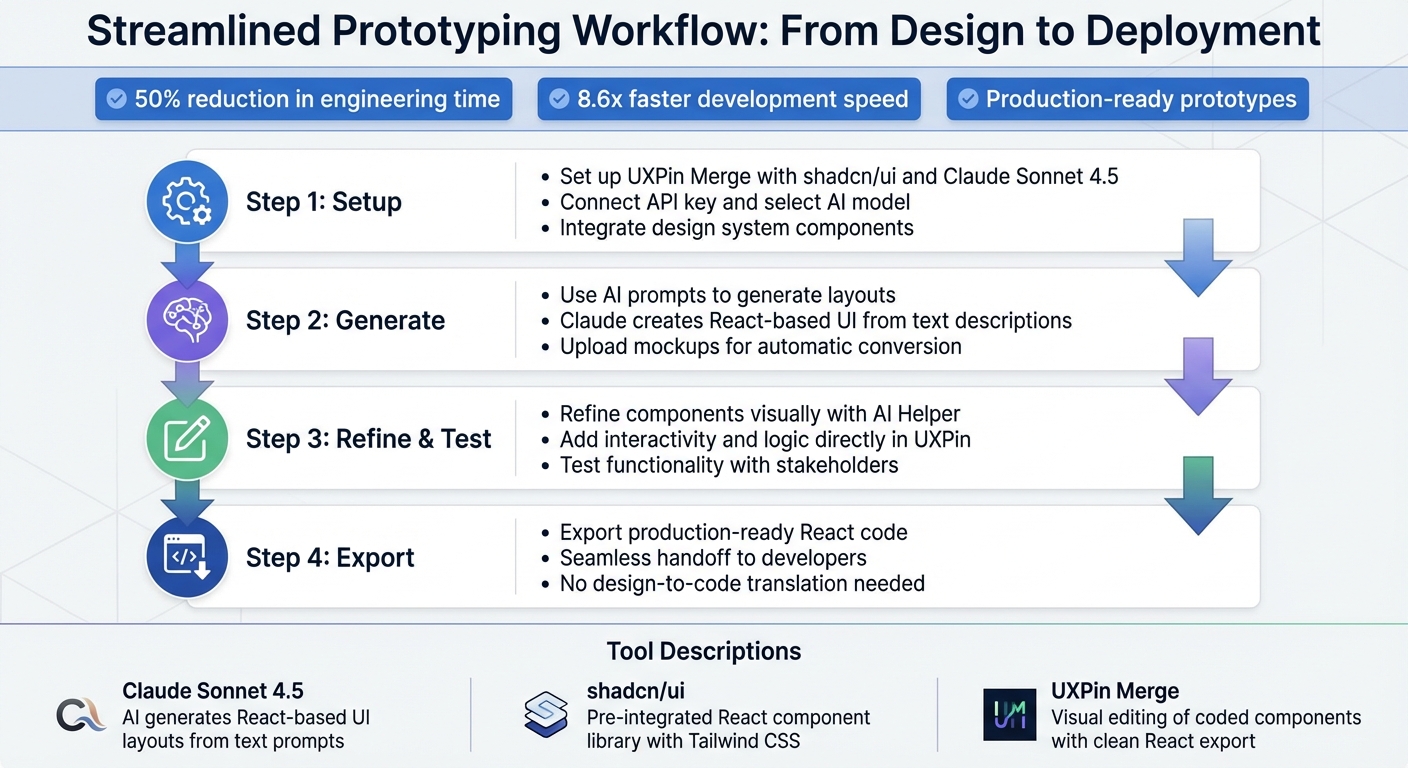
4-Step Workflow for Prototyping with Claude Sonnet 4.5, shadcn/ui, and UXPin Merge
UXPin Merge Tutorial: Prototyping an App with MUI – (4/5)
sbb-itb-f6354c6
Setting Up Your Workspace
To kick off your prototyping journey with UXPin Merge, shadcn/ui, and Claude Sonnet 4.5, you’ll need to configure these tools. Fortunately, UXPin has natively integrated them, so there’s no need to manually import libraries or manage separate API accounts – unless you’re working with a custom design system.
Before diving in, make sure you have a UXPin account with access to the Merge editor and an API key to enable AI-driven features. These tools allow you to generate production-ready React components using natural language prompts while maintaining the integrity of your design system. Once you’re ready, install shadcn/ui components and connect Claude Sonnet 4.5 to your setup.
Installing shadcn/ui Components in UXPin Merge
The shadcn/ui library is already included in UXPin Merge, making it easy to start using these components right away. Simply sign up for UXPin (a free plan is available to get started), access the Merge editor, and you’ll find shadcn/ui components ready to go.
If you’re working with a custom design system, you can integrate your own components, configure Webpack, and create a wrapper component to integrate it seamlessly. For terminal-based workflows, you can install the shadcn/ui MCP server by running this command:
claude mcp add --transport http shadcn https://www.shadcn.io/api/mcp.
Once you’ve set up shadcn/ui, the next step is connecting Claude Sonnet 4.5.
Connecting Claude Sonnet 4.5 to UXPin
To connect Claude Sonnet 4.5, open the UXPin Editor and navigate to the AI Component Creator in the Quick Tools panel. Under the Settings tab, paste your API key into the "OpenAI API Key" field. From the AI Models dropdown menu, select Claude Sonnet 4.5, which is specifically designed for generating consistent, on-brand components.
The API key activates Claude’s features within UXPin, though keep in mind that usage may come with additional costs based on your provider’s pricing. Use the Prompt tab to describe the components you want to create, or leverage the AI Helper tool to adjust existing components with simple text instructions like "make the button green" or "increase the font size to 18px".
Once this is set up, ensure your design system is compatible with UXPin Merge.
Preparing Your Design System
Your design system needs to align with UXPin Merge’s component requirements. If you’re using the built-in shadcn/ui library, this step is straightforward, as shadcn/ui relies on Tailwind CSS, which is fully supported by the AI Helper. The AI Helper allows you to tweak visual styles and layouts using text commands instead of manual edits.
For custom libraries, ensure your React components are well-documented and include accurate TypeScript props. By using the Model Context Protocol (MCP), Claude can connect directly to your component registries. This enables the AI to access precise CSS variables and animation patterns, reducing the likelihood of errors during component generation. This setup ensures that every component Claude generates is pre-approved, tested, and developer-ready. The result? A smooth design-to-code workflow that speeds up the process of turning design ideas into deployable code.
| Requirement | Description |
|---|---|
| AI Model | Claude Sonnet 4.5 (select in settings) |
| API Key | OpenAI API Key (required for AI tools) |
| UI Library | shadcn/ui (React-based, pre-integrated) |
| Integration Tool | UXPin Merge (via Git for custom setups) |
| CLI Tool (Optional) | Claude Code with Shadcn MCP for terminal workflows |
Creating a Prototype with Claude Sonnet 4.5 and shadcn/ui
Once your setup is ready, you can use Claude Sonnet 4.5 and shadcn/ui to build prototypes that closely resemble your final product. This approach removes the disconnect between design and development, helping you move from idea to deployment more efficiently. Here’s how to get started by crafting precise layouts with AI prompts.
Generating Prototype Layouts with AI Prompts
Begin by opening the AI Component Creator in UXPin’s Quick Tools panel and selecting Claude Sonnet 4.5 from the AI Models dropdown. In the Prompt tab, describe the layout you want in detail. For example, instead of a general request like "Create a login form", specify: "Create a login form with a 16px bold label above the input and a blue border on focus."
Using specific prompts and breaking down complex layouts into smaller, component-level instructions can significantly improve accuracy. If you have high-fidelity mockups or wireframes, upload them directly into the tool. Claude Sonnet 4.5 can convert these into functional UI structures using real shadcn/ui components. Detailed images with clear typography, colors, and spacing yield better results.
The generated layout will appear as actual React components on your canvas – not just static visuals. These components are production-ready and adhere to the design principles of the shadcn/ui system. If the output needs adjustments, use the AI Helper feature to refine it further with additional prompts.
Customizing shadcn/ui Components
Once your layout is generated, you can tweak it to align with your brand guidelines. Select a component, click the purple "Modify with AI" icon, and provide detailed instructions like "Set the label font size to 16px and bold" or "Add a 2px solid blue border on focus."
The AI Helper performs best with precise values, so be as specific as possible about typography, colors, and spacing. To modify multiple elements, keep the component selected while the AI processes your request – deselecting it will stop the operation. For greater accuracy, break down components into smaller parts and customize each individually.
You can also make changes directly in the Properties Panel, where you can adjust React props. This allows for fine-tuned control, such as switching a button style from "outline" to "ghost" or modifying input states. These adjustments ensure that every customization remains compatible with production code.
When the components are styled to your liking, you can add interactions to complete your prototype.
Adding Interactions and Logic
Unlike traditional prototyping tools that rely on static images, UXPin Merge uses real React code. This means your shadcn/ui components function like they would in production – input fields accept text, buttons respond to clicks, and dropdowns behave naturally. To add interactivity, open the Interaction Panel and define how components respond to user input using Triggers, Actions, and Animations.
For dynamic behavior, incorporate Conditional Interactions to create if-then or if-else logic. You can also use Variables to capture data from input fields and display it elsewhere in the prototype, such as showing a user’s name on a confirmation screen after form submission.
For more complex scenarios, use Expressions to set specific validation rules. For example, you can verify if an email contains an "@" symbol or if a password meets length requirements. This level of interactivity makes your prototype function almost like the final product, giving stakeholders a realistic experience of user flows before development even begins.
"When I used UXPin Merge, our engineering time was reduced by around 50%"
- Larry Sawyer, Lead UX Designer
Testing and Refining Your Prototype
Once you’ve created and customized your prototype, the next step is to validate its functionality. With UXPin Merge, you’re not working with static mockups; you’re using real React components. This means your prototype behaves just like the finished product, making testing about more than just visuals – it’s about ensuring the code, interactions, and logic are ready for production.
Collaboration and Stakeholder Feedback
You can share your prototype with stakeholders through a single link that includes both the interactive UI and the underlying code specifications. This gives decision-makers a hands-on experience of how features will work in practice, rather than just showing them how things look. One UXPin user highlighted how this level of detail changes the entire feedback process:
"C-suite people and directors can give us stronger feedback about the ultimate direction because they experience the features and goals of these prototypes rather than just commenting about how these boxes don’t look like a text field."
To prevent stakeholder issues and get the most out of feedback, it’s helpful to segment them based on their involvement. High-power, high-interest stakeholders should be actively engaged – invite them to test the prototype and make their input a priority. Stakeholders with high power but lower interest should receive periodic updates to keep them informed without overwhelming them. For team members who are highly interested but have less decision-making power, share mockups and include them in design debriefs to ensure they feel included. Once feedback is collected, confirm that the code aligns with your development environment to ensure a smooth transition to the next phase.
Testing for Code Compatibility
With UXPin Merge, you can open your prototype directly in StackBlitz to view and edit the functional React code behind each component. This step ensures that the logic, styling, and dependencies align perfectly with your existing codebase. Testing production-ready components, like those from shadcn/ui, helps verify that the functional code is ready for development.
If you encounter issues, the AI Helper can refine components with simple prompts, such as "Add blue border on input focus" or "Set button padding to 12px." Tackling complex components by breaking them into smaller parts and testing each one individually ensures greater accuracy. This iterative process guarantees that every element is functioning as expected before moving forward.
Exporting Your Prototype to Code
Once you’ve confirmed that everything works as intended, you can export the prototype directly. Since the prototype is built with the same React components your developers use, there’s no need for a translation layer. Developers can immediately access and integrate the code, eliminating the tedious process of rebuilding.
A great example of this workflow in action comes from Erica Rider, a UX Architect and Design Leader. Using UXPin Merge, Erica synced the Microsoft Fluent design system, enabling a small team of just 3 designers to support 60 internal products and over 1,000 developers. This approach ensured that the design system and code were always aligned, drastically improving efficiency.
In fact, this method speeds up product development by 8.6x compared to traditional workflows. Instead of spending weeks converting designs into code, your team can go straight from prototype to deployment, cutting out redundant steps and minimizing inconsistencies.
Best Practices for Using Claude Sonnet 4.5, shadcn/ui, and UXPin Merge
Strategically using these tools can help you avoid mistakes and maintain an efficient workflow.
Using AI While Maintaining Design System Integrity
One of the standout features of UXPin Merge is its ability to work exclusively with pre-approved, production-ready components from your design system. When you use Claude Sonnet 4.5 to generate layouts, it pulls components directly from the shadcn/ui library you’ve connected. This ensures that every AI-generated screen aligns with your brand and development standards.
To keep things consistent, double-check that your component library is fully integrated before prompting the AI. This ensures Claude Sonnet 4.5 uses the same components your developers rely on in production.
For more complex components, break them into smaller, manageable parts and provide clear instructions. For example, instead of asking for an entire dashboard in one go, start with smaller sections like the navigation bar, then move to the data table, and finally add the sidebar. This step-by-step approach improves accuracy and ensures that everything adheres to your design standards. This method also strengthens the design-to-development continuity mentioned earlier.
Next, let’s explore how this alignment improves collaboration between design and development teams.
Improving Collaboration Between Design and Development
With UXPin Merge, the typical design handoff process is eliminated because prototypes are created using production-ready React components. This creates a single source of truth that both designers and developers can work from.
To make the most of this, your team should export the front-end React code and specs directly from the prototype. Developers can then implement exactly what was designed, eliminating guesswork and avoiding unnecessary rework. Following this workflow has been shown to cut engineering time by nearly 50%.
While these practices can enhance collaboration, it’s equally important to be mindful of common pitfalls.
Avoiding Common Pitfalls
One common mistake is using vague or overly broad AI prompts. Be as specific as possible with your instructions – include details like exact typography (e.g., "16px bold"), colors, and interaction states (e.g., "blue border on focus"). The more precise your instructions, the better Claude Sonnet 4.5 can align with your enterprise standards.
Conclusion
Bringing together Claude Sonnet 4.5, shadcn/ui, and UXPin Merge creates a seamless prototyping workflow that bridges the gap between design and development. Instead of reworking static mockups, you’re using the exact production-ready React components your engineering team will deploy. The result? Faster iterations and smoother design handoffs, with prototypes that closely resemble the final product.
User feedback underscores the impact of this approach. For instance, Allison Barkley, Director of Operations at Baremetrics, highlighted the time savings her team achieved using this workflow.
By leveraging Claude Sonnet 4.5 to generate layouts with real shadcn/ui components, you ensure your design system stays intact while benefiting from AI-driven efficiency. The Model Context Protocol ensures the AI works directly with TypeScript definitions, meaning every suggested component is pre-approved and ready for development. This tight integration between design and code improves collaboration and keeps teams aligned.
This workflow doesn’t just accelerate prototyping – it redefines how design and development teams work together. Functional prototypes give stakeholders a clear vision, developers get clean React code, and everyone stays on the same page from concept to deployment.
Ready to see this in action? Explore UXPin Merge and discover how production-ready prototyping can streamline your process. Visit uxpin.com/pricing to find the right plan, or reach out to sales@uxpin.com for Enterprise solutions with custom AI integration and dedicated support.
FAQs
What API key do I need to use Claude Sonnet 4.5 in UXPin?
To integrate Claude Sonnet 4.5 with UXPin, you’ll need an API key from Anthropic. Start by signing up on the Anthropic Console. Once registered, you can generate your API key. This key acts as the bridge, allowing you to connect Claude Sonnet 4.5 with UXPin and unlock its features.
Can I use my own design system instead of shadcn/ui?
Yes, you can integrate your own design system with Claude Sonnet 4.5 and UXPin Merge. UXPin Merge works with production-ready React components, making it easy to incorporate custom design systems. Whether you’re using libraries like MUI or Ant Design, this setup ensures your prototypes closely match the final product – no need to depend exclusively on shadcn/ui.
How do I export the prototype as clean React code?
To generate clean React code from your prototype in UXPin, take advantage of UXPin Merge. By connecting your design system or component library, you can create prototypes using code-backed components. Once your design is complete, export production-ready JSX. This approach ensures your prototype matches production standards, making the transition from design to development smoother and more efficient.

