Want to create production-ready UIs faster and more efficiently? Combining Claude Opus 4.5 with UXPin Merge lets you design directly with code-backed components, eliminating the gap between design and development. This approach ensures consistency, reduces errors, and speeds up deployment.
Key Takeaways:
- Claude Opus 4.5 generates accurate, AI-driven UI layouts with fewer iterations.
- UXPin Merge uses real, production-ready components from libraries like MUI, Ant Design, or your custom design system.
- No more mockups – designs are ready for development from the start.
Who Benefits?
- Designers: Rapid prototyping within design system rules.
- Developers: Skip rebuilding designs; use pre-approved components.
- Leadership: Faster time-to-market with design system governance.
What You Need:
- UXPin account with Merge access.
- Git repository for custom design systems.
- Optional Databricks workspace for enterprise data workflows.
This guide walks you through connecting your design system, crafting prompts for Claude, and refining layouts in UXPin. Ready to streamline your UI process? Let’s dive in.
What You Need to Get Started
To begin creating ready-to-use UIs with Claude Opus 4.5 and UXPin Merge, you’ll need a few tools in place. Luckily, UXPin simplifies the process by offering built-in access to Claude models and popular design libraries like MUI, Ant Design, Bootstrap, and ShadCN. This means you can dive right into designing. However, if your organization relies on a custom design system, you’ll need to handle a bit of additional setup.
Here’s what you’ll need:
- A UXPin account with Merge access
- A Databricks workspace (if you’re using Claude Opus 4.5 for enterprise data workflows)
- A Git repository (GitHub, GitLab, or Bitbucket) for custom design system code
Once you’ve got these basics covered, you’re ready to access Claude Opus 4.5 and configure your design system for Merge.
How to Access Claude Opus 4.5
Getting started with Claude Opus 4.5 is simple once your account and workspaces are ready.
Claude Opus 4.5, developed by Anthropic, is their most advanced model designed for tackling complex coding and multi-step reasoning tasks. Through UXPin’s AI Component Creator, you can use Claude to generate layouts directly with your design system components – no need for a separate Claude account.
"Claude Opus 4.5 excels at autonomous long-horizon coding tasks, capable of planning and executing complex software projects that span hours or days."
– Databricks
If your team handles UI requirements with governed data access, you can also access Claude Opus 4.5 via Databricks. Tools like AI Functions and Agent Bricks make it especially useful for creating dashboards or forms tailored to your data schemas. For organizations requiring secure, self-hosted data access, DreamFactory provides governed API access to any data source, enabling your LLMs and applications to safely connect to backend systems with role-based access controls. On top of that, the model operates at just one-third of the cost of earlier versions like Opus 4.1. Databricks users can even test Claude 4.5 in the Agent Bricks AI Playground before fully integrating it into their workflows.
How to Prepare Your Custom Design System for Merge
If you’re working with a custom design system, you’ll need to integrate it with UXPin Merge to enable AI-powered UI generation. While UXPin offers over 90 interactive components out of the box, connecting your organization’s unique design system ensures that Claude references the exact components you use.
UXPin Merge supports three integration methods:
- Git integration
- Storybook integration
- npm package integration
For React or Web components, Git integration is often the most flexible. This involves hosting your design system in a repository (e.g., GitHub, GitLab, or Bitbucket), allowing UXPin to pull components directly. If you’re using frameworks like Vue or Angular, Storybook integration is a better fit, as it supports over 15 frameworks. The key is ensuring your code serves as the single source of truth, with interactivity and proper documentation in place. This setup allows Claude Opus 4.5 to generate layouts that meet your production standards right out of the gate.
Take Microsoft’s UX team, for example. By syncing their Fluent design system with UXPin Merge, just three designers were able to support 60 internal products and over 1,000 developers. This efficiency stems from having a well-structured design system before integration.
"When I used UXPin Merge, our engineering time was reduced by around 50%. Imagine how much money that saves across an enterprise-level organization with dozens of designers and hundreds of engineers."
– Larry Sawyer, Lead UX Designer
Once your Git repository is connected, Claude Opus 4.5 will generate layouts using only your approved components. This eliminates generic placeholders and ensures every design aligns with your standards, making the transition to development seamless.
sbb-itb-f6354c6
How to Build UIs: Step-by-Step
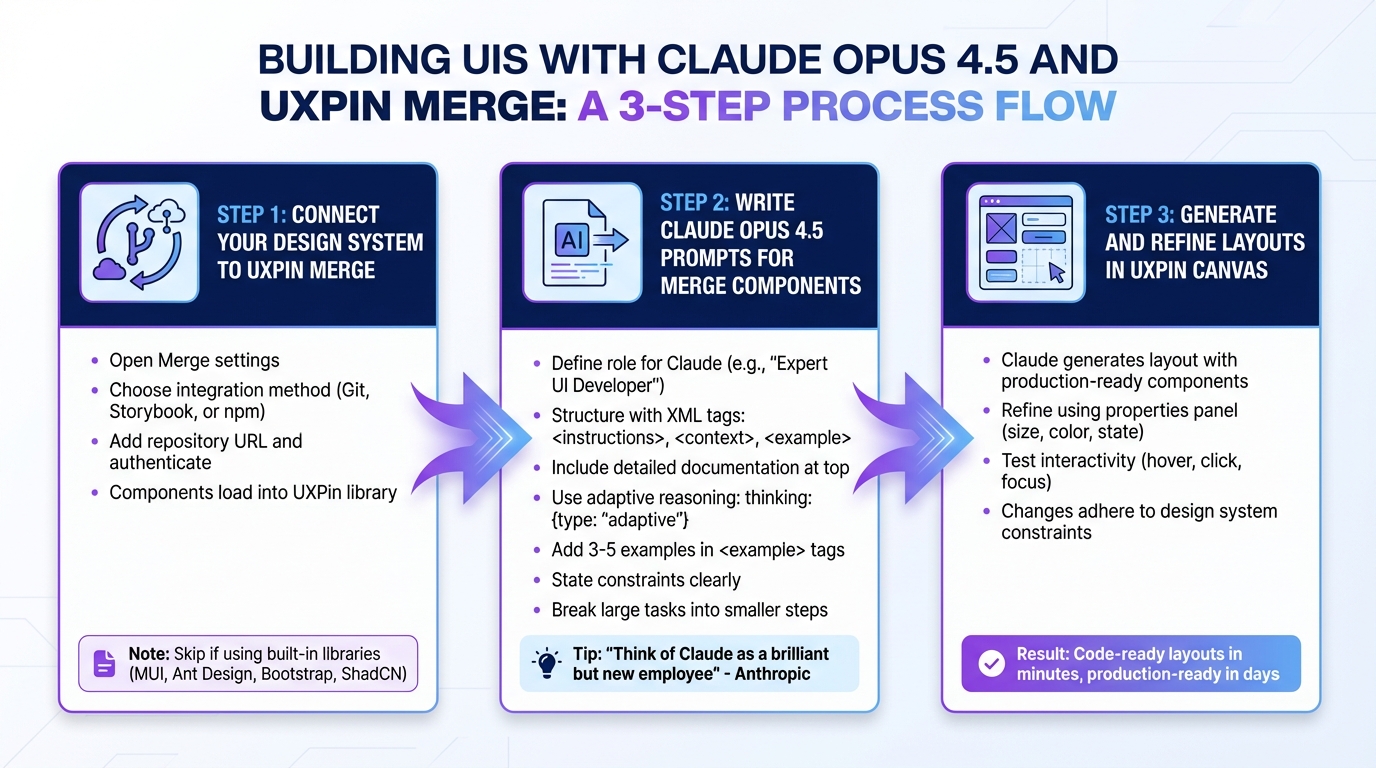
3-Step Process to Build Production-Ready UIs with Claude Opus 4.5 and UXPin Merge
With your design system connected and Claude Opus 4.5 ready to go, you can dive into creating production-ready user interfaces. The process is simple: connect your repository, craft clear prompts, and tweak the AI-generated layouts directly in the UXPin canvas. This ensures your designs are aligned with developer-ready components from the start.
Step 1: Connect Your Design System to UXPin Merge
If you’re using built-in libraries like MUI, Ant Design, Bootstrap, or ShadCN, you can skip this step – UXPin already integrates these. For custom design systems, as set up earlier, your system is now ready to go. Open the Merge settings, choose your integration method (Git, Storybook, or npm), add your repository URL, and authenticate. This step loads your custom components into the UXPin library along with their properties and documentation.
Once connected, your design system’s components will appear in the UXPin library panel. This ensures Claude Opus 4.5 uses only the approved components from your production code when generating layouts.
Step 2: Write Claude Opus 4.5 Prompts for Merge Components
The key to accurate UI layouts lies in clear, detailed prompts. Start by defining a role for Claude, like "Expert UI Developer for UXPin Merge", and structure your prompt using XML tags. Use <instructions> for directives, <context> for background information, and <example> for sample outputs. As Anthropic explains:
"Think of Claude as a brilliant but new employee who lacks context on your norms and workflows. The more precisely you explain what you want, the better the result."
For large design system libraries, include detailed documentation at the top of your prompt and save your specific query for the end. If you’re tackling a complex layout, enable adaptive reasoning with the directive thinking: {type: "adaptive"} to help Claude work through component hierarchies before generating the layout.
Be specific in your instructions. Instead of asking for suggestions, use the <default_to_action> directive to have Claude implement components directly. Include 3–5 examples wrapped in <example> tags, and clearly state constraints like "Use only components from the provided JSON library." For larger tasks, break them into smaller steps – like generating the header first, reviewing it, and then moving on to the sidebar. This approach keeps you in control and allows for review at each stage.
Step 3: Generate and Refine Layouts in UXPin Canvas

Once Claude generates the layout, it will appear on the UXPin canvas using real, production-ready components – not static visuals. This is where Merge technology shines. Every element is tied to your design system’s code, ensuring consistency with your development environment.
You can refine the layout directly on the canvas using the properties panel to adjust size, color, and state. These changes will automatically adhere to your design system’s constraints. Built-in tools, like spacing and typography scales, make it easy to fine-tune the structure.
The canvas also supports interactivity, allowing you to test component states like hover, click, and focus during refinement. This eliminates the traditional design-to-development handoff since your prototype is already aligned with production code.
As of March 2026, UXPin Merge works seamlessly with advanced language models like Claude Opus 4.5 and GPT-4.1. This integration allows you to turn text prompts into interactive, code-ready layouts in minutes. By bridging the gap between design and development, your team can move from concept to deployment in a matter of days – saving time without sacrificing quality.
With your refined UI layout ready for production, the next step is testing interactivity on the UXPin canvas. Stay tuned for how to do that in the next section.
How to Test and Prototype AI-Generated UIs
After refining your layout, the next step is testing its interactivity. When Claude Opus 4.5 generates your layout on the UXPin canvas, you’re working with code-backed components. These components come with built-in interactivity, states, and logic directly from your design system’s code. This means you can test elements like dropdowns, form validations, and hover states without needing a developer to create a prototype.
With UXPin Merge, you get functional fidelity – your prototype behaves exactly like the final product because it uses the same React or Web components as your production environment.
How to Test Interactivity in UXPin
Testing AI-generated UIs in UXPin is simple. Just click the Preview button to interact with your prototype as if it were live. You can navigate between pages, click buttons, fill out forms, and trigger component states like loading, error, or empty data. Since these are real components, they respond exactly as they would in production.
The AI Helper allows you to refine interactivity using natural language prompts, making adjustments quick and intuitive.
For more complex workflows, consider testing with real data instead of placeholders. Replacing generic text with actual dates, prices, or user names can help identify edge cases and confirm the UI handles production-level content density effectively. Additionally, you can use variables and conditional logic to mimic realistic user flows, such as pagination or multi-step forms, before development begins.
Once you’re confident the prototype behaves as intended, the next step is syncing these improvements back to your design system.
How to Sync Changes Back to Your Design System
When your prototype’s interactivity meets production standards, you can update your design system directly from UXPin. Satisfied with the prototype? Use UXPin’s Git integration to sync changes back to your design system repository. This ensures a continuous loop between design and production, keeping everyone aligned and working from a single source of truth.
The Export to StackBlitz feature is another powerful tool, giving developers a live, editable environment for immediate code inspection. You can also copy production-ready React code, complete with dependencies, directly from the canvas.
Mark Figueiredo, Sr. UX Team Lead at T. Rowe Price, shared how this process has transformed workflows:
"What used to take days to gather feedback now takes hours. Add in the time we’ve saved from not emailing back-and-forth and manually redlining, and we’ve probably shaved months off timelines."
Tips for Enterprise Teams
Scaling design and development workflows across large teams is no small feat. Enterprise teams often juggle dozens of designers and hundreds of engineers, making alignment a challenge. That’s where Claude Opus 4.5 paired with UXPin Merge comes in. Together, they create a unified component language, ensuring designers and developers work from the same code-backed components. The result? What’s designed is exactly what gets built.
How to Use Merge AI for Enterprise Workflows
Say goodbye to handoffs and hello to efficiency. By connecting your organization’s custom React design system to UXPin Merge via Git integration, designers can work directly with pre-approved, production-ready components. Then, Claude Opus 4.5’s AI Component Creator takes it a step further, generating complex UI structures – think data tables or multi-step forms – using these same components.
Here’s what this looks like in action:
"When I used UXPin Merge, our engineering time was reduced by around 50%. Imagine how much money that saves across an enterprise-level organization with dozens of designers and hundreds of engineers."
For teams without an established custom system, UXPin has you covered. Its enterprise-grade libraries, like MUI, Tailwind UI, and Ant Design, provide production-ready components right out of the box. Combine these with Claude Opus 4.5’s prompt-based iteration to quickly generate multiple layout options from a single prompt. This approach allows teams to explore designs faster without stepping outside enterprise constraints, making the design-to-development process seamless.
These tools don’t just streamline workflows – they also pave the way for better design governance.
How to Maintain Governance and Scalability
Efficiency is just one part of the equation. To truly scale, teams need a unified design system that maintains consistency. Rebuilding design mockups from scratch? That’s a recipe for chaos. UXPin Merge eliminates this issue by syncing your Git component repository directly to the design environment. This creates a single source of truth where design and code are always in sync.
Brian Demchak, Sr. UX Designer at AAA Digital & Creative Services, shared how this approach transformed their workflow:
"We have fully integrated our custom-built React Design System and can design with our coded components. It has increased our productivity, quality, and consistency, streamlining our testing of layouts and the developer handoff process."
With Git integration and versioning, UXPin Merge ensures continuous alignment between design and production code. It delivers production-ready React code, complete specs, and dependencies – no more manual redlining or compliance headaches. This synchronization reinforces the code-backed component integration across your workflow, keeping everything running smoothly and efficiently.
Conclusion
Creating user interfaces with Claude Opus 4.5 and UXPin Merge transforms how enterprise UI design is approached. Forget about mockups – jump straight into designing with production-ready components. This method not only removes handoff delays but also accelerates development timelines while ensuring consistent, production-quality results.
Claude Opus 4.5 brings powerful features to the table. With an 80.9% score on industry-standard software engineering tests and the ability to generate code with 50–75% fewer errors, it offers a significant efficiency boost. When paired with UXPin Merge’s integration of interactive design systems, AI-generated layouts are ready for production in record time.
For enterprise teams, this combination creates smoother workflows, reduces inefficiencies, and ensures consistent governance through Git-backed synchronization. With Git integration, updates flow seamlessly from design to production, cutting down on design drift and governance issues.
By merging AI capabilities with a code-backed design system, the design-to-development process becomes faster and more reliable. Whether you’re working with MUI, Ant Design, Bootstrap, ShadCN, or custom components, UXPin Merge keeps your design system unified. Merge AI ensures your workflow stays within the boundaries of your approved design system, offering both speed and dependability.
This approach delivers the best of both worlds: rapid development and high-quality output. Ready to elevate your UI design process? Start building with your design system today at uxpin.com/pricing.
FAQs
How do I get my custom design system into UXPin Merge?
To bring your custom design system into UXPin Merge, you’ll need to link its codebase to UXPin via Git or Storybook. This connection enables UXPin to sync with the actual, code-backed components from your design system. Once everything is set up, you can directly use these components within UXPin to build prototypes that stay true to your design guidelines. This approach ensures your UI components remain consistent and streamlines the overall workflow.
What should I include in a Claude Opus 4.5 prompt to get the right components?
To create precise components with Claude Opus 4.5, it’s essential to craft detailed prompts. Be clear about the type of component you need – whether it’s a button, input field, or something else. Include specifics like design system standards, visual styles, and interaction states (e.g., hover, focus, disabled). Don’t forget to mention any layout or data requirements that are relevant.
Using clear and specific language helps ensure the output matches your design system and integrates smoothly with your existing codebase, resulting in well-aligned, production-ready UI elements.
How can I validate interactivity and states before development starts?
You can test interactivity and component states before diving into development by building prototypes with Claude Opus 4.5, your custom design system, and UXPin Merge. This method allows you to simulate and evaluate UI behaviors, interactions, and states directly within the prototype. By refining and previewing everything in UXPin, you can spot and fix potential issues early, making the development process smoother and more efficient.

