Want to create landing pages faster and more efficiently? By combining GPT-5.2, MUI, and UXPin Merge, you can streamline content creation, design, and development into a single workflow. Here’s how it works:
- GPT-5.2 generates ready-to-use, structured content tailored for enterprise audiences.
- MUI offers pre-built React components like
Grid,Typography, andButtonfor consistent, production-grade design system. - UXPin Merge lets designers and developers work with live MUI components, eliminating static mockups and manual code translation.
This approach addresses common challenges like design–development misalignment, last-minute copy changes, and inconsistent design systems. With this workflow, you can reduce landing page delivery time from weeks to just days while maintaining high-quality results.
Key benefits of this workflow:
- Faster deployment with AI-generated content and reusable components.
- Unified design and development process using the same tools.
- Consistent visuals and messaging across all pages.
Let’s dive into the details of how to plan, build, and deploy a landing page using this efficient method.
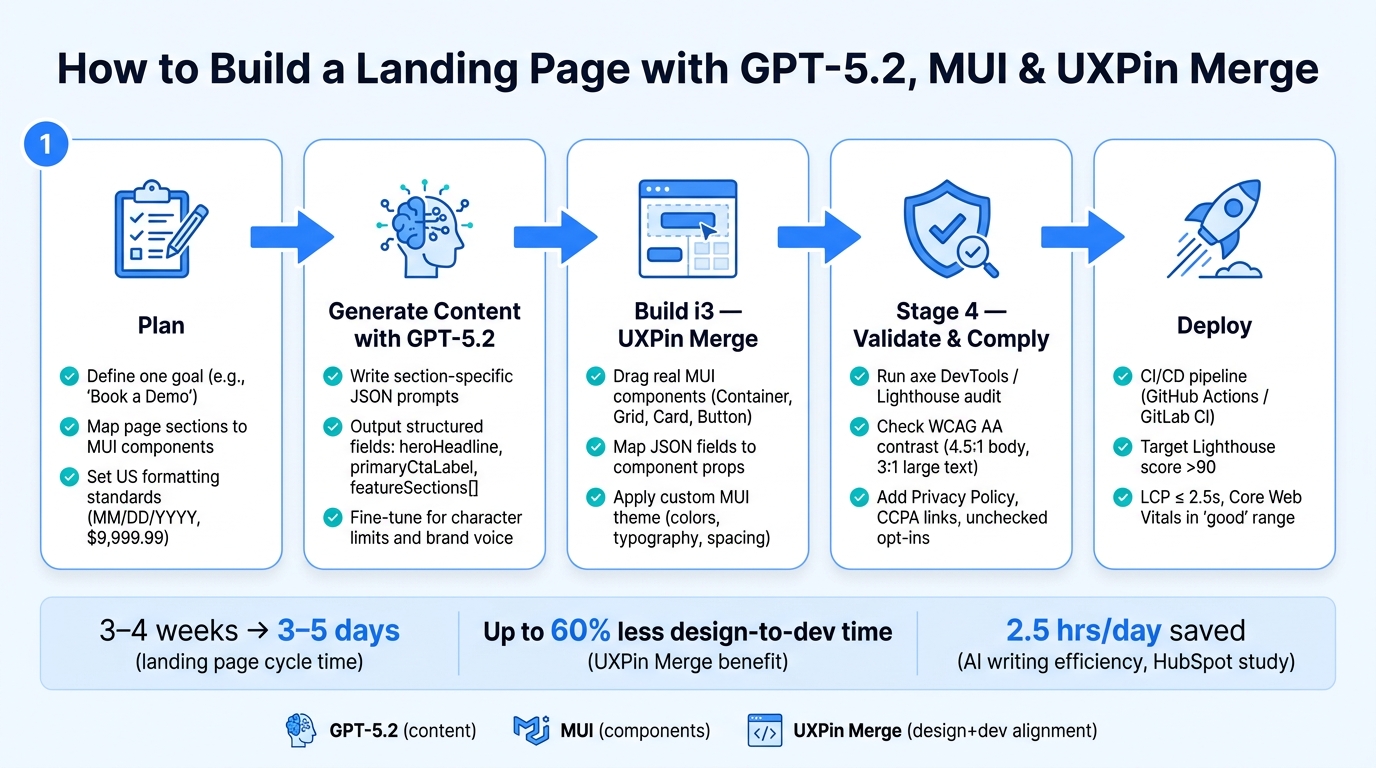
How to Build a Landing Page with GPT-5.2, MUI & UXPin Merge
Design To React Code Components
sbb-itb-f6354c6
The Tools You Need: GPT-5.2, MUI, and UXPin Merge
Let’s break down how these tools work together to streamline your workflow.
What GPT-5.2 Brings to the Table
GPT-5.2 acts as your powerhouse for content generation. By crafting well-structured prompts, you can get polished, ready-to-use outputs tailored for US enterprises. For instance, you can ask GPT-5.2 to deliver content in structured JSON, with fields like heroHeadline, heroSubheadline, primaryCtaLabel, and featureSections[].
These outputs are specifically formatted for B2B audiences, such as IT or operations professionals, with details like USD pricing ($25,000) and dates in MM/DD/YYYY. This approach eliminates the need for manual adjustments, as the content is already mapped to specific UI components. Instead of freeform text, you’re working with labeled data that slots directly into component props.
And here’s where MUI steps in to make the integration seamless.
Why MUI Is Perfect for Landing Page Components
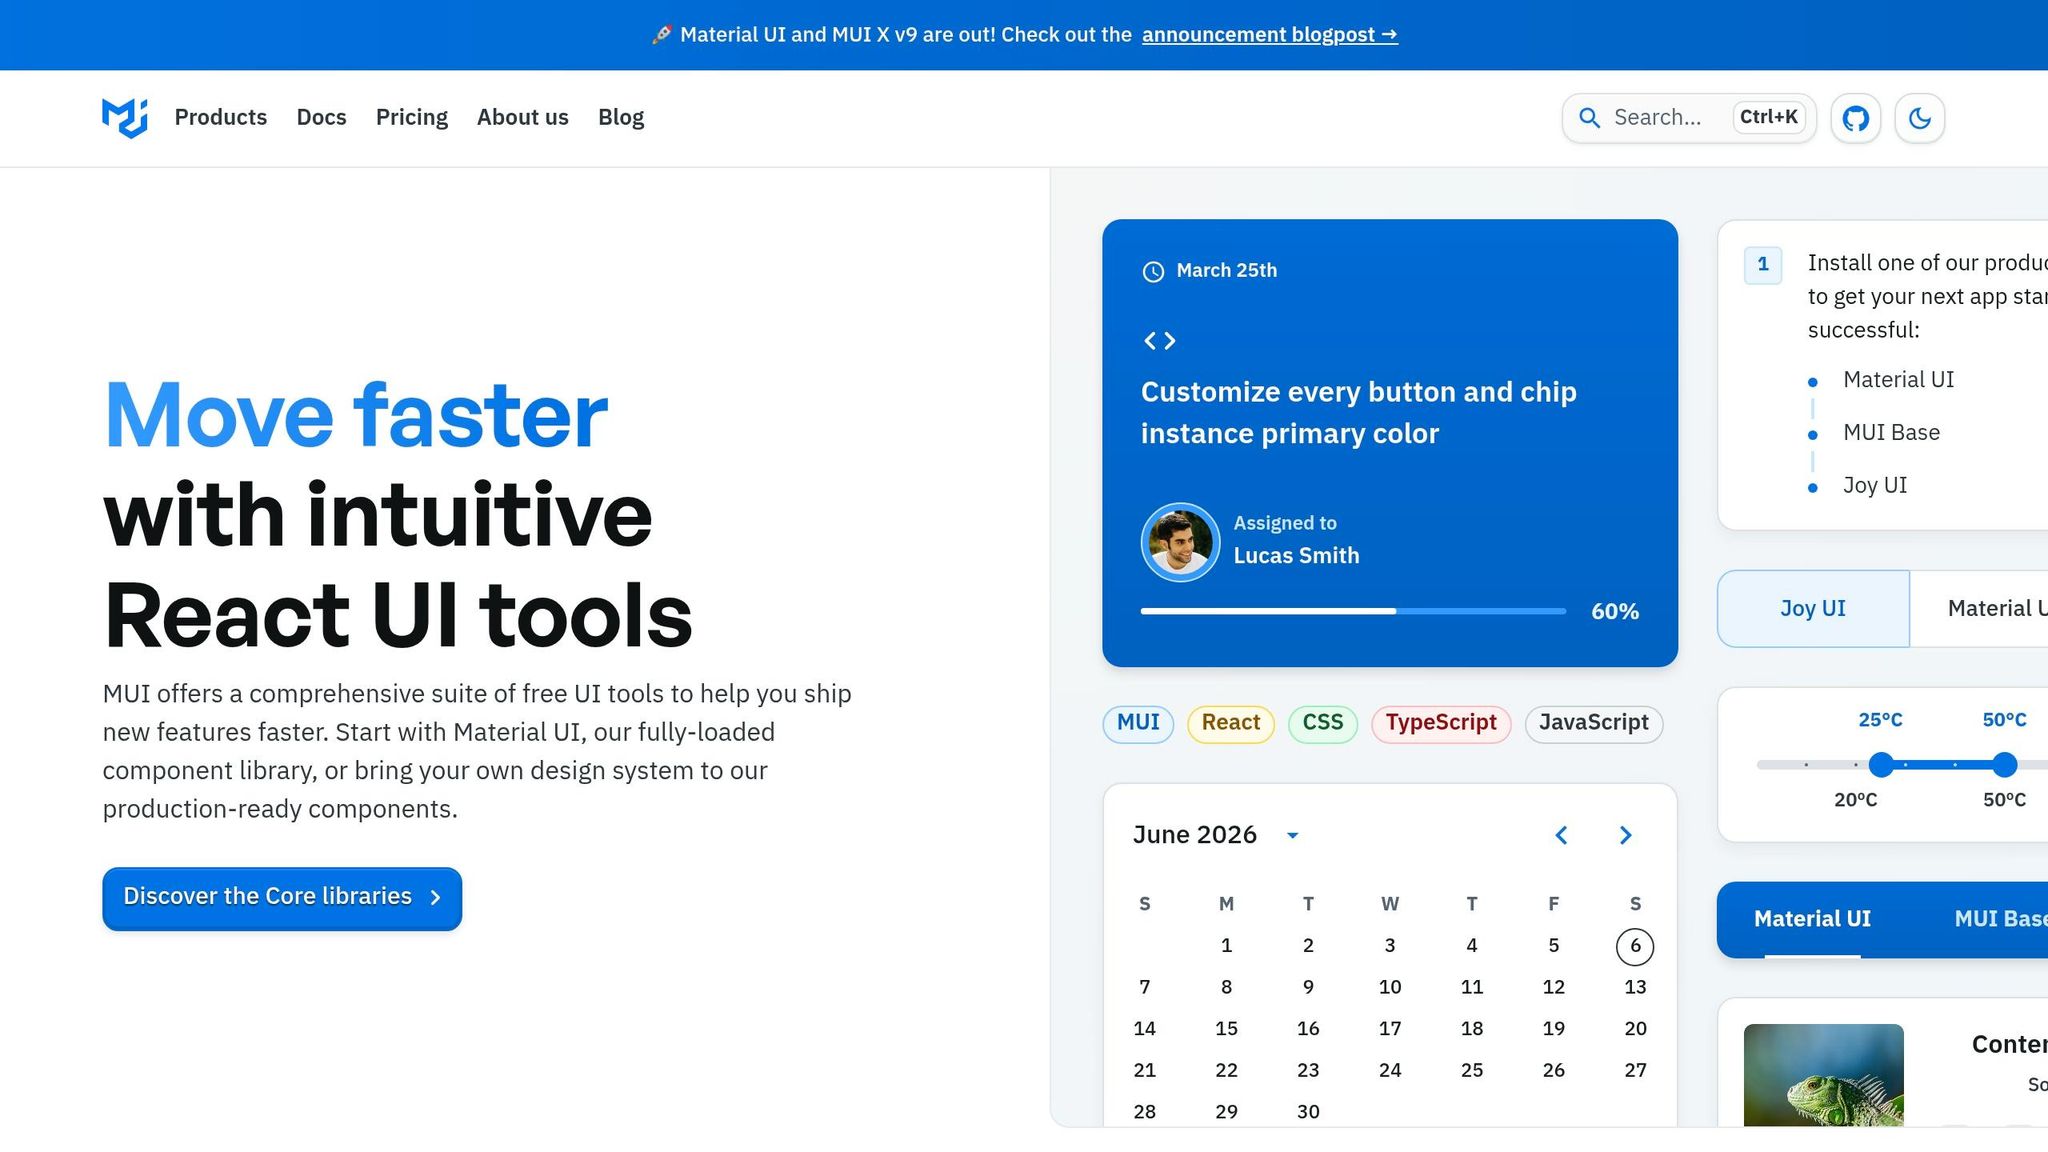
MUI (formerly Material-UI) is one of the top React component libraries with a massive following – over 90,000 GitHub stars and 3 million weekly npm downloads for @mui/material. It’s widely adopted by enterprise front-end teams, making it a reliable choice when you need to move quickly without introducing unfamiliar tools.
MUI offers production-ready components like Container, Grid, Typography, Button, Card, and TextField. These components are accessible and meet the standards expected by US enterprises. Plus, MUI’s support for design tokens and theming allows you to define your brand’s colors, typography, and spacing once and apply them consistently across all sections of your site.
This consistency is key when integrating with UXPin Merge for design and development alignment.
How UXPin Merge Aligns Design and Code

UXPin Merge bridges the gap between design and development by syncing live MUI components directly into the design environment. These components can be pulled from a Git repo, npm package, or Storybook, allowing designers to work with real props like variant="contained" or color="primary" instead of vague style notes.
The benefits are clear. Erica Rider, UX Architect at BackBlaze, shared her experience with UXPin Merge:
"We synced our Microsoft Fluent design system with UXPin’s design editor via Merge technology. It was so efficient that our 3 designers were able to support 60 internal products and over 1,000 developers."
When you incorporate GPT-5.2 into this workflow, the process becomes even smoother. For example, an AI-generated field like primaryCtaLabel can be directly applied to the prop panel in UXPin. This means prototypes already include the correct components, props, and copy, giving developers a head start with code-ready designs.
This synergy between tools creates a streamlined workflow, moving effortlessly from AI-generated content to fully functional components.
Planning Your Landing Page
Before diving into prompts or assembling components, you need a solid plan. A clear strategy upfront saves time later – whether it’s revising GPT-5.2 outputs or tweaking MUI components.
Setting Clear Goals for Your Landing Page
Every choice you make – headlines, CTAs, layout – should answer one question: What do you want visitors to do? For example, if your goal is to generate leads for an enterprise SaaS demo, everything on the page should work toward that purpose. Speak directly to one persona, like a VP of Operations, offer one compelling benefit (e.g., faster deployment cycles), and guide visitors toward one clear action (e.g., booking a demo). This approach, often called the "Rule of One", is particularly effective for B2B landing pages, where your audience values clarity and efficiency.
Having a specific goal also sharpens your GPT-5.2 prompts. Instead of requesting generic "landing page copy", you can ask for something like: "A hero headline targeting IT directors at mid-market US companies, emphasizing ROI in under 10 words." That level of detail often yields better results right from the start.
Once your goal is set, you can start aligning your page structure with MUI components.
Structuring Content for GPT-5.2 and MUI
With a clear goal in mind, outline the sections of your landing page and decide which MUI components will house each one. A typical enterprise landing page might include:
- A hero section for your main message
- A social proof bar showcasing credibility
- A features grid highlighting key benefits
- A pricing section to address costs
- A lead capture form to collect visitor info
Each of these can be mapped to specific MUI components like Container, Grid, Card, Typography, and TextField.
When prompting GPT-5.2, use structured JSON to map content directly to MUI props or slots. For instance:
{ "heroHeadline": "Accelerate Your Deployment Cycles", "heroSubheadline": "Trusted by 14,200 teams worldwide", "primaryCtaLabel": "Book a Demo", "featureSections": [ { "title": "Faster Setup", "description": "Deploy in days, not weeks", "iconName": "speed" } ] } To avoid GPT-5.2 generating elements outside your design system, include a <design_and_scope_constraints> block in your prompt. OpenAI‘s GPT-5.2 prompting guide emphasizes:
"Implement EXACTLY and ONLY what the user requests… Do NOT invent colors, shadows, tokens, animations, or new UI elements, unless requested or necessary to the requirements."
Also, specify content length limits to ensure text fits neatly within MUI’s fixed-size containers, avoiding overflow or truncation issues.
This systematic approach ensures AI-generated content integrates smoothly with your design system and fits the expectations of US audiences.
Formatting Content for US Audiences
Enterprise audiences in the US expect precise and professional formatting. Follow these conventions:
- Use the $9,999.99 format for currency.
- Display dates in MM/DD/YYYY format.
- Clearly state pricing, trial periods, and contract terms.
Specific numbers build trust. For example, "14,200 teams use this platform" feels more credible than "thousands of teams." When prompting GPT-5.2, explicitly request specific figures and US-standard formatting to avoid localization errors.
Keep the reading level accessible – aim for a Flesch-Kincaid Grade Level of 9 or lower. This doesn’t mean dumbing things down; it means respecting that your readers are likely skimming for critical details. Use short sentences, active verbs, and results-oriented language. For instance, "Ship in days, not quarters" is more effective than a lengthy, feature-packed description for a B2B audience.
Generating and Mapping Content with GPT-5.2
After planning your page structure, the next step is integrating AI-generated content directly into your MUI component setup.
Writing Prompts That Deliver Section-Specific Content
When working with GPT-5.2, avoid treating it like a traditional copywriter. Instead, craft prompts that produce JSON tailored to specific sections. Generic prompts often result in long-form text that requires extra effort to break into components. For better results, write one prompt per section – for instance, one for the hero section, another for the features grid, and another for pricing. Each prompt should clearly define the section’s purpose, intended audience, and the exact JSON schema required.
Here’s an example prompt for a hero section aimed at US enterprise buyers:
You are generating content for a US enterprise SaaS landing page. Target audience: product managers and engineering leaders at mid-market US companies. Tone: concise, professional, benefit-focused. US English only. Return ONLY valid JSON. Follow this schema exactly: { "headline": "string, max 80 characters", "subheadline": "string, max 220 characters", "primaryCtaLabel": "string, max 20 characters", "secondaryCtaLabel": "string, max 20 characters", "supportingBulletPoints": ["3 strings, each max 90 characters"] } Emphasize faster speed-to-deployment, design–development alignment, and production-ready MUI components. By explicitly specifying the format and content structure, you can ensure the output aligns with your needs, minimizing the need for manual editing. Once the schema-driven prompts are in place, you can map the JSON outputs directly to MUI component properties.
Linking GPT-5.2 Output to MUI Component Props
To streamline the integration process, bind the JSON fields directly to corresponding MUI props. For example, the headline field can populate a <Typography> component, while primaryCtaLabel maps to a <Button>. Arrays like feature lists can be rendered using a <Grid> of <Card> components.
Here’s a quick reference for mapping JSON fields to MUI props:
| GPT-5.2 JSON Field | MUI Component | Prop |
|---|---|---|
headline |
Typography |
children (variant: h2) |
primaryCtaLabel |
Button |
children |
variant |
Button |
variant (contained, etc.) |
features[].iconName |
Icon |
children |
plans[].priceMonthlyUSD |
Typography |
children (e.g., "$149/month") |
testimonials[].rating |
Rating |
value |
For fields like pricing, it’s helpful to request both a raw numeric value (e.g., "priceMonthlyUSD": 149) and a preformatted string (e.g., "priceDisplay": "$149/month") to simplify integration.
If you’re using UXPin Merge, their Forge AI tool can further assist. According to UXPin:
"Forge generates UI using the same components your team ships in production. Every element comes from your React library – with real props, variants, and states."
Once the JSON is mapped, you can refine the content directly in GPT-5.2 to ensure it aligns with character limits and maintains the desired tone.
Fine-Tuning the Generated Content
Refinement is key to producing polished, usable content. Instruct GPT-5.2 to shorten headings by about 15% while keeping the value proposition intact. Ensure the JSON adheres to the schema and fits within the character limits for each component. Afterward, a human reviewer should check the copy for consistency with US enterprise standards. This includes:
- Using specific numbers and active verbs.
- Ensuring all text fits cleanly within the design constraints.
- Replacing absolute claims with softer language like "teams report" or "can help."
A study by HubSpot found that AI tools save marketers an average of 2.5 hours daily on writing and editing tasks. With a structured review process, you can maximize these time-saving benefits while maintaining high-quality output.
Building the Landing Page in UXPin Merge with MUI
With your GPT-5.2 content finalized, it’s time to bring everything to life in UXPin Merge. This is where the focus shifts from generating content to hands-on layout creation, showcasing just how quickly you can move from concept to a functional design.
Putting the Page Layout Together
Start by placing a Container and adding a Grid to establish a responsive framework. From there, add the key sections: hero, feature cards, social proof, and lead-capture form. The best part? Every element you add is a real MUI component, meaning the layout mirrors production code right from the get-go.
For the hero section, use a two-column Grid layout (side-by-side on md and above, stacked on smaller screens). Include a Typography h1 or h2 for the headline, a body1 paragraph for supporting text, and a primary Button for your main call-to-action. For the feature blocks, use three or four Card components arranged in a row. Each card can include an icon, a Typography h5 title, a short description, and an optional secondary link. Lastly, for the lead-capture area, include TextField components (like an email field with type="email") alongside a primary Button for submissions.
You can access MUI components directly from the Design System Libraries panel by pressing Alt + 2. Simply drag them onto the canvas and nest child elements into parent components as needed. For responsive alignment, right-click on a group and choose "Add flexbox" to control spacing and stacking – no manual CSS required.
Once the layout is complete, the next step is to map your GPT-5.2 content to the appropriate MUI component properties.
Connecting GPT-5.2 Content to MUI Components
With the layout ready, use the Properties Panel to map your GPT-5.2 JSON output to the corresponding MUI component props. For example, the hero headline content goes into the children prop of a Typography component, while a CTA label maps to the children prop of a Button. This approach ensures developers receive clean, production-ready prop values during handoff.
If GPT-5.2 generates text that’s longer than expected, wrap the affected MUI elements in a Flexbox Component to maintain a clean layout. For more complex data, like feature arrays or testimonials, UXPin Merge offers a JSX-based interface in the Properties Panel. This is especially handy for pasting structured content directly into components.
"It used to take us two to three months just to do the design. Now, with UXPin Merge, teams can design, test, and deliver products in the same timeframe." – Erica Rider, UX Architect and Design Leader
After mapping the content, it’s time to make sure your design aligns with your company’s standards.
Adjusting Components to Match US Enterprise Standards
Once the content is mapped, ensure every component aligns with your enterprise’s branding guidelines. Start by connecting a custom MUI theme to your UXPin Merge repository. This theme should include your corporate font, brand colors, border radius, and spacing. Once applied, these settings automatically update in the editor, ensuring every component inherits the correct design tokens without needing manual adjustments.
For typography, follow MUI’s scale: use h1 or h2 for the hero headline, h4–h5 for section titles, and body1 for supporting text. For buttons, stick with contained and color="primary" for main CTAs, while using outlined or text for secondary actions. If specific brand requirements, like a custom hex code or padding, aren’t covered by standard MUI props, use the Custom CSS control to apply these directly to the root element. This ensures your design system remains intact while handling unique cases.
Finally, use UXPin’s States/Interactions panel to define hover and focus effects for Buttons and Cards. These interactions leverage MUI’s built-in states, making your prototype behave like the final product during stakeholder reviews – no additional coding required.
Finalizing and Deploying the Landing Page
With your layout complete and content in place, the final steps involve making interactions functional, ensuring accessibility and compliance, and deploying the page without compromising its quality.
Adding Interactions and Form Validation
The lead-capture form is the most important interactive feature on your landing page. Use MUI’s TextField, Select, and Checkbox components, and connect them to validation states using UXPin’s Interactions panel. For example, create a state like emailError and bind it to the error and helperText props. This way, if a user submits the form without entering a valid email, they’ll see an inline message like, "Please enter a valid business email address." Studies suggest that immediate inline validation helps reduce errors and increases form completion rates.
For a US-based audience, ensure that phone numbers, ZIP codes, and currency inputs follow US-specific formats. For the main call-to-action (typically a "Request a Demo" button), you can configure it in the Interactions panel to either open a MUI Dialog or scroll directly to the lead form. To keep the Dialog and its trigger in sync, bind the Dialog‘s open prop to a UXPin state.
Checking for Accessibility and Compliance
According to WebAIM‘s 2024 analysis of the top 1 million homepages, 96.3% had WCAG 2 failures, with an average of 50 detectable errors per page. The most common problems include low-contrast text and missing alt text. While MUI’s component library addresses many of these issues, it’s essential to verify your implementation using a web accessibility checklist.
Use tools like axe DevTools or Lighthouse to identify missing attributes or labeling errors. Then, conduct a manual check by navigating the page using only a keyboard. Ensure every element is accessible via the Tab key, focus indicators are visible, and any Dialog can be dismissed without a mouse. For color contrast, confirm that your MUI theme’s primary and secondary colors meet WCAG AA standards: a contrast ratio of 4.5:1 for body text and 3:1 for larger text.
On the compliance front, include links to your Privacy Policy, Terms of Use, and Cookie Settings in the footer using MUI Link components. Add a short legal disclaimer below the form’s submit button using a Typography component. For example: "By clicking ‘Request a Demo,’ you agree to our Terms of Service and acknowledge our Privacy Policy." If California residents are part of your audience, include a "Do Not Sell or Share My Personal Information" link to comply with CCPA/CPRA regulations. Also, ensure any marketing opt-in checkboxes are unchecked by default.
Once interactions and compliance checks are complete, you’re ready to move toward deployment.
Handing Off and Deploying
Since both design and development use the same MUI components, your handoff process can be more streamlined. Share the prototype link along with a concise architecture note (e.g., PageLayout > Hero > Grid > Typography + Button > LeadForm), the exported MUI theme configuration (including typography, colors, and spacing), and a detailed interaction spec that covers all form states: empty, error, loading, and success. These steps ensure the design aligns with user needs and enterprise requirements, making the transition to development smoother.
"With the MUI library in UXPin, design and development needs no translation, as you all build your React application or website using the very same component library’s elements." – UXPin
UXPin notes that this method can reduce design-to-development time by up to 60% because developers can directly reuse the component structure instead of recreating it from scratch.
For deployment, run the page through a CI/CD pipeline using tools like GitHub Actions or GitLab CI. Incorporate Lighthouse checks to ensure quality, aiming for a Lighthouse performance score above 90 and Core Web Vitals within Google’s "good" range. Specifically, target a Largest Contentful Paint (LCP) of 2.5 seconds or less. Google’s data shows that when load times increase from 1 to 5 seconds, bounce rates rise by 90%, emphasizing the importance of performance for conversions. Before launch, set up analytics and define a conversion goal for form submissions to track success effectively.
Conclusion: What This Workflow Gets You
GPT-5.2, MUI, and UXPin Merge tackle common hurdles like slow deployment, uneven results, and the disconnect between design and development.
By aligning workflows, teams that adopt a design system best practices and AI-powered content creation can cut the typical 3–4 week landing page cycle to just 3–5 days for new pages – and reduce campaign variations to mere hours. This speed is essential in today’s fast-moving marketing landscape.
Consistency becomes second nature. MUI components ensure uniform typography, spacing, and interaction states across every page. GPT-5.2 helps maintain brand voice and messaging standards, creating cohesive copy throughout. Meanwhile, UXPin Merge keeps design and development on the same page, ensuring prototypes mirror the final product.
It’s worth noting: GPT-5.2 isn’t the finish line – it’s the starting point. Human oversight, especially for critical elements like value propositions, pricing, and compliance, ensures quality remains high. When combined with a well-governed MUI component library in UXPin Merge, this process scales effortlessly, enabling teams to produce dozens of landing pages without adding significant design or engineering overhead. It’s a workflow built for the demands of US enterprises, cutting cycle times while scaling to meet evolving needs.
Here’s a quick look at the improvements this workflow delivers:
| What the workflow improves | How it does it |
|---|---|
| Deployment speed | AI-generated drafts and production-ready MUI components streamline the process |
| Visual & content consistency | Shared design systems and reusable GPT-5.2 templates ensure uniformity in US formatting |
| Design–dev alignment | Designers and developers rely on the same MUI component library for seamless collaboration |
| Scalability | Template-driven workflows allow teams to create variations without starting from scratch |
FAQs
What do I need to set up before using GPT-5.2 content in MUI components?
To integrate GPT-5.2 content with MUI components in UXPin, you’ll need a UXPin account that includes Merge access. Fortunately, the MUI library comes pre-installed, so there’s no need for additional setup.
If you’re working with custom design systems, you can connect them through Git, Storybook, or npm under the Design System Libraries tab. For seamless functionality, map React props like variant and color to UXPin’s Properties Panel. This ensures the AI-generated content utilizes elements that are ready for production.
How do I keep GPT-5.2 outputs within my design system and character limits?
To make sure GPT-5.2 generates outputs that match your design system, start by uploading your system’s JSON documentation or the uxpin.config.js file. This allows the AI to reference your approved components directly. When crafting prompts, clearly specify that only library-approved components should be used, steering clear of standard HTML tags.
For managing output length, implement a feedback loop. This involves having the AI review its own output against a predefined rubric before finalizing the code. This approach helps maintain consistency, ensures adherence to your design system, and keeps character counts within acceptable limits.
What should I check before deploying (accessibility, compliance, performance)?
Before rolling out your prototype, it’s crucial to ensure it meets system, usability, and compliance standards. Start by using Spec Mode to review JSX and CSS, making sure they’re aligned with production requirements. Test all component states – loading, empty, and error – to confirm they function as expected. Double-check that role-based views display correctly for different user roles.
Accessibility is another key area to validate. Ensure features like keyboard navigation, clear labels, and proper focus movement are in place. Static analysis tools can help you assess code quality, identifying any issues early. Finally, use Preview mode to test responsiveness across various devices, ensuring a smooth and consistent experience for all users.

