Improve Your Prototyping Skills with These Features

The prototyping and testing phase is always a challenge for UX designers. Without the fidelity and functionality of code, image-based prototypes don’t produce accurate results during usability testing. They often result in design drift and friction with devs during the design handoff.
With code-based design tools like UXPin, that’s no longer the case. Designers can create immersive prototypes with fidelity and functionality that accurately represent a fully developed product. You can even personalize the experience, capture data, create functional signup forms, validate passwords, and more!
This article explores some of UXPin’s advanced features, including States, Variables, Expressions, APIs, and code-like interactions designers can use to create fully functioning prototypes.
Table of contents
If you haven’t got a UXPin account, sign up for a free trial and discover how code-based design can significantly enhance your prototyping and testing skills.
Code-Based vs. Image-Based Prototypes
While most leading design tools offer fantastic features, including interactions and animations, they do nothing to enhance prototype fidelity or functionality.
These image-based tools combine static artboards to create prototypes–which doesn’t make much sense when the final product is code. How do you test user inputs, onboarding flows, or a checkout experience?
Instead of static artboards, UXPin renders HTML, CSS, and Javascript. So, elements like form inputs work the same as in code. Designers can use Variables to capture data and use it elsewhere in the application–like personalizing the welcome sequence or populating a user’s account page.
With Expressions, you can take your prototypes to the next level by setting a username and password during signup and then asking the user to reenter those credentials to log in to the application–a standard sequence that’s impossible to replicate using artboards.
Even something as simple as changing an element’s state is unachievable using image-based tools. Designers often have to use GIFs, videos, or multiple artboards to simulate an experience that UXPin can accomplish with a few clicks.
8 Advanced Code-Based Features to Enhance your Prototypes
Now that you understand the fundamental differences between code-based and image-based design tools let’s dive into eight of UXPin’s advanced features to understand how they enhance prototyping.
1) Process Real Data with Variables
Variables alone put UXPin on a level above other image-based design tools. With variables, prototypes feel like an authentic product experience, operating on data or actions by users.
For example, you can collect information, like the user’s name and email address, and pass it to another page, like a greeting message–“Welcome John, thank you for signing up!”
You set UXPin Variables exactly as you would in Javascript by using a name–either camel case or underscore. So, for our signup form’s name input, we might use userName or user_name. We recommend using the same naming convention as your engineers to create cohesion between design and development.
Find out more about UXPin Variables here.
2) Code-Like Interactivity With States
States are important considerations for developers. They must set each component’s default state when the UI loads, and then program changes based on system changes or user interactions.
States give UXPin prototypes immersive interactivity with changes to the UI as a user hovers, clicks/taps, swipes, and other triggers. The most common example is a button’s default, hover, active, and disabled states.
But you can also use States for more complex interactions like content carousels, dropdown navigation, or switching the interface between light and dark modes.
3) Conditional Interactions
Conditional Interactions allow designers to set Javascript-like “if-then” and “if-else” conditions to validate the information.
For example, an if-then conditional interaction can check if the user has entered a valid email format (including @ and domain extension) or verify a password (character inclusions/exclusions, length, etc.) when creating an account. If everything is correct, the user can proceed to the next screen or log in.
If-else conditions allow designers to program what happens if a user doesn’t meet the if-then requirements—for example, setting a button’s state to disabled until the user completes the signup form correctly.
4) Expressions
With Expressions (basic Javascript functions), designers can extend UXPin prototypes even further, like advanced form validation or building computational components like a functional shopping cart.
UXPin allows you to write Expressions using:
- Numbers
- Strings
- Variables
- Content of elements
- Function (Numbers, text, date, Regex)
- Boolean values
A typical example of how you might use a text-based Expression ensuring you capitalize a person’s name using an input variable. Returning to our signup form above, let’s assume the user entered their name in lowercase: john, and we captured that input using the userName variable. To capitalize the first letter of John’s name, you would write the following expression: capitalize(“userName”).
5) Scrollable Content
Whether you’re designing a website or application, scrolling is a significant part of the user experience. With just a few clicks, designers can set horizontal or vertical scrolls to any piece of content.
Side note–With UXPin’s Content and Data feature, you can fill elements with real data from JSON, CSV, Google Sheets, or Unsplash with one click. You can even use Match Content by Layer Name, which recognizes keywords (like photo, date, time, login) and populates the fields with relevant content.
6) Use APIs to Communicate With Real Products
Another benefit of a UXPin’s code-based design tool is the ability to make API requests (GET or POST) to third-party services and applications. Like posting or fetching data from Google Sheets or a database. This feature is especially useful when you need governed API access to enterprise data sources, such as when prototyping an application to control smart devices, like a home lighting system.
Incorporating APIs into your prototypes extends the functionality and provides usability participants with a real-world user experience.
7) Improve Accessibility with Built-in Features
Accessibility is a time-consuming yet essential part of the design process. Most design tools require designers to test UIs using external applications or plugins–adding time and sometimes costs to the UX workflow.

UXPin offers built-in accessibility features with a contrast checker and color blindness simulator so designers can check UIs on the fly without leaving the design canvas.
8) Leverage Built-in Component Libraries
UXPin features built-in design systems and a React component library through our MUI integration. Every component is completely customizable via UXPin’s properties panel. Designers also have the choice of switching to JSX to edit React components.
The benefit of designing with code components is that your prototypes have the same fidelity and functionality as a final product or website. You can also use MUI’s library as a foundation to build and scale your own design system.
With UXPin’s Storybook integration, you can import any public Storybook design systems, like Shopify Polaris, Salesforce Lightning, IBM Carbon, and many more.
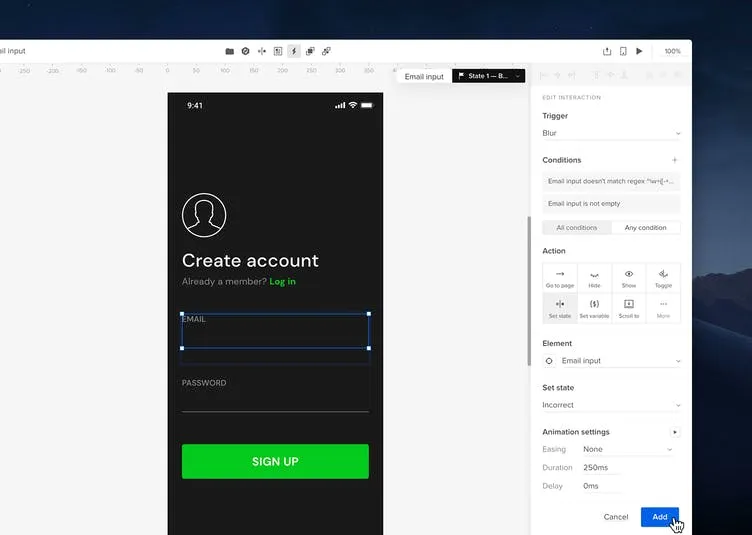
Building a Signup Form Using UXPin’s Prototyping Features
We’ll use this simple Signup form example to demonstrate some of UXPin’s advanced prototyping features, including States, Conditional Interactions, interactive inputs, and logic.
The template has two pages, a signup form, and a confirmation page. The signup form has three states:
- Base: The static default state
- Empty: Displays a red error message when the user clicks the SIGN UP button, and either of the inputs is blank. The error reads, “Can’t be blank.”
- Incorrect: Displays an email error “Incorrect email” if the user doesn’t use @ or a domain extension. It also shows an error for the password field if there are less than eight characters, “Must be at least 8 characters long.”
To get to the confirmation page, the user must meet all four conditions:
- Email must not be empty
- Password must not be empty
- Email input matches regex: ^\w+([-+.’]\w+)*@\w+([-.]\w+)*\.\w+([-.]\w+)*$
- Password matches regex: 8
If the user doesn’t meet these conditions, the UI displays either an Empty or Incorrect error message below the relevant input field.
The confirmation page uses a variable from the email field to personalize the verification message. For example, if we used example@uxpin.com, the email message would read, “Confirm your email. We sent a verification link to example@uxpin.com.”
With this simple email form, you can begin to see the endless possibilities of prototyping in UXPin’s code-based design tool.
If you found this introduction helpful, check out the walkthrough of our Calming App template, where we explore Components, Interactions, Media (images, video, audio), and States.
With UXPin’s free trial, you can play with any of our interactive UI patterns or the four app examples. You also get a taste of Merge with our MUI integration. Sign up for a 14-day trial to experience code-based design with UXPin.

