Prototyping just got faster and easier for enterprise teams with GPT-5 Mini, Bootstrap, and UXPin Merge. This workflow lets you design directly with production-ready code components, cutting development time by up to 8.6x. By combining AI-driven layout generation with Bootstrap’s responsive framework, you can create functional prototypes in hours – saving time, reducing revisions, and ensuring alignment between design and development.
Key Highlights:
- AI-Powered Design: Use GPT-5 Mini to generate React Bootstrap components with simple text prompts or uploaded sketches.
- Seamless Integration: UXPin Merge syncs directly with Bootstrap, so prototypes match final product performance and appearance.
- Time Savings: Teams report up to 50% less engineering time using this workflow.
- Customizable Components: Easily refine layouts and styles using natural language commands.
- Code-Backed Prototypes: Export production-ready React code for faster developer handoffs.
This approach is perfect for enterprise teams managing multiple products, working with established design systems, or aiming to speed up the design-to-development process. Start designing smarter by integrating these tools into your workflow.
Generate Bootstrap Dashboard Using AI (No Coding, Free Tools!)
sbb-itb-f6354c6
Prerequisites and Setup
Before diving into prototyping, make sure you have everything you need. The process is simple, thanks to Bootstrap’s built-in integration – no extra steps like importing packages or setting up repositories are required.
What You Need to Get Started
First, you’ll need a UXPin account with Merge access. This feature is available starting with the Core plan, which costs $29/month and includes 200 AI credits along with basic models. If you’re looking for more, the Growth plan at $40/month offers 500 AI credits and access to advanced models.
To use the GPT-5 Mini AI Component Creator, you’ll also need an OpenAI API key. This key links UXPin to OpenAI’s models, and you may face additional charges depending on how much you use the API. You can get your API key directly from OpenAI’s website.
While having some familiarity with Bootstrap is helpful, you don’t need to be an expert.
How to Enable Bootstrap in UXPin Merge
Bootstrap integration in UXPin Merge is seamless – there’s no manual setup required. Unlike custom libraries that demand Git or Storybook integration, Bootstrap components are ready to go without importing packages or configuring CSS paths.
To activate GPT-5 Mini for creating components, follow these steps:
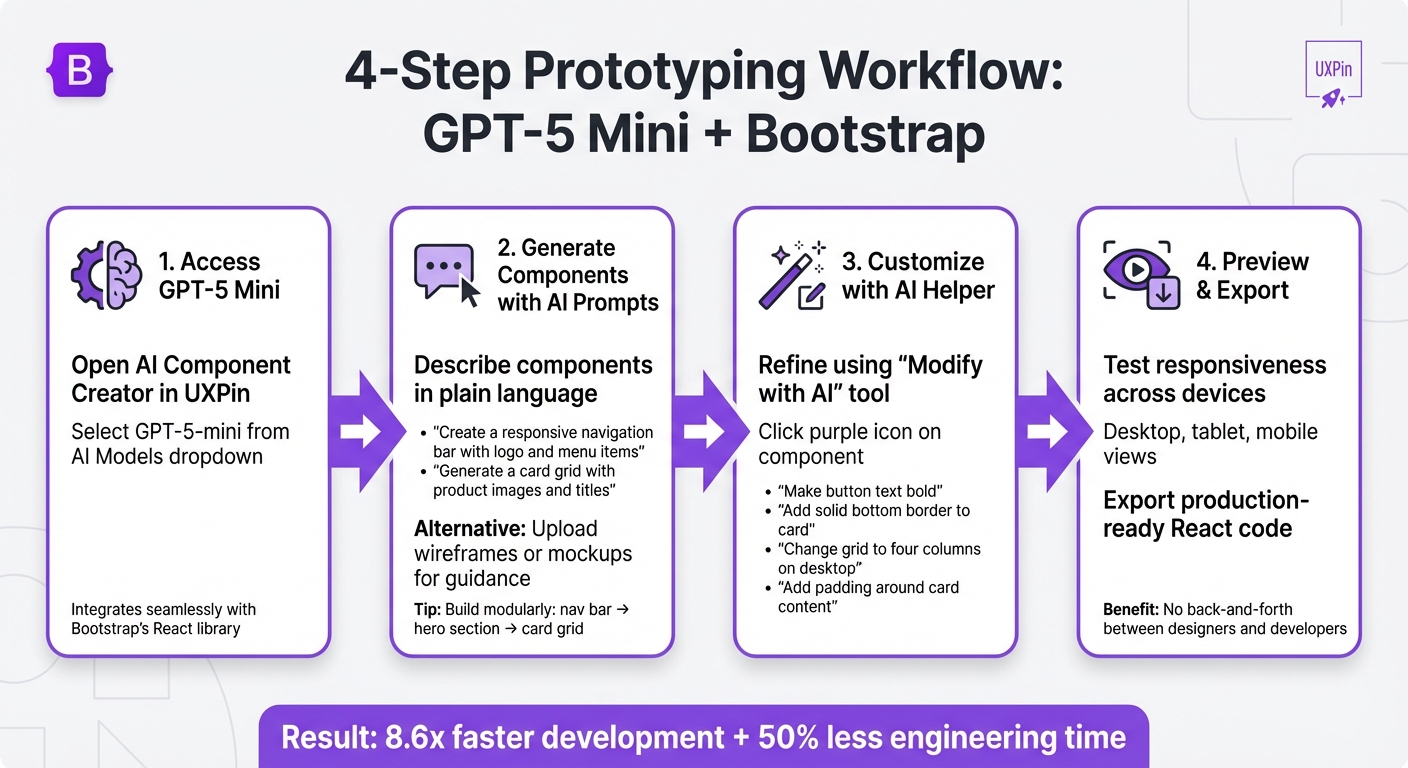
- Open the AI Component Creator in the Quick Tools panel within the UXPin Editor.
- Go to the Settings tab and paste your OpenAI API key into the provided field.
- Once the key is active, choose GPT-5-mini from the AI Models dropdown menu. This model is designed for speed and is perfect for generating quick layout variations.
"GPT-5-mini – Fast and efficient. Best for quick tests, layout variations, or when you need results right away."
After completing the setup, you’re ready to start generating AI-powered Bootstrap components effortlessly. This allows you to quickly move from basic layouts to a high-fidelity prototype that looks and behaves like the final product.
How to Create a Prototype with GPT-5 Mini and Bootstrap
GPT-5 Mini Bootstrap Prototyping Workflow in UXPin Merge
Building on a streamlined setup, here’s how you can create effective prototypes using GPT-5 Mini and Bootstrap, ensuring production-ready code every step of the way.
How to Access GPT-5 Mini in UXPin
To get started, open the AI Component Creator in UXPin and select GPT-5-mini from the AI Models dropdown. This model is designed for speed and excels at generating quick layout variations. It integrates seamlessly with Bootstrap’s React library, ensuring that every component adheres to Bootstrap’s design standards and responsive functionality.
How to Generate Components with AI Prompts
Switch to the Prompt tab and describe the component you need in plain language. For instance, you might type:
- "Create a responsive navigation bar with a logo and menu items."
- "Generate a card grid with product images and titles."
Start by building essential sections like the navigation bar, followed by the hero section, and then the card grid. This step-by-step approach enhances precision and keeps your design modular.
You can also upload wireframes or mockups to guide the AI. Low-fidelity sketches help outline basic structures, while high-fidelity designs provide more detail, including typography, colors, and spacing. This added input ensures the generated components align closely with your vision.
How to Customize AI-Generated Components
Once the AI generates a component, you can refine it using the "Modify with AI" tool. Simply click the purple icon on the component to access the AI Helper. Then, use plain text instructions to make adjustments. For example:
- "Make the button text bold."
- "Add a solid bottom border to the card."
- "Change the grid to four columns on desktop."
- "Add padding around the card content."
This method eliminates the need for manual tweaking, making it easier to achieve your desired look. After refining, preview the changes to ensure everything aligns with your design goals.
How to Preview and Export Your Prototype
Click the Preview button in the top toolbar to test your prototype’s responsiveness across desktop, tablet, and mobile views. Thanks to Bootstrap’s responsive design, your layout will adapt seamlessly to different screen sizes.
Once you’re satisfied with the design, export your prototype for developer handoff. Since every component is backed by code, the exported design mirrors the final development output, cutting down on the usual back-and-forth between designers and developers.
"Being able to jump straight from design to having code ready to going to be a huge time-saver for our team." – Allison Barkley, Director of Operations, Baremetrics
Best Practices for GPT-5 Mini and Bootstrap
Building on your prototype creation process, here are some strategies to boost both efficiency and quality.
How to Improve AI Results with Iterative Prompts
Start with clear, detailed instructions. When asking GPT-5 Mini to create Bootstrap components, be as specific as possible. For example, instead of saying, "Create a card", provide detailed requirements: "Create a card with a 16px bold title, 14px body text, and a 2px solid bottom border." This precision ensures the output aligns closely with your expectations from the very beginning.
Tackle complex designs in smaller steps. If you’re working on something as intricate as a dashboard, avoid generating it all in one go. Break it into manageable sections – like a navigation bar, sidebar, content grid, and footer. Generate each part separately, then assemble them. This method not only improves accuracy but also gives you greater control over the final result.
Leverage the AI Helper for quick tweaks. Once a component is generated, use the purple AI Helper icon to refine it through text-based commands. For instance, you could say, "Add 24px padding around the card content" or "Switch the grid to four columns on desktop." This iterative process makes it easy to fine-tune components without starting from scratch.
How to Get More from UXPin Merge Features
UXPin Merge offers tools that go beyond basic component generation, streamlining your workflow while maintaining flexibility. The AI Helper integrates with popular React libraries like Bootstrap, MUI, Ant Design, and Tailwind, enabling seamless component modifications across frameworks. Additionally, uploading high-fidelity mockups helps the AI better interpret typography, colors, and spacing, giving you a more accurate starting point for your Bootstrap components.
Test responsiveness early. Use the Preview button to see how your prototype adapts to various screen sizes, including desktop, tablet, and mobile. This early testing helps you identify and address any design inconsistencies before handing off your work. It’s a small step that can save significant time later on.
AI-Generated vs. Manual Prototyping: A Comparison
AI-driven prototyping delivers noticeable time savings and consistency improvements. Larry Sawyer, Lead UX Designer, highlights the benefits:
"When I used UXPin Merge, our engineering time was reduced by around 50%. Imagine how much money that saves across an enterprise-level organization with dozens of designers and hundreds of engineers".
| Feature | AI-Driven Prototyping (UXPin Merge) | Manual Prototyping |
|---|---|---|
| Speed | 8.6x faster development | Slower, pixel-based assembly |
| Consistency | High; adheres to library rules (Bootstrap/MUI) | Variable; depends on manual precision |
| Code Output | Production-ready React code | Requires translation from design to code |
| Iteration | Instant via AI Helper prompts | Manual property/layer adjustments |
The advantages are especially clear during design handoff. AI-generated prototypes provide clean React code and dependencies, eliminating the need for redlining or manual coding, which is often required with traditional methods.
Conclusion
Key Takeaways
GPT-5 Mini, Bootstrap, and UXPin Merge come together to create a prototyping workflow that bridges the gap between design and production-ready code. This approach can speed up development by 8.6 times and cut engineering time in half.
With Bootstrap’s mobile-first framework and AI-driven tools, responsive prototyping becomes simpler. Features like the AI Helper allow for quick iterations, while the Preview button ensures designs look great across different screen sizes. Developers can then work with clean React code, making handoffs seamless. As Erica Rider, UX Architect and Design Leader, highlights:
"It used to take us two to three months just to do the design. Now, with UXPin Merge, teams can design, test, and deliver products in the same timeframe".
These tools aren’t just about saving time – they set the foundation for more efficient workflows and better collaboration.
Next Steps for Your Team
Take advantage of these time-saving tools by integrating UXPin Merge into your process. Since Bootstrap is built-in, you can start prototyping right away. For larger teams, the Enterprise plan offers perks like custom component library integration, unlimited AI credits, and dedicated support to meet your specific needs.
Ready to get started? Visit uxpin.com/pricing to compare plans and find the best fit for your team. If you’re part of an enterprise-scale operation, reach out to sales@uxpin.com to discuss tailored pricing and onboarding options. The sooner you embrace code-backed prototyping, the faster your team can deliver products that match the design vision perfectly.
FAQs
How does GPT-5 Mini improve the prototyping process with Bootstrap?
GPT-5 Mini streamlines the prototyping process by leveraging AI to transform text prompts or images into polished UI components. This means designers can quickly craft layouts and interactive elements without spending hours on manual adjustments, significantly speeding up their workflows.
Paired with Bootstrap’s responsive framework, GPT-5 Mini ensures that these components are aligned with production-ready code, making the shift from design to development smoother. Its AI-powered recommendations also help maintain a cohesive design, automate tedious tasks, and reduce the chances of errors, allowing teams to build functional prototypes with greater speed and efficiency.
What are the costs of using GPT-5 Mini with UXPin Merge?
The cost of using GPT-5 Mini with UXPin Merge will depend on your usage and the subscription plan you choose. Here’s a quick breakdown:
- GPT-5 Mini Pricing:
- Input tokens: $0.25 per 1 million tokens
- Output tokens: $2.00 per 1 million tokens
Your total expense will vary based on the volume of AI-generated content used during prototyping.
UXPin offers subscription plans starting at $29 per month for the Core plan, with additional Enterprise options available for larger teams. These plans include AI-powered features and built-in credits, which can help offset some costs depending on how extensively your team integrates AI tools.
For teams looking to streamline workflows and cut down on development time, combining GPT-5 Mini with UXPin Merge can offer an efficient solution. However, your final cost will ultimately hinge on your usage patterns and the subscription tier you select.
How does AI help maintain design consistency when using Bootstrap?
AI plays a key role in maintaining design consistency with Bootstrap by generating components that adhere to Bootstrap’s production-ready code. This ensures that the components used during prototyping are not only functional but also align perfectly with the standards of the final implementation.
Thanks to UXPin’s integration, designers can work directly with actual Bootstrap components, making the shift from prototype to production effortless. On top of that, AI-powered tools in UXPin can create components that respect your design guidelines while staying true to Bootstrap’s structure, ensuring both visual harmony and functional consistency throughout the design workflow.

