Want to speed up your UX workflow while keeping designs aligned with production code? Combining Claude Haiku 4.5, Bootstrap, and UXPin Merge makes it possible. This approach bridges gaps between design and development, ensuring faster prototyping and fewer inconsistencies.
Here’s the quick process:
- Claude Haiku 4.5: AI for UX planning, task flows, and component suggestions.
- Bootstrap: Responsive, pre-built components for layouts and interactions.
- UXPin Merge: Design with production-ready code components for seamless developer handoff.
This guide walks you through setting up these tools, using AI for UX flows, building responsive layouts, and ensuring smooth collaboration between teams. Whether you’re creating dashboards or enterprise tools, this workflow ensures your prototypes are functional and ready for production.
UXPin Merge Tutorial: Intro (1/5)
sbb-itb-f6354c6
Getting Started: Prerequisites and Setup
Getting everything in place before diving into your project can save you a lot of time and headaches down the road.
Tools and Accounts You Need
To ensure smooth collaboration throughout your project, you’ll need three key tools: UXPin with Merge enabled, Claude Haiku 4.5, and a Bootstrap-based component library. These tools work together to bridge the gap between design and development.
For UXPin, you’ll need either a Growth or Enterprise plan to access Merge, SSO, and role-based permissions – features that are particularly important for enterprise teams. Since Bootstrap is already integrated into UXPin, most teams won’t need to import anything extra unless they’ve built a custom Bootstrap-based design system. If that’s the case, you’ll need NPM integration to pull your proprietary components into Merge. For example, if your team uses @yourcompany/bootstrap-ui hosted on a private NPM registry, coordinate with your front-end platform team to confirm registry access and ensure the right versions are available.
Claude Haiku 4.5 and Forge, UXPin’s built-in AI assistant, are accessible directly within UXPin. You won’t need a separate Anthropic account or API key for standard Forge features.
Assigning roles early will also streamline access:
- Designers: Editor access
- Developers: Admin or integrator access (to manage the Merge library)
- Product Managers: Viewer or commenter access (for prototype reviews)
Once your tools and accounts are ready, the next step is setting up an efficient workspace.
Setting Up Your Workspace
A well-organized workspace can make a big difference in how smoothly your team collaborates. Since UXPin is browser-based, there’s no software to install. It works best on the latest version of Chrome, running on a modern macOS or Windows machine.
For maximum efficiency, use a dual-monitor setup. Keep UXPin open on one screen and AI prompts or documentation on the other. This setup makes it easier to switch between generating AI outputs and refining your designs.
A strong broadband connection is also essential, especially when multiple team members are editing prototypes or syncing component libraries. For US-based teams, make sure to adjust UXPin defaults to MM/DD/YYYY date formats and USD ($) currency – small details like these can prevent confusion when working with real interface copy.
Depending on how prepared your codebase and accounts are, teams can typically go from nothing to a working prototype in anywhere from half a day to two full business days.
Configuring UXPin Merge for Bootstrap
Once your workspace is ready, it’s time to configure UXPin Merge for Bootstrap. This step connects your design environment to production-ready components, ensuring alignment between design and development.
If you’re using UXPin’s built-in Bootstrap library, setup is minimal – components are available in the component panel right away. For teams using a custom Bootstrap library via NPM, follow these steps:
- Connect your library: In UXPin, go to Design with Merge components → Add new Library → Import React Components with npm integration. Name your library and link to your package (e.g.,
@yourcompany/bootstrap-ui). Ensurereact-bootstrapandbootstrapare installed, and include the CSS path:bootstrap/dist/css/bootstrap.min.css. - Select your components: Expose only the components your team uses frequently, such as grids, buttons, forms, navbars, modals, alerts, and cards. Keeping the library focused makes it easier to navigate and maintain.
- Map your design tokens: Extract your Bootstrap theme variables (like
--bs-primary, font scales, and spacing units) and align them with UXPin’s token system. This ensures consistent colors, typography, and spacing between design and production. - Set up your project file: Create a "Design System" project in UXPin for shared components and global styles. Separate product or feature projects can then reference this system. Use prefixes like
TPL_for templates andFLOW_for flows to keep files organized as your team scales.
Before starting your first project, schedule a half-day enablement sprint. Use this time to connect Merge, validate that a sample Bootstrap page renders correctly from your components, and run a quick Forge prompt test. This ensures your components match your production theme and helps avoid a common pitfall: discovering mid-project that your library is out of sync with production.
Using AI to Plan UX: Claude Haiku 4.5 and Forge
Once you’ve set up the basics, it’s time to let AI take the reins in your UX design process. Start by using Claude Haiku 4.5 to map out your UX flows.
How to Prompt Claude Haiku 4.5 for UX Flows
The key to getting high-quality results from Claude lies in how you frame your prompts. Clear and detailed instructions lead to well-structured outputs, while vague prompts can result in scattered or unhelpful results.
A strong prompt for UX planning should address four main areas: the user, their goal, platform constraints (e.g., Bootstrap 5 and responsive design), and the required output format. Here’s an example of a precise prompt:
"Act as a senior UX designer creating an internal analytics dashboard for US-based sales managers. The product is a responsive web app built with Bootstrap 5. Generate a task flow for ‘Create and share a sales report’ using numbered steps. For each step, include: the page type (dashboard, list, detail, wizard, or modal), recommended Bootstrap components (navbar, cards, tables, forms, alerts), and key user actions. Optimize for desktop first, with responsive notes for mobile breakpoints."
This type of prompt ensures that every step aligns with Bootstrap design patterns – like navbars, cards, or pagination – making it easy to translate into tools like UXPin. According to a 2024 Nielsen Norman Group survey, about 50% of teams leveraging AI for UX work use it primarily to develop task flows and page outlines.
For more detailed planning, you can also specify layout structures using Bootstrap grid terms. This way, the AI delivers a wireframe-ready blueprint.
Once you’ve got a detailed output from Claude, the next step is to bring it to life using Forge.
Converting AI Plans into Layouts with Forge
With your UX flows defined, Forge can turn them into responsive layouts. Use Claude’s structured output – whether it’s a numbered list of pages, a section breakdown, or specific component recommendations – as a natural-language input for Forge. For example:
"Create a responsive list page using Container, Row, Col, Navbar, Table, and Button from our Bootstrap Merge library. Use
col-lg-6for desktop and stack columns on mobile."
Forge then generates layouts using real Bootstrap components, complete with exposed props for spacing, typography, and interactive states. This ensures that the layouts you create are grounded in actual code. Focus on building one critical page at a time, and cross-check it against your design system for consistency.
Ensuring AI Outputs Conform to Your Design System
One potential pitfall of AI-assisted design is the risk of deviating from your design system. For instance, Claude might suggest a component variant that doesn’t exist in your codebase, or Forge might create layouts that use unapproved design tokens.
You can avoid this by constraining the AI from the outset. Start every Claude session with a prompt preamble that includes:
- A list of approved component names (exactly as they appear in your Merge library).
- Your design tokens (e.g.,
--bs-primary: #0d6efd, along with border radius and spacing scales). - Explicit rules like: "Do not create new components or colors. Only use components from the following list."
By using the same terminology and component names your developers rely on – such as UXPin Bootstrap / Button / Primary – you ensure Claude’s output aligns seamlessly with Forge’s capabilities.
Additionally, locking deprecated or non-approved components in your Merge library acts as an extra safeguard. Even if the AI suggests an unsupported element, designers won’t find it in the panel. This approach keeps your design-to-development workflow consistent. Teams using this design-system-constrained AI workflow report 30–50% fewer inconsistencies between design and development, significantly reducing rework for enterprise teams working at scale.
Building Layouts and Interactions with Bootstrap in UXPin Merge
Building Responsive Layouts with Bootstrap Components
Once you have your AI-generated UX flows ready, the next step is to create layouts in UXPin Merge. Merge integrates real Bootstrap components, so your designs will behave responsively, just like in production.
Start by using a Container component as the page wrapper. Then, structure your layout with Row and Col components to define horizontal sections. You can adjust responsive breakpoints by setting column properties like md={6} or lg={4} in the properties panel. For example, enterprise dashboards often use a full-width header row, a col-12 col-md-3 sidebar for navigation, and a col-12 col-md-9 main content area for elements like cards, tables, and filters. On the other hand, marketing or product pages might benefit from a two-column hero row followed by equal-width feature rows.
Bootstrap’s utility classes are fully configurable in Merge. Use them for spacing (mt-3, px-4), flex alignment (d-flex justify-content-between), or visibility controls (d-none d-md-block). This approach ensures your layouts remain consistent with what developers will implement later.
Once your responsive layout is ready, the next step is adding dynamic interactions.
Setting Up Interactions and Component States
With your layout in place, focus on defining key user journeys – like navigating a dashboard, opening a report, or confirming an action. Use UXPin’s Interactions panel to connect components and bring your designs to life.
For navigation, select a navbar or sidebar item and set an "On Click → Navigate to Page" action. To handle modals, use the Bootstrap modal component. Keep it hidden by default, then trigger "Show/Hide Modal" through a button click. You can even add animations to simulate the overlay effect. For forms, connect input states to validation logic: display an inline error message if required fields are left empty, or enable the submit button only when all mandatory inputs are filled.
Bootstrap components in Merge come with predefined states like default, hover, active, disabled, error, and success. You can toggle these states in the properties panel or activate them dynamically through interactions. This flexibility allows you to prototype real-world scenarios, such as disabled buttons based on permissions or error-heavy forms in enterprise systems. These details ensure stakeholders see a realistic representation of edge cases.
Using AI to Refine Layouts and Plan Interactions
After testing your components and interactions, AI tools like Claude Haiku 4.5 can help fine-tune your design. Provide it with a structured prompt that describes your page, its components, and target breakpoints, and ask for specific layout improvements. For instance:
"Propose three alternative Bootstrap grid layouts for an analytics dashboard for US enterprise users. The page includes KPI cards, a data table, and a filter bar. Optimize for desktop (1,440px+) with responsive notes for 768px tablets."
Claude might suggest organizing KPI cards in a three-column col-md-4 row, placing filters in a collapsible panel for smaller screens, or transitioning secondary navigation to a tabbed interface on mobile. With these suggestions, you can easily tweak your layout in Merge by adjusting your container, row, and column components.
For refined micro-interactions, Claude can also offer tailored recommendations. For example, you could ask:
"Suggest hover and focus behaviors for primary buttons on an enterprise billing page built with Bootstrap."
"Describe step transitions for a multi-step Bootstrap form."
It might recommend using Bootstrap Toasts for success messages after form submissions or applying is-invalid styling on blur for empty required fields. These ideas can be directly translated into UXPin configurations, allowing you to implement interaction logic seamlessly without switching tools.
From Prototype to Production: Handoff with UXPin Merge
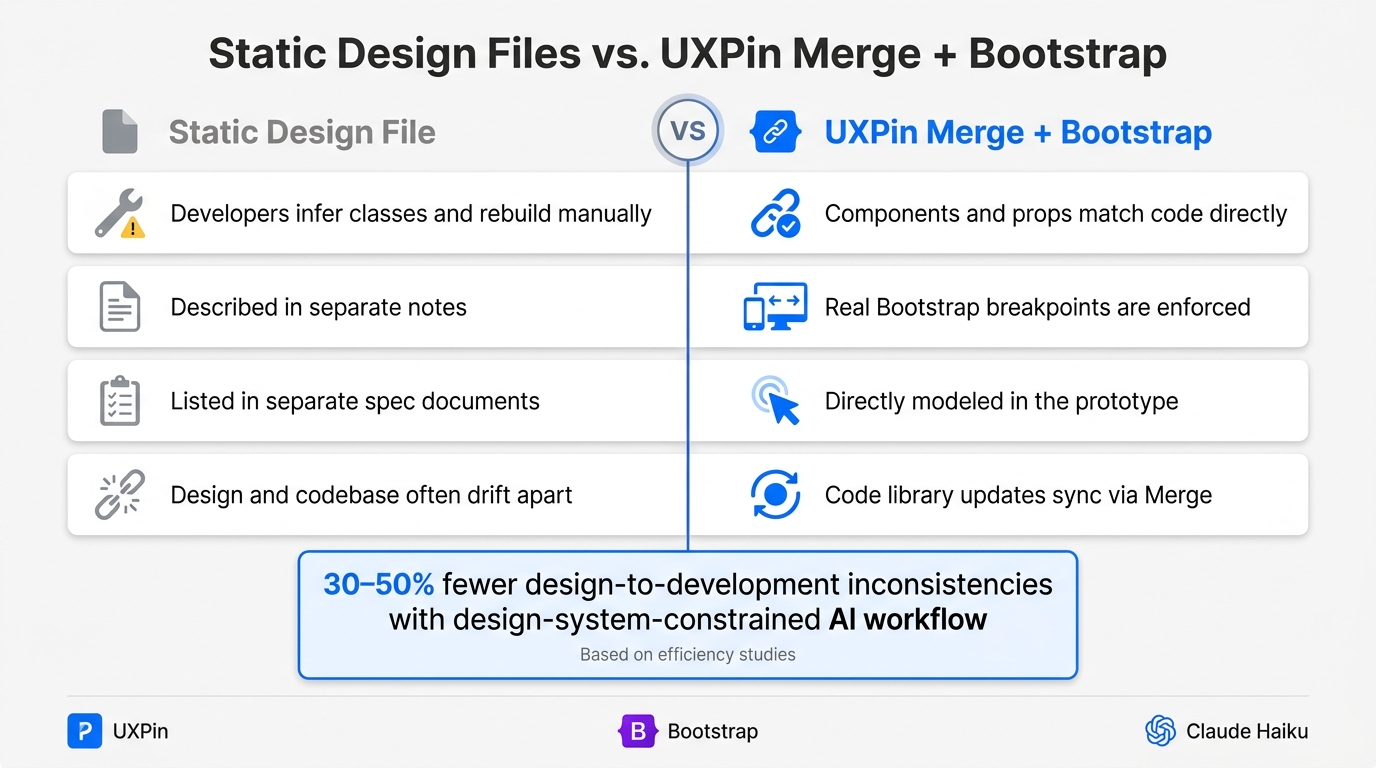
Static Design Files vs. UXPin Merge + Bootstrap: Handoff Comparison
What Code-Backed Prototypes Mean in UXPin Merge
UXPin Merge takes prototyping to the next level by integrating production-ready code directly into the design process. When building prototypes with UXPin Merge using Bootstrap, every component you add – whether it’s a Modal, a Form.Control, or a btn-primary button – uses the same properties and structure as its production counterpart.
This approach transforms the handoff process. Developers can open the prototype and inspect the actual Bootstrap elements, such as row, col-md-6, container, or alert-danger. This eliminates the need for extra documentation like redlines, as responsive breakpoints and other critical details are already embedded in the design.
Working with Developers on Handoff
The best handoffs happen when prototypes act as living specs instead of static images. UXPin’s inspect mode allows developers to see which Bootstrap components are used, along with their variants and state configurations (e.g., Button variant="primary" size="lg"). They can also confirm responsive breakpoints directly within the prototype.
To streamline the process, use screen names that align with your app’s code routes. For instance, naming a screen /settings/billing immediately clarifies its function and location within the app. Pair this with a quick walkthrough of the prototype, pointing out component variants, grid layouts, and any custom interactions that differ from standard Bootstrap behavior. This approach reduces the risk of miscommunication and ensures developers can implement the design as intended.
| Handoff Aspect | Static Design File | UXPin Merge + Bootstrap |
|---|---|---|
| Component mapping | Developers infer classes and rebuild manually | Components and props match code directly |
| Responsive behavior | Described in separate notes | Real Bootstrap breakpoints are enforced |
| Interaction states | Listed in separate spec documents | Directly modeled in the prototype |
| Update sync | Design and codebase often drift apart | Code library updates sync via Merge |
Using Claude Haiku 4.5 to Write Handoff Documentation
Even with a detailed, inspectable prototype, written documentation remains essential – especially for edge cases and acceptance criteria that may not be immediately obvious. That’s where Claude Haiku 4.5 comes in. This tool helps formalize handoff documentation, ensuring developers and QA teams have everything they need.
Once your UXPin prototype is finalized, you can describe the key screens and interactions to Claude and prompt it to generate clear, structured documentation. For example, you could use a prompt like:
"You are a senior UX writer documenting an enterprise web app built with Bootstrap 5. Based on this UXPin Merge prototype of the billing settings flow, create: (1) a plain-English description of the flow for stakeholders, (2) bullet-point acceptance criteria for each step using U.S. date formats (MM/DD/YYYY), (3) a list of error messages with wording suitable for corporate users in the United States."
Claude will produce outputs with labeled sections, covering the main user flow, alternative paths, and error handling. For instance, for a payment confirmation screen, it might create acceptance criteria like: "Given a valid U.S. credit card and billing address, when the user clicks ‘Confirm Payment,’ the system charges the card in USD and displays a confirmation message formatted as $X,XXX.XX." You can then directly add this documentation to Jira tickets or your team’s internal wiki, keeping everything aligned with the prototype.
Conclusion: Building UX Faster with Claude Haiku 4.5, Bootstrap, and UXPin Merge
Key Benefits of This Workflow
This workflow offers a clear and repeatable process: using Claude Haiku 4.5 to map out flows and create documentation, while leveraging Forge and Bootstrap components in UXPin Merge to create responsive, code-backed prototypes that double as design specifications.
The standout advantage here is alignment. Designers and developers work from the same component library, cutting down on misunderstandings and last-minute tweaks. For enterprise teams – especially those in industries like financial services or healthcare, where consistency is critical – this shared foundation ensures smoother collaboration and adherence to strict requirements.
Claude Haiku 4.5 plays a supporting role, helping to speed up planning, identify edge cases, and draft documentation. However, every output is guided by your Bootstrap design system and UXPin Merge components, ensuring the AI-generated work stays on-brand and feasible. This balance of speed and precision makes it an ideal choice for teams looking to streamline their workflows.
Next Steps for Enterprise Teams
To put this workflow into action, start with a focused pilot project. Choose a manageable feature, like an onboarding flow or a settings page, and tackle it within a single sprint. Assemble a small team of designers, product managers, and engineers, connect UXPin Merge to your Bootstrap-based component library, and use Claude Haiku 4.5 to outline the user flow and define acceptance criteria.
Make sure to document key design tokens, approved component guidelines, and interaction rules, and incorporate these into your Claude prompts. After the pilot, conduct a retrospective to evaluate three key metrics: cycle time, design-to-development clarifications, and rework compared to your previous process. These insights will pinpoint where the workflow saves time and where adjustments are needed before expanding it across your organization.
For additional support, consider UXPin’s Enterprise plan, which offers custom library integration, dedicated onboarding, and advanced AI controls to further enhance the efficiency of your design-to-development pipeline.
FAQs
Do I need an Anthropic account or API key to use Claude Haiku 4.5 in UXPin?
No, you don’t need an Anthropic account or API key to access Claude Haiku 4.5 in UXPin. The AI assistant, Forge, seamlessly integrates the model into UXPin, allowing you to work on component-driven designs without the need for a separate AI subscription. All that’s required is a UXPin account with Merge enabled to unlock these features.
How do I connect my custom Bootstrap component library to UXPin Merge with NPM?
To link a custom Bootstrap library to UXPin Merge using npm, head to the Libraries section in your UXPin dashboard. Click Add Library and select Import React Components with npm integration. Next, install the react-bootstrap and bootstrap packages. In the Merge Component Manager, specify the package names and include the full path to the Bootstrap CSS file (e.g., bootstrap/dist/css/bootstrap.min.css). Once done, publish your changes and refresh to see the updates.
How can I prevent AI-generated designs from breaking my design system rules?
To make sure AI-generated designs align with your design system, integrate Merge AI with your connected component library and production code. Be specific with your prompts – include details like hex codes, spacing requirements, and interaction states. Alternatively, you can upload high-fidelity mockups for reference.
Provide clear instructions for the AI to validate its outputs against your design standards. Once the designs are generated, review the components directly on your canvas. Refine them as needed using the AI Helper and sync everything via Git to keep your design system consistent and up-to-date.