Want to create a landing page fast without coding? Combine GPT-5.2, Bootstrap, and UXPin Merge to simplify the process. Here’s how each tool helps:
- GPT-5.2: Writes headlines, benefit statements, and CTAs tailored to your audience.
- Bootstrap: Provides a responsive grid and ready-to-use components like buttons and cards.
- UXPin Merge: Lets you design with production-ready Bootstrap components, eliminating back-and-forth between designers and developers.
This guide walks you through setting up tools, generating content, and building layouts – all while ensuring your page is responsive, following responsive web design best practices, aligned with your brand, and ready for production.
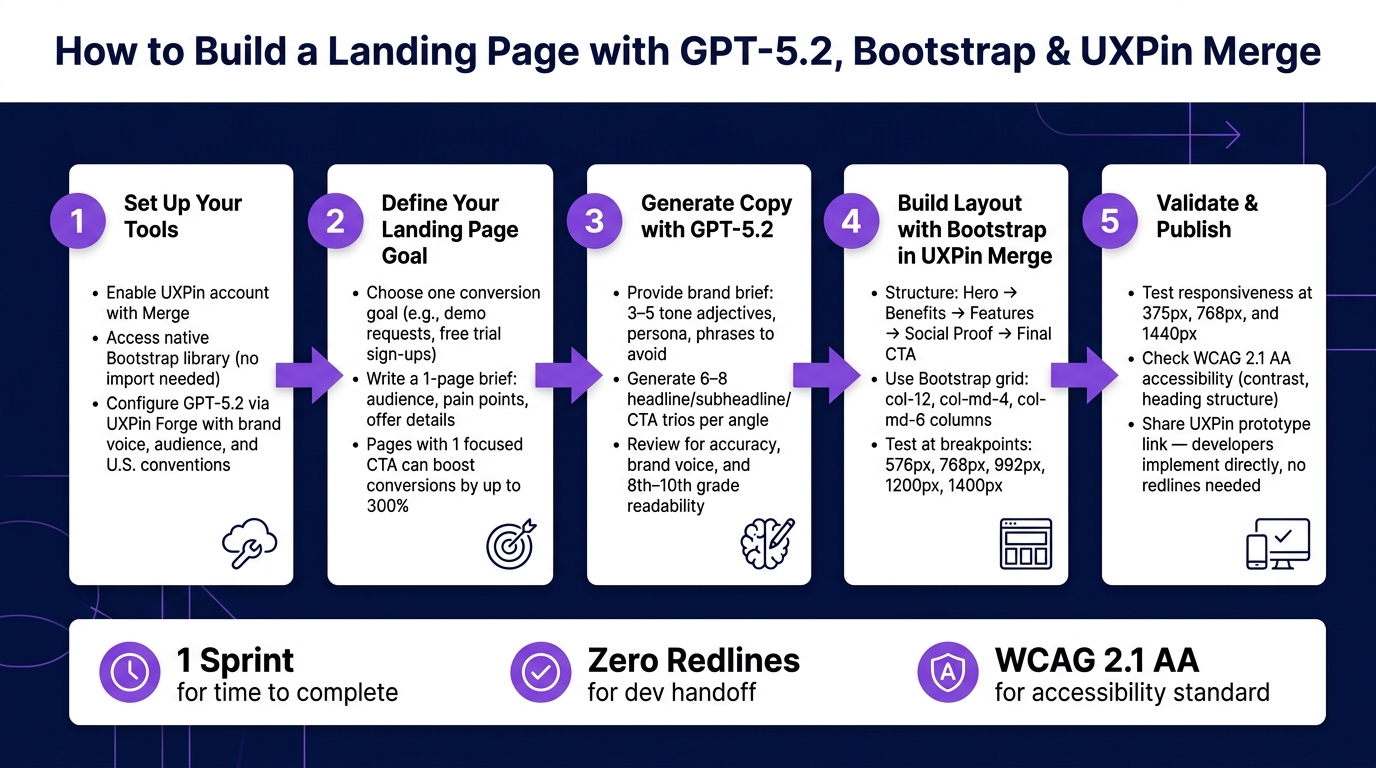
How to Build a Landing Page with GPT-5.2, Bootstrap & UXPin Merge
Setup and Prerequisites
Before diving in, make sure you have three things ready: the right accounts and permissions, Bootstrap components prepped in UXPin Merge, and a clear understanding of what your landing page needs to achieve.
First, you’ll need a UXPin account with Merge enabled. The good news? Bootstrap is already built into UXPin as a library – no importing, no extra costs, no setup hassles. If your team uses a custom Bootstrap-based component library, a developer will need to connect it via Git (using services like GitHub, GitLab, or Bitbucket) through UXPin’s Merge settings. This step is typically handled by a design systems lead or a front-end engineer. Designers, on the other hand, just need editor access to the relevant UXPin project and Merge library.
Preparing Bootstrap Components in UXPin Merge
Thanks to UXPin’s native Bootstrap integration, the library is instantly accessible directly within the design canvas. If your team uses a custom internal library built on Bootstrap, you’ll need to wrap Bootstrap components as React components – think Container, Row, Col, Card, Button – and expose clear props. These props let designers tweak variants, sizes, and alignment without needing to write any code.
To save even more time, consider creating composite layout components on top of the foundational Bootstrap elements. For example, build reusable sections like a hero banner, a feature grid, or a testimonial strip, and make them available as Merge components. This way, designers can focus on refining layouts instead of starting from scratch. Don’t forget to integrate design tokens for brand-specific colors, typography, and spacing, ensuring the final design aligns with your branding rather than default Bootstrap styles.
Configuring GPT-5.2 Inside UXPin Forge
UXPin Forge, the platform’s built-in AI assistant, works seamlessly within the design canvas. There’s no need for a separate ChatGPT account or any external AI tools. Forge analyzes your selected components, page context, and project metadata to suggest copy and layouts tailored to your design system.
To get the most relevant output, set up project-level instructions in Forge before generating anything. This includes defining your brand voice (tone, preferred terminology, and phrases to avoid), target audience, and product positioning. For U.S.-focused landing pages, specify U.S. conventions like spelling (e.g., "customization"), currency formats (e.g., $4,999.00), and date formats (e.g., October 21, 2026). Additionally, setting a target reading level – 8th to 10th grade tends to work well for marketing pages – ensures the copy remains clear and approachable.
Defining Your Landing Page Goals Before You Start
Start with one clear conversion goal: Are you aiming for free trial sign-ups? Demo requests? Content downloads? Every decision about copy and layout should revolve around this single goal. Marketing research shows that pages with one focused call to action can boost conversion rates by up to 300% compared to pages with multiple CTAs.
Create a short brief – no longer than one page – that outlines your goal. Include details like your target audience (e.g., "enterprise product managers at U.S.-based SaaS companies"), their key pain points, and the specifics of your offer (e.g., "14-day free trial, no credit card required"). Use this brief to guide Forge prompts, ensuring the AI generates copy that resonates with your audience rather than sounding generic.
Once these prerequisites are in place, you’re ready to move on to generating AI-driven copy and structuring your page layout efficiently.
sbb-itb-f6354c6
Generating Landing Page Copy with GPT-5.2
To get the most out of GPT-5.2 for landing page copy, start with a clear and detailed brief. This step ensures the AI understands your goals and brand identity.
Your brand brief should include:
- 3–5 tone adjectives that define your voice (e.g., "confident, practical, direct").
- 2–3 examples of existing copy that match your brand style.
- A description of your primary target persona (e.g., "VP of Product at a U.S.-based SaaS company, 500+ employees").
- Any specific words or phrases to avoid.
Place this brief at the start of every prompt session to keep the AI aligned with your brand.
Writing Headlines, Subheadlines, and CTAs with GPT-5.2
Crafting effective headlines starts with a focused prompt. Be explicit about your goals, tone, and format. Here’s an example:
Example prompt: "Act as a senior SaaS copywriter. Using the brand brief below, generate 8 headline, subheadline, and CTA trios for a landing page promoting UXPin Merge for U.S. enterprise product teams. Goal: boost demo requests. Use American English, benefit-first tone, no jargon, with word limits: headlines ≤10 words, subheadlines ≤25 words, CTAs ≤3 words. Output as a numbered list. Brand brief: [paste brief]."
By requesting trios – headline, subheadline, and CTA – you ensure each element works together seamlessly. Ask for 6–8 variations grouped by angle, such as:
- Outcome-focused: "Ship landing pages 3x faster."
- Pain-focused: "Stop losing time in design-dev handoffs."
- Credibility-focused: "Trusted by 50+ enterprise product teams."
Research from Nielsen Norman Group shows users decide whether to stay on a webpage within 10–20 seconds. That makes the above-the-fold copy critical, so generating multiple options is worth the effort.
Generating Benefit Statements and Feature Descriptions
For features and benefits, use a structured features → benefits → proof approach. Start by listing product features, then ask GPT-5.2 to:
- Turn each feature into a benefit statement (focus on outcomes, max 18 words).
- Write a 1–2 sentence feature description that’s easy for product leaders to understand.
Provide examples of your preferred tone and format, and ask GPT-5.2 to match them without copying the exact wording. Specify the output format clearly, like this:
[Feature name] – Benefit (max 18 words) – Feature description (1–2 sentences)
Including character limits for each section (e.g., "card titles max 40 characters, card body max 160 characters") ensures the text fits perfectly into your Bootstrap components, like cards or feature grids in UXPin Merge.
Reviewing and Refining AI-Generated Copy
AI-generated copy always needs a thorough review. Focus on three key areas:
- Factual accuracy: Remove any unverified statistics or claims added by GPT-5.2.
- Brand voice: Ensure the tone matches your company’s style and persona.
- Clarity: Make sure a busy VP of Product can quickly scan and understand the content.
To refine further, paste the draft back into GPT-5.2 and ask it to identify vague claims, unnecessary jargon, or weak CTAs. This self-review process often highlights issues faster than manual editing. Finally, run the copy through readability tools like Hemingway Editor or Grammarly, aiming for an 8th–10th grade reading level. This range works well for U.S. enterprise marketing pages.
Once polished, you’re ready to integrate the copy into your Bootstrap layout.
Building the Landing Page Layout with Bootstrap
Once your GPT-5.2-generated copy is ready, the next step is to create a responsive, structured layout. Bootstrap simplifies this process with its grid system and pre-built components – no need to craft custom layout logic from scratch.
Structuring the Key Sections of Your Landing Page
Break your landing page into clear, purpose-driven sections. For a B2B page focused on demo requests, a Hero → Benefits → Features → Social Proof → Final CTA flow works well. This layout reflects how enterprise buyers evaluate products: they want to know what it does, why it matters, and whether others trust it before taking action.
Here’s how Bootstrap can bring each section to life:
- Hero Section: Use a
.containerwith a.rowdivided into twocol-12 col-md-6columns. Place the copy on the left and a visual element on the right. On mobile, these stack vertically, while on larger screens, they sit side by side. - Benefits Section: Arrange three benefit tiles using
col-12 col-md-4columns inside a single.row. This creates a single-column view for mobile and a three-column layout for larger screens. - Features Section: Alternate text and image blocks using
col-md-6pairs, ensuring balanced visual weight for each feature. - Social Proof Section: Use a logo grid with
col-6 col-md-3columns. Display two logos per row on mobile and four per row on desktop for a clean, professional look. - Final CTA Section: Implement a full-width band using
.container-fluidwith a nested.containerfor readability on larger screens.
By treating each section as a reusable component, you ensure consistency and simplify future updates. These layouts can be imported directly into UXPin Merge, where they function as configurable patterns. Swap out text or images without disrupting the structure, keeping the design process efficient and seamless.
Using Bootstrap’s Grid, Cards, and Buttons
Bootstrap’s card component is perfect for organizing benefits, features, and testimonials. Here’s how to use it effectively:
- Benefit Cards: Place
.card.border-0inside acol-12 col-md-4column. Add an icon at the top, a.card-titlefor the benefit name, and a.card-textfor a brief description. Removing the border gives it a clean, professional look. - Testimonials: Use the same card structure but include the user’s name and role beneath the quote text for added credibility.
For buttons, stick to Bootstrap’s built-in styles and maintain consistency throughout the page. Here’s a quick guide:
| Variant | Usage |
|---|---|
.btn-primary |
Main CTAs, such as in the hero or the final CTA band |
.btn-secondary |
Secondary actions like "Watch a walkthrough" |
.btn-outline-primary |
Alternative CTAs with less emphasis |
.btn-link |
Links for footer items like "Terms of Service" |
To maintain consistent spacing, rely on Bootstrap’s utilities. Apply .py-5 to section wrappers for balanced vertical spacing and .mb-4 between content blocks. For mobile, combine .text-center with .text-md-start to center text on smaller screens while keeping it left-aligned on desktops. This approach ensures a polished, professional feel, ideal for a B2B audience.
Finally, test your layout across all standard Bootstrap breakpoints: 576px, 768px, 992px, 1,200px, and 1,400px. This step helps you identify and resolve any stacking or overflow issues before moving the design to UXPin Merge.
Bringing Bootstrap Components into UXPin Merge
Once you’ve built your responsive layout, the next step is importing your Bootstrap components into UXPin Merge. Doing this creates a single source of truth for both designers and developers, ensuring your prototypes use the same production code.
Syncing Bootstrap with UXPin Merge
UXPin Merge offers a native Bootstrap integration, allowing you to start designing with actual Bootstrap components right away – no need to manually import or recreate them.
If you’re working with a custom Bootstrap library, here’s how to connect it to UXPin Merge using a Git repository:
- Prepare your repository: Ensure your repo includes properly exported components like
HeroSection,CTASection, andTestimonialCard. - Connect to UXPin: In the Merge settings, choose "Git repository" as the source. Authenticate with your Git provider and point UXPin to the correct branch, such as
mainor a dedicateddesign-systembranch. - Set up the build: Configure your install and build commands (e.g.,
npm install && npm run build) so UXPin can compile the project and display the components on the canvas. - Test on the canvas: Drag and drop components like
Button,Card, orNavbaronto your prototype and confirm they render correctly with your custom Bootstrap theme.
If your team uses Storybook to document Bootstrap components, UXPin Merge can also integrate with it. This option often requires less setup since Merge pulls directly from Storybook’s existing controls and stories, making props editable right within UXPin.
With your components in place, the focus shifts to ensuring design and development stay perfectly aligned.
Keeping Components Consistent Between Design and Dev
Once your components are synced, consistency becomes the priority. Designers work directly with the exact same components developers use in production – eliminating the need for separate UI kits or static mockups that can drift from the codebase.
For example, when a designer modifies a Button component in UXPin – changing its variant from "primary" to "outline-primary" or its size from "md" to "lg" – those changes directly correspond to Bootstrap props. If a particular variant or prop isn’t defined in the code, it simply won’t appear as an option in UXPin. This built-in limitation helps avoid design inconsistencies before they even reach developers.
To keep everything synchronized as your Bootstrap library evolves, set up automatic syncs tied to Git pushes. For instance, if a developer adds a new backgroundVariant prop to the HeroSection component, that update will automatically appear in UXPin. Be sure to notify design teams about new additions so they can take full advantage of updated options. This streamlined workflow ensures design and development stay in lockstep, cutting down on manual revisions and keeping projects moving efficiently.
Refining and Validating Your Landing Page Prototype
With your Bootstrap components integrated in UXPin Merge and GPT-5.2-generated copy in place, the final step is ensuring everything functions seamlessly before presenting it to stakeholders or moving it into production.
Testing Responsiveness Across Devices
Start by confirming that your GPT-5.2 headlines render properly across different devices. For instance, ensure the hero headline doesn’t awkwardly wrap on a 375px mobile screen and that the CTA button remains visible above the fold. Test at three key screen widths: mobile (375px), tablet (768px), and desktop (1440px). Pay close attention to how Bootstrap’s grid system adjusts at these breakpoints. A two-column layout that looks clean on desktop could collapse into a confusing single-column setup on mobile if the content order isn’t carefully planned. Once responsiveness is verified, shift your attention to how well the copy and UI elements align with current landing page design trends.
Checking That Copy and UI Work Together
After confirming responsiveness, review the page to ensure the content and design flow smoothly. Go through the page in order, looking for areas where the layout might clash with the messaging. For example, avoid placing testimonials far from the claims they support or using a CTA like "Get Started" before explaining the product clearly.
Keep supporting evidence close to its related claim. If your GPT-5.2 copy states, "Used by 10,000+ product teams", make sure the social proof, such as logos or testimonials, appears immediately nearby – not buried several sections later.
Additionally, run a quick readability check. Watch for overly generic phrasing or repetitive patterns that are common in AI-generated content, like "Whether you’re a designer or a developer…" Simplify these areas to make the language more engaging and human.
Running a Final Review Before Publishing
Once you’ve ensured responsiveness and aligned the copy with the design, conduct a final, detailed review. Use this checklist to guide your final pass:
| Review Dimension | What to Check | Target |
|---|---|---|
| Readability | Sentence simplicity, avoid jargon | 5th–7th grade level |
| Responsiveness | Proper wrapping, CTA visibility | Above the fold on mobile |
| Trust | Proof near claims | 1:1 claim-to-proof ratio |
| Forms | Limit required fields | 5 fields or fewer |
| Accessibility | Contrast, heading structure | WCAG 2.1 AA compliant |
For accessibility, use tools like axe-core to identify issues with color contrast or heading hierarchy. This is especially critical if any Bootstrap components have custom color overrides. After fixing these issues, recheck the entire page to ensure no changes – like adding trust signals – accidentally push the CTA below the fold on smaller screens.
"A landing page isn’t there to impress anyone. It’s there to help the right visitor say yes with less effort." – Mathias Michel, Maker of RewriteBar
Once the page meets all these criteria, share the UXPin prototype link with stakeholders for final approval. Since the prototype uses real Bootstrap components synced via Merge, developers can jump straight into implementation without needing additional redlines or spec documents.
Conclusion: Faster Landing Pages with GPT-5.2, Bootstrap, and UXPin Merge
Building a landing page has often meant juggling multiple tools and enduring endless revisions. But with this integrated workflow, the process becomes straightforward: set clear goals, craft and refine content using GPT-5.2, design layouts with Bootstrap components in UXPin Merge, and validate everything before launch. This approach simplifies the workflow, making delivery faster and more accurate.
GPT-5.2 generates precise, brand-aligned copy for your Bootstrap-based layout, while UXPin Merge ensures designers and developers work with the exact same components. This eliminates the usual friction between design and development.
For U.S. enterprise product teams, the benefits are undeniable: consistent results at scale. Every landing page is built from a shared library of Bootstrap components managed through Merge. Design tokens, button styles, and grid systems stay consistent across pages, no matter the audience, without requiring manual adjustments.
The time savings are substantial. Tasks that once took days can now be completed in a single sprint. From generating multiple headline and CTA variations to creating responsive layouts for all devices, and delivering prototypes developers can directly implement, the process dramatically shortens timelines.
With this workflow, designers focus on strategic decisions, writers polish AI-generated content, and developers work with production-ready components – all within a unified system. It’s a streamlined process that saves time and enhances efficiency, showcasing the power of the UXPin workflow.
FAQs
What’s the fastest way to turn a landing page brief into on-brand copy with GPT-5.2?
To craft effective, on-brand copy using GPT-5.2, start with a solid foundation. Provide a clear product description, a detailed audience profile, and a specific conversion goal. These elements set the stage for accurate and targeted content.
Next, request a section-based outline. Include fields like:
- Objectives: What do you want the copy to achieve?
- Hero Headlines: Attention-grabbing headlines that align with your brand.
- CTAs (Calls to Action): Direct prompts that guide users toward your goal.
Use prompts to fine-tune the tone, set character limits, and ensure the output reflects U.S.-specific formatting. For example, you can specify preferences for spelling, date formats, or even measurement units.
Finally, ask GPT-5.2 to review for localization. This ensures everything – from spelling to formatting – meets U.S. standards, making the copy polished and ready for your audience.
How do I use Bootstrap components in UXPin Merge without rebuilding them manually?
To work with Bootstrap components in UXPin Merge without starting from scratch, you can use the built-in Bootstrap library. Just open the Design Systems panel, pick the Bootstrap UI Kit, and drag the components you need onto your canvas.
For custom libraries, you can integrate them through the Merge Component Manager using either npm or Git. This setup connects React props directly to the Properties Panel, letting you tweak components as needed while keeping the underlying code intact. This ensures a smooth handoff to developers.
What should I validate before publishing to ensure responsiveness and accessibility?
Before hitting publish, make sure your code is ready for production by running it through static analysis tools, linters, and security scanners. Double-check responsive breakpoints using Bootstrap’s grid system, and test your layouts on a variety of devices to ensure they look great everywhere.
For accessibility, review ARIA attributes, verify color contrast, and test interactive states like hover effects to ensure everyone can navigate your site easily. Lastly, preview your content to confirm proper localization – this includes U.S. spelling, date formats, and units – to deliver a polished and user-friendly experience.