Introducing Variables and Conditional Interactions for More Interactive Prototyping

Your prototypes have officially gained superpowers. Now you can store or pass information using variables and add conditional interactions! Prototyping just got a whole lot more interactive. Get much closer to real, coded apps with these new features. They’ll be especially handy for user testing.

Fall 2018 has been a crazy time at UXPin for all the right reasons. We have many cool features on their way—stay tuned for Expressions, States and Data. But we digress… today, we’re excited to show you not one, but two new features closely tied together!

What are they?

Variables

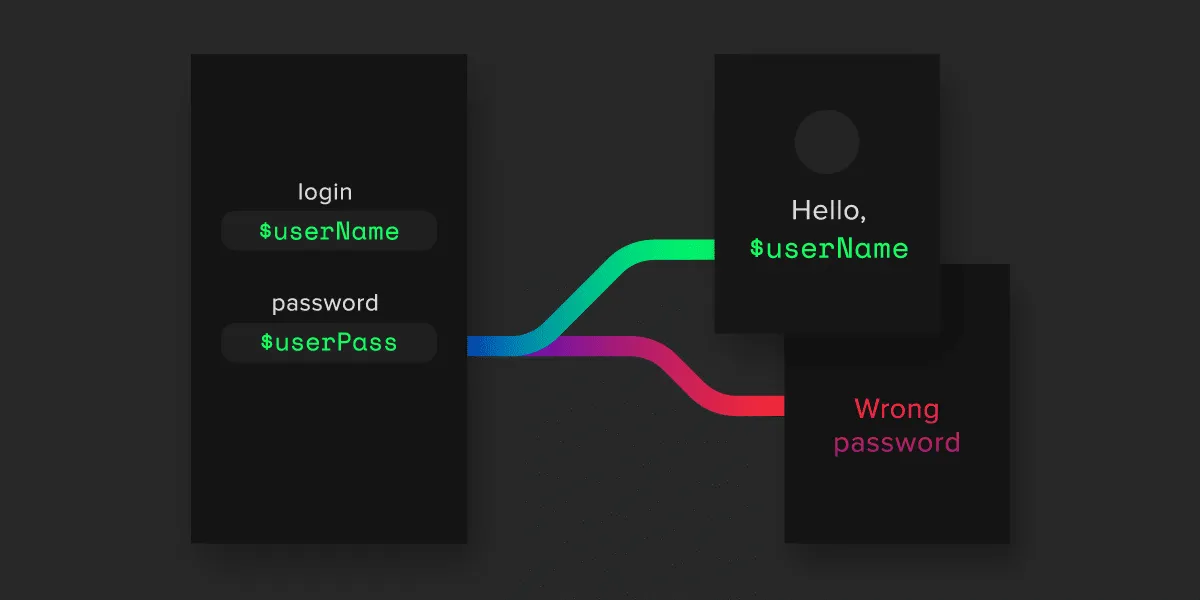
Variables allow different elements to “communicate” with each other even if spread across pages. This data persists from page to page as you click through the prototype. Meaning you can set a variable’s value on one page and then take action based on that value on a completely different page.

With variables, you’ll be able to build the relationships between elements in a prototype. To do that, you can simply set the same variable for the elements you want to pair together. For example, to collect user data in an input and then use “username” in a message in a different part of the prototype.

[videojs_video url=”https://www.uxpin.com/studio/wp-content/uploads/2018/08/variables-video.mp4″ autoplay=”true” controls=”false” loop=”true” muted=”true”]


Conditional Interactions

Conditional interactions give your prototypes a layer of logic—this is a very powerful feature that is characteristic to only a handful of prototyping tools. We’re very excited to be added to that list. With conditional interactions, you can set rules that make the interaction happen only if those rules are met.

When to use these features

  • To collect some information, like a name, and pass it to another page to display it as part of a greeting message
  • Easily store user-entered data and then reuse it across elements and pages in your prototype
  • To tailor prototype content and behavior to different scenarios for user testing

Why you want them in your life right now

  • Make prototypes feel like the real deal, operating on data or actions by users (especially when user testing)
  • Your prototypes will be more dynamic and less generic
  • Make it much easier to showcase (to developers, for example) how the solution should work in real life
  • Create more flexible prototypes and save a lot of time on creation, because you don’t have to re-do components to fit different use cases

How can you start using them right away?

  • All this is already live in your account (both web and desktop app) if you use UXPin.
  • Don’t use UXPin yet but want to try your hand at variables and conditional interactions?

Join the world's best designers who use UXPin.

Sign up for a free trial.

Four Ways Of Making Your Wireframing Job Easier!

Is it even possible? Well… YES! We did a lot of listening and thinking lately and now we can proudly present four new features that will make your job easier and faster! So, let’s cut the chit-chat.

Feature One – Context-Sensitive Menu and the Properties Tab

After years of using non-web-based prototyping tools such as Axure, I am accustomed to right-clicking on elements and this is one area that unfortunately the limitations of the medium created some difficulty – right clicks within Chrome, for example, result in the Chrome popup window rather than any context-sensitive menus for JustProto itself.  It wouldn’t be fair to criticism JustProto for this, however, as it’s a limitation that applies to all web-applications but I felt that because the interface is just so, well, slick, I kept forgetting that it was a web-app at all. – John Clark wrote reviewing JustProto.We took his words very seriously and decided to make a change. After all, people are creatures of habit ;) That is why, from now on, right clicking on the workbench or elements will show a brand new context-sensitive menu!

Also, when you click on any of the elements, the properties tab on the right will show up automatically. Small but significant improvement – saves two clicks before changing the element’s properties. :)

Feature Two – Grouping

You build this amazing wireframe, there’s a gallery there with 10 pictures. After you set it up, when everything’s ready, you need to resize the images to fit 4 new ones. And now what? Resize of all elements is long and can set you back. Resize one and then delete the rest and copy/paste? I don’t think so! From now on, the problem is gone. Grouping option just arrived to the scene! :) Select elements you need, group them and then resize and move everything the way you need it and how you like it. You can find the Group/Ungroup Options in the new Context-Sensitive Menu.

Feature Three – Fade To Gray

If you want to keep focused on the functionalities of the project and not on its outlook this is The Feature for you! It sometimes happens with the clients – showing them the wireframe is one endless series of questions like: “Why this button is light orange, it should be big and screaming red, and this blue line should be two pixels to the left…” And all the UX stuff is non-existing. Crashing into User Experience Iceberg happens a lot – see presentation by Trevor Van Gorp. Fade To Gray lets you… well… fade to gray everything that takes the attention away from UX and interactions of the wireframe.

Feature Four – Border Radius and Shadow

We added two new properties to the properties tab – Border Radius and Shadow. From now on, if you need shadow and rounded edges in your wireframe’s elements – no problem! Just select the element, set up shadow and border radius you want and need ET VOILA!

Also, a little tip: thanks to border radius you can now add a new shape to the wireframe – circle. Just play with the properties :)

We hope new features will help you make your work even easier and faster than before :) To try out new the new stuff login to your account or create new one.

How customer feedback helps us improve JustProto

Another e-mail from one of the users about JustProto features:
One quick question when we share a preview link with the client can I hide the left pane which shows the pages other than minimizing it.

Thanks, Rakesh

Well, a week ago we didn’t have that option.  Sharing a prototype preview link generated by our wire framing tool gave only the option to show your project with a sitemap and that sometimes could lead to tons of questions like: WHAT IS THIS PAGE I DIDNT ASK FOR THIS I AM NOT PAYING FOR THIS!!!! ;)

Now the problem is gone – you can share your wireframe link with or without the sitemap!

We love to help you make your wireframing experience better and better all the time. If any of you guys have another great idea on how to improve JustProto for you just drop us a line here!

Thank you Rakesh for the suggestion!


Check the new feature at work!

How customer helps us to improve JustProto

A while ago we got a message from one of the users. Here’s what Mark said:

I really wish that I could set the individual menu cell width for a horizontal menu so that when I am overlaying it on an existing web design that it will line up correctly with the existing menu tabs… is there any possible way to get that functionality in the software? I have been looking for this feature EVERYWHERE and nobody has it.

Well, now no one can say “nobody has it” ;)
We took Mark’s suggestion under consideration and now it’s possible to set individual height and width for the menu element. You can do it manually – just click on the menu and you’ll see highlighted sections that you can set exactly how you need them.
What seemed to be a little improvement ended up being a big programming pain but eventually, we were able to set it up for Mark and all of you!

Kudos for Buka and Dooshek for not abandoning ship mid-project!

You can all try out the improvement here!

We love to get your feedback and we take all suggestions very seriously.
If there’s anything we can improve for you – just drop us a line!

New and improved Text Editor now in JustProto!


As part of a  new JustProto version, we improved the text editor. Next to standard formatting options now you have available a few new ones. What options exactly? Take a look at the picture. Below the image, you’ll find a brief description of each new option.

Paste as plain text – this option helps you when when you want to add a tex full of links – without those links. While using previous  editor you had to remove all links manually and that took some time. Now just select the Paste as plain text option and paste your linked text there – after you confirm all links will be automatically removed. Simpler and faster, right? :)

Paste – sometimes you need to paste the text with links. To do so just click on Paste, copy the text there, confirm et voila!  :)

Find – sometimes it happens that the text you write is very long and you want to find one exact word in it. To find it faster use Find and type your chosen word there. It’ll be highlited in the editor window.

Find and replace – this option lets you to find an exact word and replace it with some other word chosen by you.

Clear formatting – when you highlight formated text and click this option all the formatting will be removed and set do default.

Add / remove link – this option gives you the chance to link a piece of text to another webpage somewhere on the web. Previous text editor didn’t have such an option – you had to add another text block to link it as the whole text was one big link. Now you can choose a certain part of the text and link it. Or unlink it using the Remove link option..

Select special character ­­– gives you all kinds of special characters that you can add to your text: accents, umlauts or fractions.

Login to JustProto and check out new options!

Chat or refining communication once again.

Soon JustProto’s getting new feature – chat:)

Thanks to chat all collaborators will have the chance to talk over the project in JustProto without using any other chatlike solutions. Chat history will be saved in JustProto so users gain access to conversations – even if they go out of town – directly in the web browser. Thanks to Chat option new users and clients will also have the chance to follow older conversations to check what’s going on with the project. Pretty cool, isn’t it? ;)

Prototype your world using JustProto!

Lock it! New feature allowing locking and unlocking elements.

How many times were you annoyed by the fact your perfectly placed elements moved accidentally? Or the cat sat on the keyboard and your work just went to hell? If that made you “go bananas” – here’s the solution: we present new
JustProto element property – Lock/Unlock!

From now on you can block certain elements using the Lock/Unlock option in the top bar over your workbench.

Blocked elements can’t be added to selection or moved. If you press delete or want to cut blocked elements you’ll be asked for confirmation. You can still copy blocked elements – all the properties will remain the same for both elements, except the copy won’t be blocked.

Every blocked element will have a tooltip with the name of the element and a small padlock. You may find it useful, especially while making more complex prototypes.

Try it on your prototypes!

Components – new JustProto feature!

Here’s another great news for JustProto users. Long-awaited feature is now done and ready to be used.

Easily created components are a great tool for everyone who have problem with applying the same, multiple elements on various pages of prototype. They’re piece of cake to use – just click Add like you do it adding pages, and tick the Component option. Now create your Component with elements and when you’re done – drag&drop it on your pages. It’s that simple.

All changes that you apply on Components are automaticly shown on all your pages, so you don’t need to worry about changing properites of similar elements on every single page. That’s gonna significantly speed up the work, especially while making advanced prototypes.

See for yourself how easy is creating, using and changing Components and then try it on your prototype!