Design with Code – UXPin Merge Tutorial

Are you ready to elevate your design workflow to the next level? In this comprehensive tutorial, we’ll delve into the world of UXPin Merge, empowering you to seamlessly integrate your React app components into the UXPin editor for high-fidelity prototypes.

Gone are the days of static designs. With UXPin Merge, you can dynamically link your React components, ensuring that your prototypes are always in sync with the latest developments in your codebase.

Get ready to unlock the full potential of UXPin Merge – let’s dive in!

Create beautiful layouts without designers

Design production-ready prototypes 8.6x faster. No pixels. pure code.

What is UXPin Merge?

UXPin Merge is a technology for designing with coded UI components that are backed with production-ready code. It’s part of UXPin – a code-based design tool for highly realistic and accurate prototyping. With this tech, you can grab all the specs, JSX code, and any other asset and hand them over for developer to make the entire product development workflow 8.6x faster.

UXPin Merge tutorial – How to use this technology?

UXPin Merge technology works like a drag-and-drop UI builder. You take a component out of the design library in UXPin and put it on the canvas. Then, after you’ve done arranging the layout and setting up components props, you can copy a ready React code (or CSS code for Tailwind library) to your development environment or open it in StackBlitz.

You can build anything you like. From simple dashboards that automate your team operations to more complex, e-commerce stores which front-end is decoupled from the back-end. UXPin has a few templates and patterns to get you started.

We highly recommend you watch a video tutorial of how to use UXPin Merge presented by a real-life web developer, Rachel. She did a wonderful job of walking you through all the panels, functionalities, and features of Merge technology, and she also shows you how to do a design handoff with UXPin Merge.

Watch it on Youtube. Here’s the full playlist of UXPin Merge tutorial.

How to integrate your own components, step by step

UXPin Merge supports Storybook components and React components from open-source libraries, such as MUI, Ant design or Bootstrap.

We want to give more details and show you how easy it is to integrate a React-based library into Merge to design with code on a day-to-day basis. All that without learning how to code!

UXPin Merge allows users to import their existing custom React components in a seamless fashion to create interactive prototypes using real code, which is unlike anything else traditional design tools offer.

This eliminates the need for designers to manually maintain a “second” design system within their design tool and instead provides the entire team with a single source of truth. The result? The disconnect between designers and developers is gone when building digital products. 

We want to save you time so we’ve designed this tutorial to integrate Mozilla’s React Todo App example with Merge. After the integration, you’ll be able to use the app’s components to design an interactive Todo list prototype within UXPin!

Remember to start by requesting access to Merge – you can do it here. After the verification process and the setup, you’ll be ready to design with code! Also, don’t worry about integrating with GitHub – we don’t have any requirement of where the codebase should be located, so you can use whatever you want!

The components

The Todo app has three React components:

1. Form – create a todo item.

2. FilterButton – filter todos by their current state.

3. Todo – a todo list item.

These components are in the `src/components` directory and are outlined in the screenshot below:

When this tutorial is completed, a designer will be able to create a prototype with these components. Your real-world custom design system (DS) likely has many more than three components. However, the concepts we’ll illustrate in this tutorial should apply to your DS as well.

Set up UXPin Merge

To begin, fork then clones the following link https://github.com/mdn/todo-react. Then install our UXPin Merge NodeJS package, which includes our CLI.

  1. Navigate into your project folder cd todo-react
  2. Install UXPin Merge and It’s CLI NodeJS bundle with: yarn add @uxpin/merge-cli–dev
  3. Ignore the UXPin Merge build directory with: echo ‘/.uxpin-merge’ >> .gitignore

A custom design system requires two additional config files:

  1. uxpin.webpack.config.js
  2. uxpin.config.js

UXPin typically doesn’t need to use your entire existing Webpack build process. We’ll use a more minimal and default build for UXPin. Create a uxpin.webpack.config.js file and paste the following code into it:

const path = require("path");
const webpack = require("webpack");
 
module.exports = {
    output: {
      path: path.resolve(__dirname, "build"),
      filename: "bundle.js",
      publicPath: "/"
    },
    resolve: {
      modules: [__dirname, "node_modules"],
      extensions: ["*", ".js", ".jsx"]
    },
    devtool: "source-map",
    module: {
      rules: [
        {
          test: /\.(s*)css$/,
          use: [
            {
              loader: 'style-loader'
            },
            {
              loader: 'css-loader',
              options: {
                importLoaders: 2
              }
            },
          ]
        },
        {
          loader: "babel-loader",
          test: /\.js?$/,
          exclude: /node_modules/,
          options: {
            presets: ['@babel/preset-env', '@babel/preset-react'],
          }
        },
      ]
    }
}

For components you want to use in UXPin Merge, you must specify their file directory in the uxpin.config.js file at the top of the directory of the repo. As you can see in the code snippet below, we’ve only added the ‘Form’ component src/components/Form.js  for now and will add the other components later in the tutorial. 

Create a uxpin.config.js and paste the following content into the file:

module.exports = {
  components: {
    categories: [
      {
        name: 'General',
        include: [
          'src/components/Form.js',
        ]
      }
    ],
    webpackConfig: 'uxpin.webpack.config.js',
  },
  name: 'Learn UXPin Merge - React Todo list tutorial'
};


Lastly, Babel-loader will be used by Webpack to create the app bundle. To install babel use the following commands: yarn add babel-loader –dev then yarn install .

CONGRATULATIONS👏 You’re all good to go and have the minimum configuration required to view the Form component.

Experimental Mode

Using the settings provided in `uxpin.webpack.config.js`, Experimental mode bundles your components and opens a browser window. You can lay out components in a similar fashion as the UXPin Editor. After Experimental Mode loads, drag and drop the Form component from the sidebar onto the project canvas:

We have the Form component but it lacks styling. For that, we’ll create a Global Wrapper Component.

Using a Global Wrapper Component to apply CSS styles

Just like your custom design system, this Todo app contains global styles. These are specified in the `src/index.css` file. All of our components need the styles specified in this file. We can load this file via a Global Wrapper Component. This component will wrap around every component we drag onto the UXPin canvas.

Create a wrapper file:

Copy and paste the following into `UXPinWrapper.js`:

import React from "react";
import '../index.css';

export default function UXPinWrapper({ children }) {
  return children;
}

The `import ‘../index.css’;` line ensures our CSS styles are loaded prior to rendering each component.

We need to tell UXPin to use this wrapper file. Add the following to uxpin.config.js:

wrapper: 'src/wrapper/UXPinWrapper.js',

Experimental mode should open a new browser window with a styled Form component:

Adding the FilterButton with a customizable name

Now we’ll work on adding the FilterButton to UXPin Merge. These buttons are displayed below the Form component:

Adding this component will be similar to the Form component. However, I’d also like to give designers the ability to specify the text that is displayed within the button. We’ll do that via the `prop-types` package.

Component propTypes are mapped to the UXPin properties panel when editing a component. The existing FilterButton component doesn’t use prop-types so let’s add this to `FilterButton.js`:

import React from "react";
+ import PropTypes from 'prop-types';

function FilterButton(props) {
  return (
@@ -15,4 +16,9 @@ function FilterButton(props) {
  );
}

+ FilterButton.propTypes = {
+   name: PropTypes.string
+ }

+FilterButton.defaultProps = {
+  name: 'Button Name'
+};

export default FilterButton;

Two of our three components are now working with UXPin Merge. We have one component remaining: the Todo component.

Adding the Todo component with a wrapper

We’re moving on to our final component: the Todo. These are displayed within the list of todo items in the UI:

When adding the FilterButton, we edited the FilterButton.js file to add propTypes. What if you want to isolate your Merge-specific changes and don’t want to modify the source code of your components? We can create a wrapper that is specific to the Todo component for this. It’s similar in concept to the Global wrapper component we used to apply CSS styles but will be specific to the Todo component.

Type the following:

mkdir -p src/components/merge/todo 

touch src/components/merge/todo/Todo.js

Copy and paste the following code into Todo.js. 

import React from 'react';
import PropTypes from 'prop-types';

// Import the original component
import TodoM from '../../Todo';

function Todo(props) {
  return <TodoM {...props}/>
}

Todo.propTypes = {
  /**
   * If `true`, the todo will be marked as completed.
   */
  completed: PropTypes.bool,

  /**
   * The name of the todo.
   */
   name: PropTypes.string,

  toggleTaskCompleted: PropTypes.func,
}

Todo.defaultProps = {
  name: 'Do Laundry'
};

export default Todo;

We’re importing the original Todo component as `TodoM` and returning this component in our newly defined `Todo` function. We specify propTypes just like we did with the FilterButton component on our newly defined `Todo` wrapper function.

Add ‘src/components/merge/todo/Todo.js’ to uxpin.config.js and restart using ./node_modules/@uxpin/merge-cli/bin/uxpin-merge –disable-tunneling. After Experimental launches a new window, click-and-drag the Todo component onto the canvas:

You’ll see the Todo component along with the default “Do Laundry” todo name. This default name is only applied when using Merge.

Pushing to UXPin

Until you push your design system to UXPin the components are only visible to you. To let your design team use these components we need to push the component bundle to UXPin. Creating and pushing a Merge design library requires two steps:

1. Create the library within the UXPin UI

1. Go to your UXPin account

2. Enter the UXPin Editor

3. Create a new library

4. Select the option import React components

5. Copy the Auth token (don’t share it with anyone and do not place it in any files checked into git repository. This token provides direct access to the library on your account.) The process looks like this:
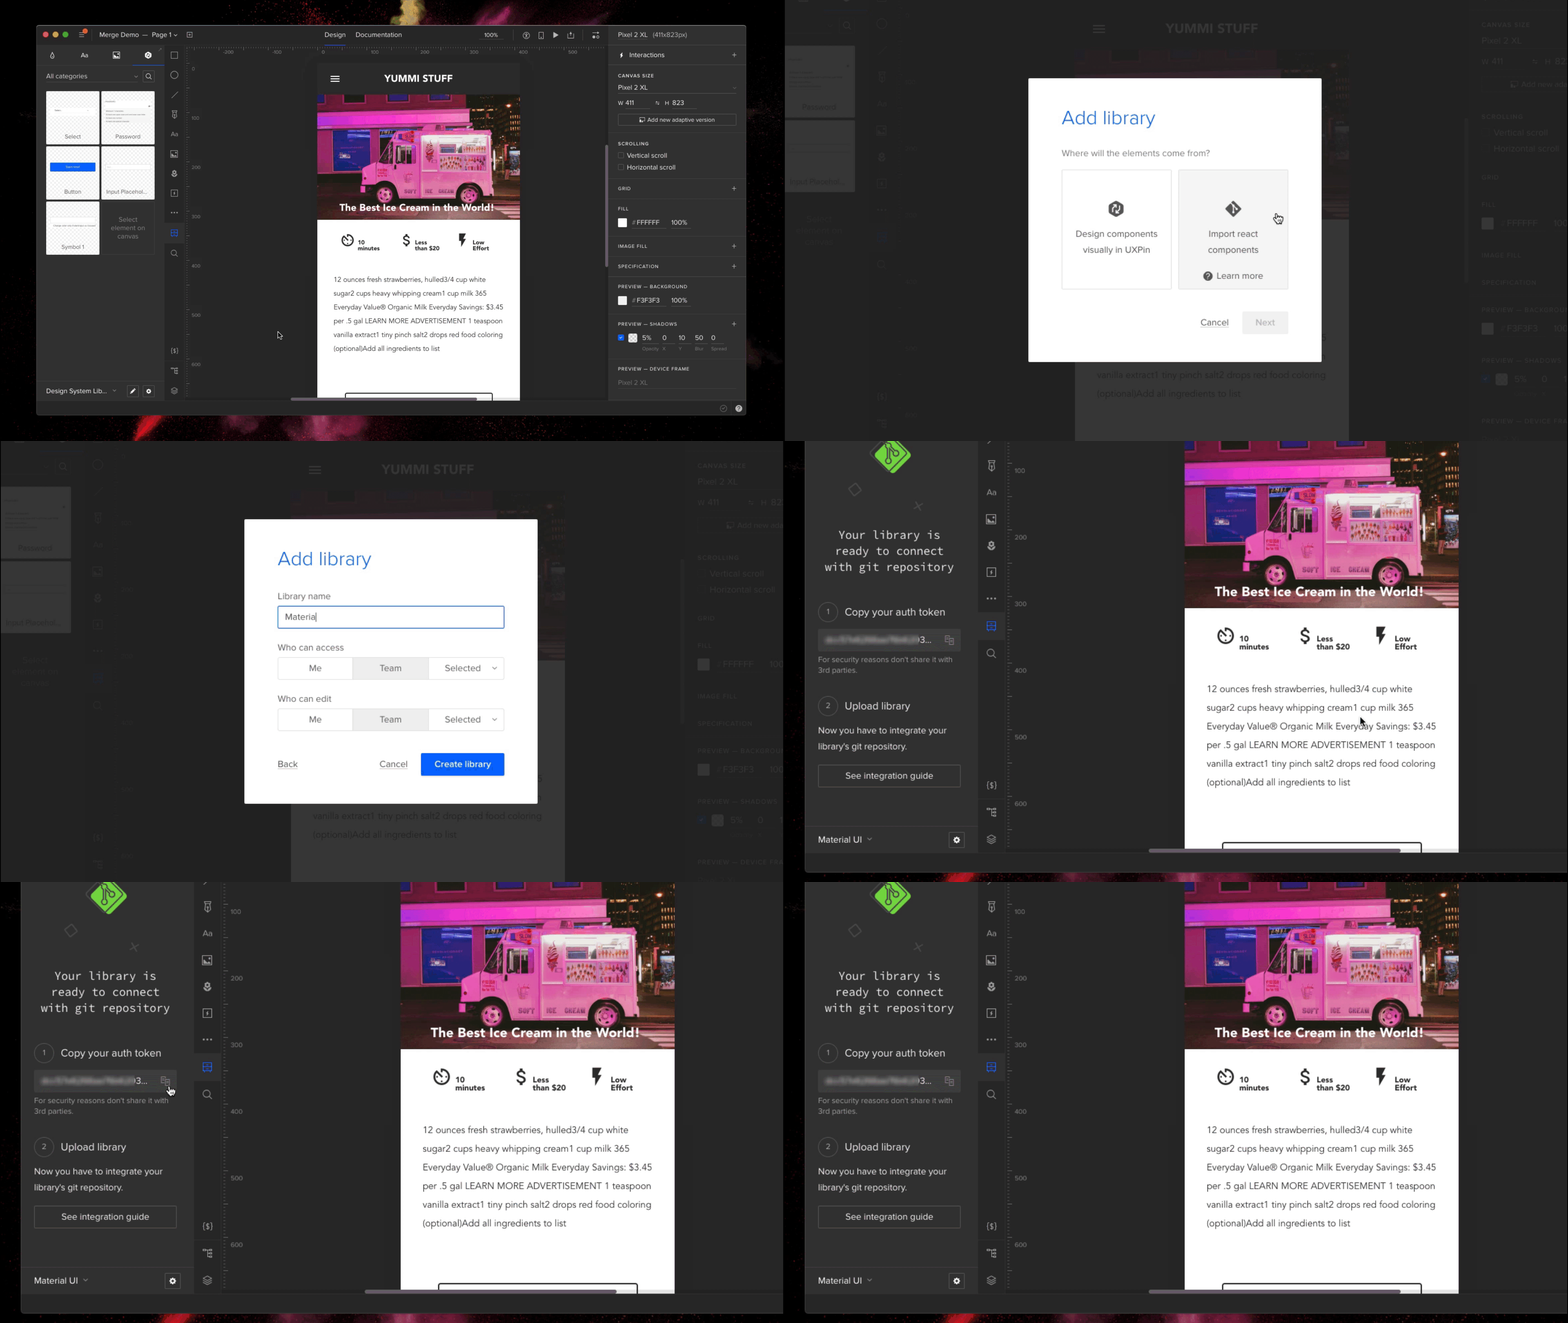
2. Push the library via the uxpin-merge CLI

Using the token created from the previous stop, run the following from within the project repo:

./node_modules/@uxpin/merge-cli/bin/uxpin-merge push –token YOUR TOKEN 

Your design team can now access the Merge library.

Using the Merge library within UXPin

Now that the Merge design library has been pushed its time to test it out within the UXPin editor:

  • Reload the UXPin Editor in your browser.
  • Select the “Learn UXPin Merge” design system in the bottom left corner of the editor.
  • Click and drag the components from the sidebar to the canvas.

You should have a solid looking prototype:

How does a designer hand off a prototype back to a developer?

Previewing and Exporting

Now that we’ve built a quick prototype in UXPin we’re ready to export it back to our app. We can preview the output and then use Spec mode to copy and paste the JSX code for our components.

Click the play button in the upper right corner of the editor. Once the preview loads click the “Spec” link at the top. You can now click on the components and view the JSX code to generate them in the right panel:

It’s great to push an initial version of our design system. However, you’ll likely need to push out quite a few updates over time.

Pushing an Update

The FilterButton has a “pressed” state to indicate the currently active filter. Looking at the live React app, here’s the difference between the pressed and not-pressed state:

Let’s add support for this state. Make the following change to `src/components/FilterButton.js`:

FilterButton.propTypes = {
-   name: PropTypes.string
+   name: PropTypes.string,
+   isPressed: PropTypes.bool
}

Commit the change to git and push to UXPin:

Merge components are automatically synced to the most recently pushed code. To show the latest, reload the tab showing the UXPin editor. Select a FilterButton. In the right panel of the editor you should see a new “isPressed” property.

Select it to activate this state:

Follow this same flow (git commit + uxpin-push) when you make future changes. Prototypes will automatically use the latest pushed version of components.

Speed up building your product by 8.6x

You’ve taken a React app and pushed its components to UXPin Merge. You’ve also learned how to push updates when you modify components or add new ones. Now your design team can use these components to create high-fidelity prototypes within the UXPin editor.

You can browse the source code for this project on GitHub. To learn more advanced Merge techniques see our Merge docs or reach out to us at hello@uxpin.com.

Don’t have UXPin Merge yet? First, remember to go through the process of requesting access to make the most of designing with code! Try UXPin Merge for free.
Adopting Design Systems in Enterprise with Johnson & Johnson

Adopting Design Systems in Enterprise with Johnson Johnson

When any new leader walks into an enterprise with more than a century of history—as Johnson & Johnson does—they know they must adapt to some of the existing processes. Improvements in technology, however, have made it necessary for all corporate designers to turn processes into even more efficient methods. If you start a new job tomorrow, you might find that you need to turn old style guides into design systems. Ultimately, these new systems make life easier for you, your design team, and other employees.

Ben Shectman, a UX design expert with decades of management experience, found himself in that situation. He became the Experience Design Expert Service Leader at Johnson & Johnson in 2019. The company had two style guides that UX designers used for language and graphics. Unfortunately, the style guides were only available as PDF files. It was clear to Shectman that he needed to adopt design systems and move away from the PDF style guides.

Table of Contents

Design systems offer a single source of truth

PDF and print style guides present a considerable problem: you can never know whether you have updated all of them to meet the enterprise’s current standards. You can hold as many meetings as humanly possible, but an outdated style guide will manage to sit in someone’s desk drawer, just waiting to make your life more difficult a year or two from now.

single source of truth design system JnJ

Design systems offer a single source of truth that exists in a digital format you control. Some companies get by fine using established design systems like Material Design, Carbon, or Fluent Design System. A robust, multinational corporation like Johnson & Johnson, however, needs a unique design system built from the ground up.

You maintain complete control over your design system, build it in a design tool such as UXPin, have the components coded and stored in a Git repository. When you make an update, everyone who accesses it will only experience the new version. You never have to worry about outdated copies because you control the source for the company’s digital products.

Design systems based on atomic design processes improve workflows

Shectman decided to build the J&J interactive design system with atomic design. Atomic design serves J&J well because it lets designers break down features and designs into their most basic components (called “atoms”). Using UXPin, anyone in the company can potentially access the approved components and create new tools that comply with J&J’s guide.

design system based on atomic design process

In reality, Johnson & Johnson’s design team makes its internal products. The team even created a process that makes it easier for Shectman to approve new components and add them to the design system.

Regardless of who actually builds a prototype, the atomic design improves workflows by providing all of the approved components. From there, you just choose the components you need and adjust them to meet the project’s goal.

Create design systems for developers and designers

Johnson & Johnson’s design team meets with developers regularly to gain insight into their approach to building products. Getting developers involved makes it easier for designers to avoid concepts that don’t function well when put into code.

Building an interactive design system is a great start to improve design consistency. You can go one step further and try out a new technology called Merge. It makes it even easier for enterprise users to bring designers and developers together. The all-in-one designing and prototyping app powered by code, allows you to bring components from developers’ libraries (from Git repository or Storybook) and use them in your designs. These components keep all the interactivity and are still production-ready, which saves a lot of handoff troubles. It speeds up building digital products; both the design and development process.

design system for designers and developers

Everyone also benefits from Merge’s ability to make prototypes that function like finalized products. Whatever you design with Merge technology, will work exactly the same after the development team completes the project. 

Try UXPin Merge

Shectman and members of his design team offer a deeper look into their process in this webinar. It includes a demonstration of a J&J designer using their interactive design system to transform an outdated tool into a new version with better functionality and aesthetic appeal. Go beyond a design system and bring UI code components to the UXPin editor. Make it easier for designers and developers to create prototypes from approved components in a design system. Request access to UXPin Merge so you can speed up your product development process and make it smoother.

Make Theme Switching Easy with UXPin Merge

Theme switching is an essential part of designing prototypes. Whether that be changing between a simple light and dark mode or testing several client’s themes on a single prototype, it is something that all designers need to consider and have a well-thought-out process for.

Furthermore, this need has become increasingly important with the adoption of open-source Design Systems, such as Material-UI, which have become a valid choice for projects.

So, theme switching functionality – such an integral part of the design process, enables to dynamically test themes on-the-fly without using multiple design systems or layouts. It is an amazingly efficient and powerful feature to have at your disposal.

With the importance of this feature, we want to show how this can be done in UXPin, thanks to the power of Merge and designing with code.

Want to use the power of Merge yourself? – Get access to UXPin Merge.

Reach a new level of prototyping

Design with interactive components coming from your team’s design system.

Why do we need a Theme Switcher?

You don’t have to be a white labeling web design agency or a large-scale company with several brands to make use of a theme switcher, you could be a sole developer wanting to quickly test a new color scheme. But, switching themes is sometimes no easy task.

You don’t want to be making multiple layouts of a single prototype just with different themes – that’s an incredibly tedious process just so you can test something. 

Using the Material UI library, we can explain this limitation. Material UI has themes already built into their components but UXPin (and many other prototyping tools) don’t have a unified dynamic way to switch between themes that can be used by both developers and designers.

The power of Merge – designing with code solution

Merge gives you the freedom to design with ‘real’ production React code and vector-based tools together, breaking free of previous limitations. That’s why Merge is powerful.

You can make use of Styled-components. Styled components are the perfect solution to our problem as you can inject Javascript into the CSS to create editable theming capabilities.

So, creating themes is easy.

For each theme, create a file containing css values you want to inject into your styled components as properties. Then, from the list of imported themes, you can simply select the one you want and the styling of that theme will be passed as props to the html elements.

So, what if you just created files for each theme you wanted, import them into a wrapping theme switcher styled-component, and then pass those values down into each nested child component. Then, all you need to do is change the theme at the top-level component using the Javascript props injected into the Styled Components CSS.

Creating a Theme Switcher Component

First, we create a component named ThemeSwitcher, that functions as a top-level wrapper component, passing a selected theme’s styles to all nested components. When components are nested in the ThemeSwitcher, you can dynamically switch between any imported themes – themes, which can completely change the look and feel of components, while keeping all their functionality.

The code below shows the simplified structure of ThemeSwitcher and a breakdown of how it works will follow.

import blue from "./themes/blue";
import red from "./themes/red";
import dark from "./themes/dark";
import light from "./themes/light";
 
 
function ThemeSwitcher(props) {
 let selectedTheme;
 
 function getTheme(themeProfile) {
   switch (themeProfile) {
     ...
   }
   return selectedTheme;
 }
 
 function makeCustomTheme() {
   const customTheme = createMuiTheme({
     ...
   });
   return customTheme;
 }
 
 return (
   <MuiThemeProvider theme={getTheme(props.themeProfile)}>
     {props.children}
   </MuiThemeProvider>
 );
}

As you can see, it’s a simple React component using the Material UI’s imported hooks, only two functions, and a return statement to pass the theme down as props.

Inside the return statement, we have the MuiThemeProvider component. This is used as a wrapper component that passes the selected theme as props down to the child components.

getTheme()

We created themes using Material UI’s styling guidelines, then imported them into the Theme Switcher component.

import blue from "./themes/blue";
import red from "./themes/red";
import dark from "./themes/dark";
import light from "./themes/light";

To keep track of which theme is selected, we pass a drop-down target value into the getTheme function and pass the result as a theme prop in the MuiThemeProvider component in the return statement.

function getTheme(themeProfile) {
   switch (themeProfile) {
    // _.merge combines two themes together
     case "light":
       selectedTheme = _.merge({}, igloo, light);
       break;
     case "red":
       selectedTheme = _.merge({}, igloo, red);
       break;
     case "dark":
     selectedTheme = dark;
     break;
     case "custom":
       selectedTheme = makeCustomTheme();
       break;
     case "blue":
       selectedTheme = selectedTheme;
       break;
     default:
       selectedTheme = selectedTheme;
   }
   console.log(selectedTheme)
   return selectedTheme;
 }

return (
   <MuiThemeProvider theme={getTheme(props.themeProfile)}>

When in the  UXPin editor, this is what the theme selector menu populated from the getTheme function would look like.

makeCustomTheme()

Not only do you have the option to import completed themes, but you can also create custom temporary themes within the UXPin editor. We’ve only included a few properties such as primary and secondary colors for simplicity but you go into as much detail as you need.

Below is the code of the makeCustomTheme function. This makes use of Material UI’s built-in core function of createMuiTheme, which creates a theme based on options received. 

function makeCustomTheme() {
   const customTheme = createMuiTheme({
     ...selectedTheme,
     palette: {
       primary: {
         main: props.primaryColor
           ? props.primaryColor
           : selectedTheme.palette.primary.main,
       },
       secondary: {
         main: props.secondaryColor
           ? props.secondaryColor
           : selectedTheme.palette.secondary.main,
       },
       decoration: {
         main: props.decorationColor
           ? props.decorationColor
           : selectedTheme.palette.decoration.main,
       },
       headerBadges: {
         main: props.headerBadgesColor
           ? props.headerBadgesColor
           : selectedTheme.palette.headerBadges.main,
       },
     },
   });
   return customTheme;
 }

That concludes one way to include a dynamic Theme Switcher in your design system. Just a wrapper component (Theme Switcher) passing properties to nested child components, allowing you to dynamically change the theme without creating a new design system, page or layout.

Try Theme Switching in UXPin Merge

Using UXPin Merge gives you so much flexibility and creativity when comparing it with other design tools on the market.

Focusing on a code-based, single source of truth for styling and functionality creates an interconnected system, bridging the gap between designer developer handoffs. Anything you can create in a React component, you can bring to life in your design system. You don’t have to rely on 3rd party plugins or APIs to add important features to your design system. You’re free to create dynamic and interactive prototypes while changing styles with a single command. 

Want to find out more about Merge or would like to try it for yourself?

Responsive Design with UXPin Merge

Responsive websites, mobile-friendly designs, adaptive images are crucial for user experience. So, being able to responsively design prototypes without using multiple layouts for different screen sizes is an extremely powerful and time-saving feature. It’s something that many people have wanted and thanks to the power of Merge, you can do just that by using actual React components to design with code

Continue reading Responsive Design with UXPin Merge

You Can Become a Code-Based Designer Without Learning Code

Code-Based Designer Without Learning Code

When you hear about code-based design as an emerging trend in digital apps development, you might experience a shudder of panic. You enjoy design images, and you learned how to use software common throughout the industry so you could get a job. Now, they want you to learn to write code!

Knowing how to write basic code could open doors in your career, especially when you focus on popular languages like Swift and Java. Thanks to UXPin, though, you do not need to learn how to code to become a code-based designer.

Does that sound confusing? The following points will clarify how you can become a code-based designer without learning code.

Adopt a code-to-design prototyping solution

If you want to adopt interactive code-based design without learning to code, there’s a way! Just search for a solution that simply lets you add interactive components with a drag-and-drop feature. When you drop a feature into your design, the solution generates code that matches your work.

Most graphic design softwares still generate static images that developers need to remake to add functionality. UXPin Merge stands out as an excellent resource for designers that want to improve workflows and functionality by taking a code-to-design approach to digital design. Thanks to the single source of truth in Merge your design will look and behave just like the final product. 

Think beyond aesthetics to make your designs more functional

It’s easy for graphic designers to get stuck thinking about how they can make their work more attractive to users. That’s a significant part of the job, after all! The product that gets sent to consumers, however, needs more than intuitive navigation, beautiful color combinations, and meaningful icons.

Code-based design pushes you to think through the entire process of building a digital product. Don’t think of this as a burden. Learning to think beyond your specific role in product development will give you a more rewarding experience.

If you feel frustrated taking a code-driven approach to design, remember that it:

  • Will result in a final product that looks more like your original design. Image-based design forces developers to take some liberties when using code to build your work. Code-driven design makes that less likely.
  • Gives you more control over how components function, which means you have a greater influence over the user’s experience.
  • Improves collaboration between the design and development teams. Improve collaboration should lead to better products that perform well in the market.
  • Gets you to think about how the end-user will experience more aspects of your design. You’ve probably been disappointed by a website or application you worked on. Maybe the navigation didn’t work as you’d intended. Perhaps the interactions don’t feel as fluid as you’d imagined. Code-based design will help you overcome those limitations.

Aesthetics matter, but products with poor functionality don’t thrive. You can contribute to success by taking a code-based approach to design.

Get Friendly With Developers on Your Team

You can become a more effective code-based designer by communicating with developers. A no-code platform will let you create designs with interactive components, but you don’t automatically have access to every feature you might want to use. Someone needs enough technical knowledge to:

  • Connect your software to Material, React, and other libraries.
  • Push live components to make sure designers have access to the latest options.
  • Provide advice when designers want to make small changes to components in their libraries.

UXPin Merge has a very open command-line interface (CLI) that helps developers add new libraries and components to your designing and prototyping environment. If you don’t know how to connect with other libraries, use your relationship with the development team to gain access. They may do the work for you or take some time to teach you the process. Either way, making friends with developers will improve your code-based design abilities and speed up the design handoff! 

Sign up to experience code-based design with UXPin Merge

Are you ready to try code-based design? Get access to UXPin Merge to see how it works for you. You’ll discover that it lets you do much more than your typical design software will. It allows you to design with already interactive components that look just like the final product. It’s time-efficient and helps you make an extremely realistic prototype.  

Reflections on UXPin’s 8th Birthday

On November 11th, UXPin turned eight!

Time flies! In 2010 I was 24, working as a UX Manager at a thriving Polish eCommerce company and, after several unsuccessful attempts to start a tech business (the youthful energy!), I took a break from any serious side projects. However, I still wanted to channel my energy towards something productive; 9 to 5 was never really an option for me. Instead of pursuing dreams of a tech breakthrough, I decided to team up with two friends and enjoy exploring the problem that bothered us for years — design — engineering collaboration. Without any business goals in mind, we started to think about helping designers and engineers work better together. The problem was very close to our hearts, we just didn’t know what the solution could be.

Freed from the constraints of a firm idea, we considered multiple options. A workshop or conference? A book? Some sort of software? Physical product? We casted a wide net.

After couple of months of creative explorations, we settled on the idea of… a paper prototyping notepad.

We believed that if designers and engineers could use the same tool, they could find the common ground for collaboration. Paper seemed to be the solid foundation for what we wanted to accomplish. After all, everyone is familiar with paper and can use it for creative purposes. The only issue? Not everyone can draw. Somebody who isn’t comfortable sketching will likely be terrified of sketching in front of others. We decided to eliminate this fear by providing designers and engineers with a set of predefined, generic user interface elements printed on sticky notes. Instead of drawing interfaces you could simply pin (yes! This is why we’re called UXPin!) elements to paper. Anyone can do it!

Early visualization of the first UXPin product. November 2010.

Fast forward a couple of months of prototyping and testing our tool, searching for the right manufacturer and waiting for the production to finish — on November 10th (one day ahead of schedule!) we were ready to launch UXPin!

Well… almost ready.

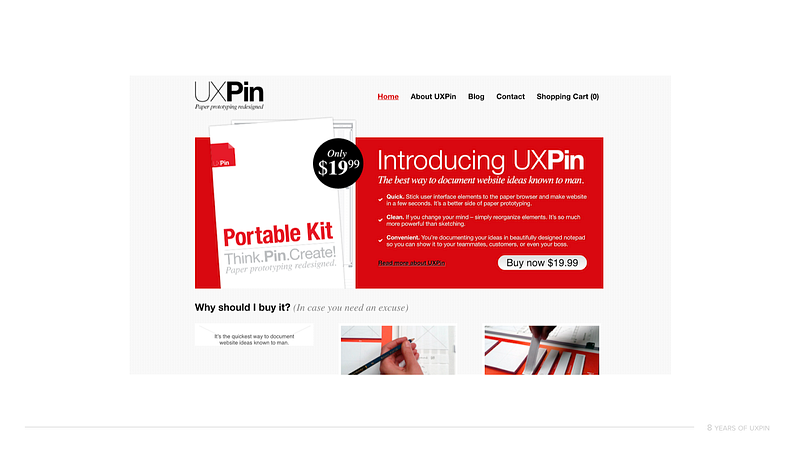
The one thing that we were missing was our… website. Ridiculous, taking into account that, in this entire project, building a website was the one thing that we felt really comfortable doing. We had no experience building physical products, but building a website? We certainly knew how to do that. And perhaps that’s why we left it at the very bottom of our list of tasks. To launch on 11th, we had to fix this mistake… and fast.

On November 10th we pulled a true all–nighter. We started designing and coding after our full–time jobs and finished at 4am. The first version of uxpin.com was the most impromptu thing that we’ve ever created. Once the website was ready, we had to wait until sunrise to take pictures of our notepads. After all, people had to see the product! I remember moving my desk as close to the window as possible to catch the first beams of sun. We were exhausted.

The original UXPin Website. November 11th 2010.

After all this hard work, our approach to the launch was as simplistic as it was anticlimactic. We announced UXPin on Twitter.

Our marketing was unbeatable 😎 . First tweet about UXPin.

We got our first order 2 minutes later. Another followed 5 minutes later… 48 hours in and we were completely sold out, deprived of sleep (massive adrenaline rush!) and unsure what actually happened (and how!). Over 400 notepads sold in 48 hours in dozens of countries. UXPin became the talk of the design town.

First UXPin pictures. Definitely worth waiting for the sun!

Some months later, All Things Digital — A Wall Street Journal tech publication, published an article about UXPin (likely the first “startup” from Poland covered by WSJ). A year later, we had turned our notepad into a SaaS application and raised our first round of funding. Soon, awards for the best startup in Central and Eastern Europe and even MIT 30 under 30 statuses followed. There was a rapid growth in number of designers and engineers using UXPin all over the world. This led to the decision to move part our business to Silicon Valley and learn to take this unexpected success even further. After months of fundraising we became one of the first Polish companies to raise capital in Silicon Valley and established our second office in Mountain View.

The legend of the web — Chris Messina was an early adopter.

Much growth, many changes, successes and failures later… here we are today. Almost everything is different. Design is more important than ever and UXPin is among the leaders in the design tools market. Thousands of companies, including world leaders of tech, automotive, finance and entertainment, rely on our platform.

One thing did not change, however: we’re still on the mission to merge design and engineering into one, unified, product development process.The task that emerged from our passions in 2010 pushes us to innovate still, 8 years later. We’re chasing the ideal software production process and that may never change. Perfection is impossible to reach, but always worth fighting for. That’s why our mission is so broad and ambitious — to push us beyond the limits of our abilities and discourage ever slowing down.

One thing did not change, however: we’re still on the mission to merge design and engineering into one, unified, product development process.

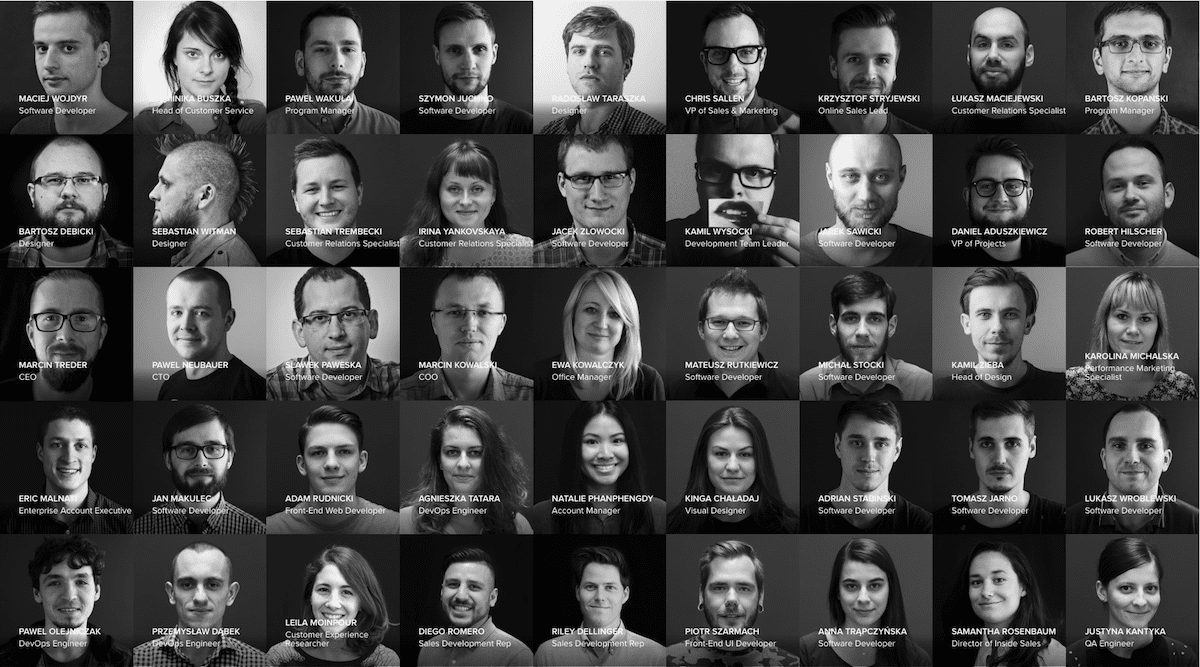
These past 8 years were nothing short of amazing. We met and teamed up with some exceptional folks (our first engineers are still with us!) and stormed through both joy and pain — always getting stronger. The experience of maturing together with your team, product and market is something that I’m going to be forever grateful for. Thank you!


Our exceptional team is always at your service! This article was originally published on Medium here.

Join the world's best designers who use UXPin.

Sign up for a free trial.